
This step-by-step guide will show you how to build a FB Messenger list + an Email list ,while distributing single use coupon codes, without using any landing page.
This can be very useful for ranking amazon product (sending this traffic to amazon using a storefront url / brand url / etc).
Here you could see a demo:
Simply comment “yes” on this post and you’ll automatically get a Messenger message with all the details.
You will need the following to make this happen:
- FB Page
- ManyChat account
- Google account (for a google sheet)
- Zapier account
- MailerLite account (or any other email marketing service)
Here is a map showing the process:
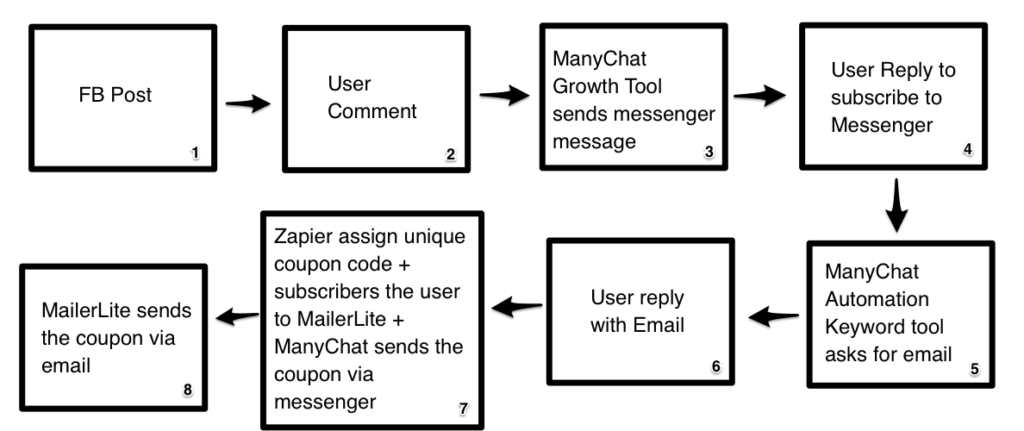
Table of Contents [hide]
Setting up ManyChat
Setting Custom Fields
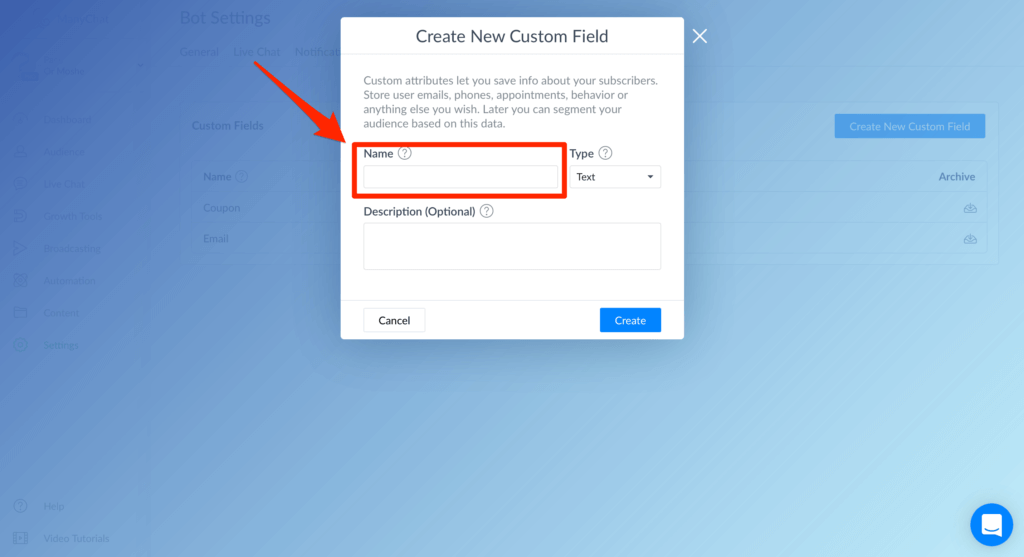
Open ManyChat and go to Settings > Custom Fields, and click on Create New Custom Field.
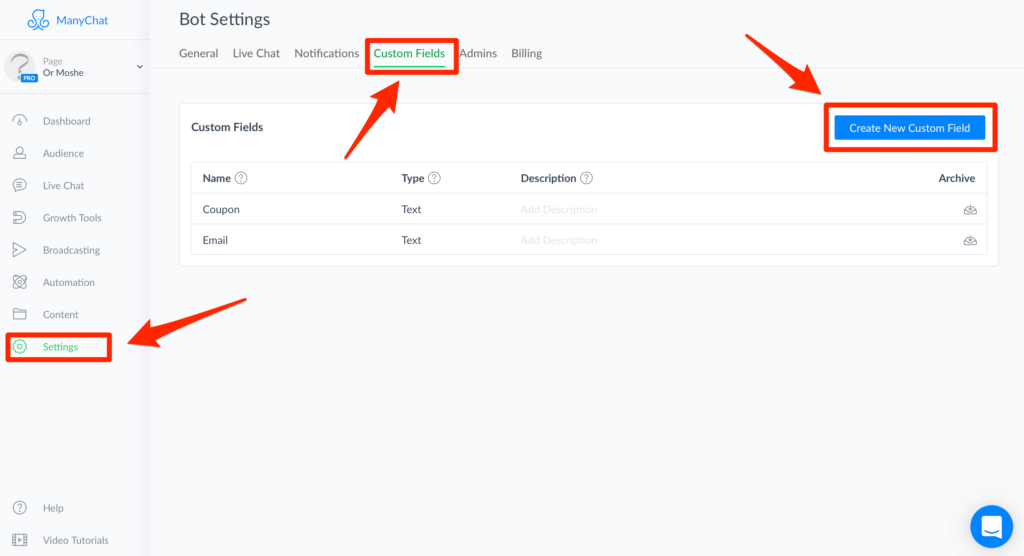
Enter Coupon under Name and click the Create button.
Then do it again, this time enter Email under Name and click the Create button.
Setting Automation Sequence
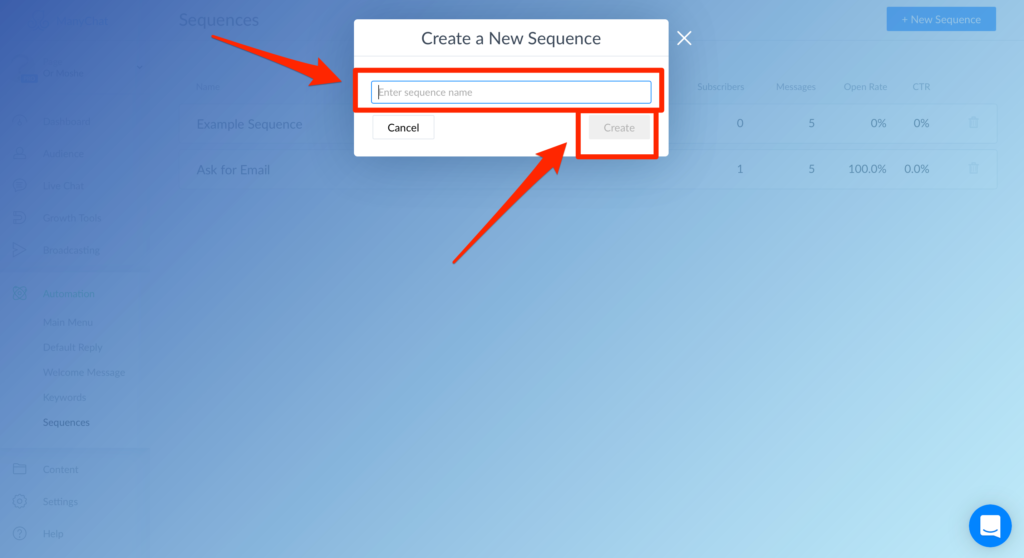
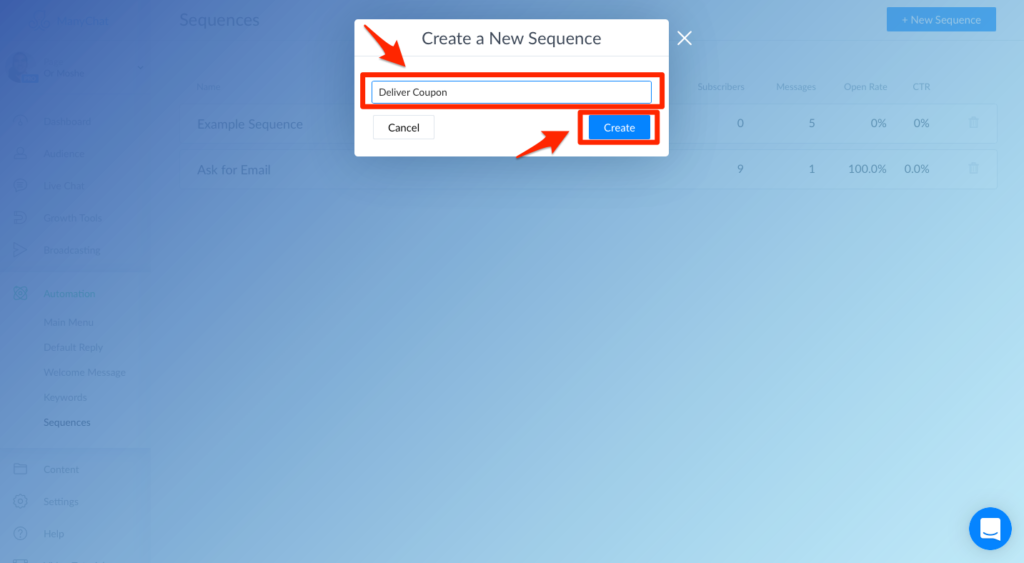
Go to Automation > Sequences and click the New Sequence button.
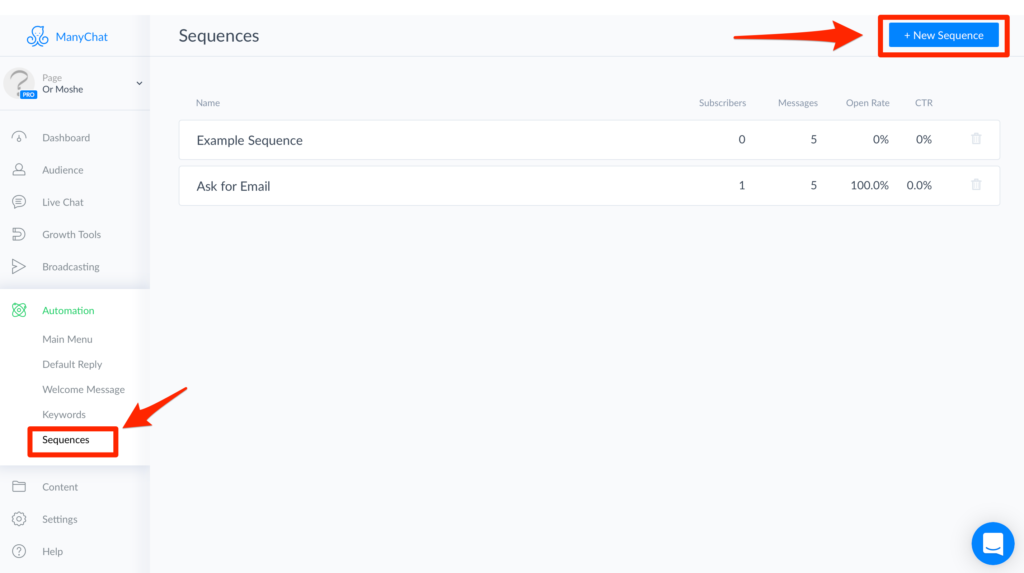
Enter sequence name and click the Create button.
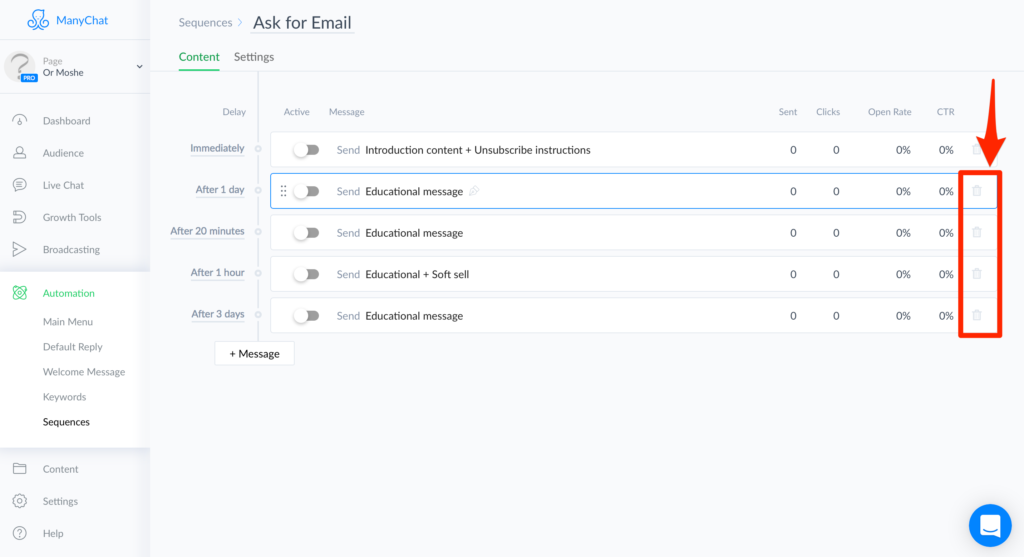
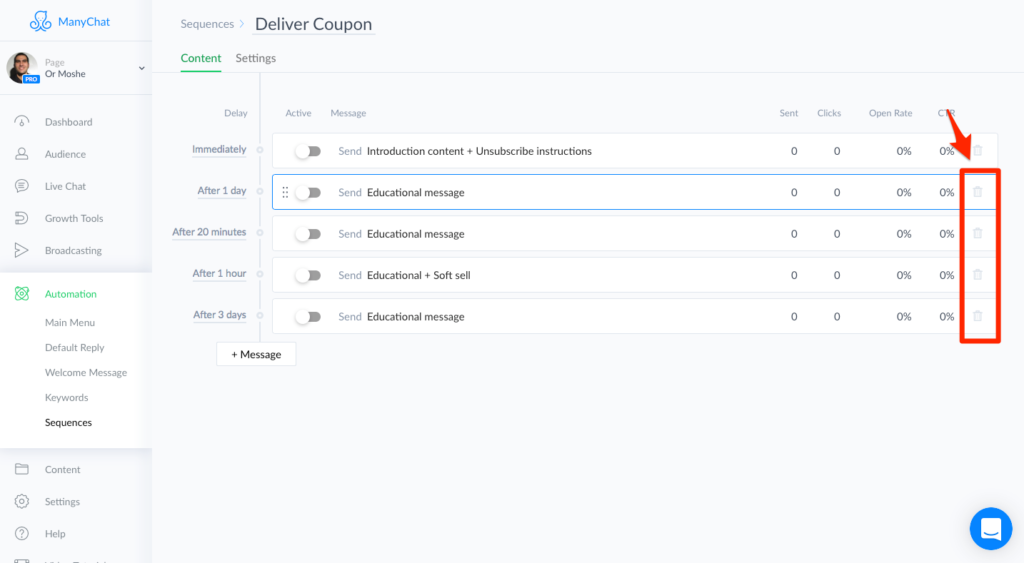
Delete the last 4 messages that were auto-created, leaving you with only the first one.
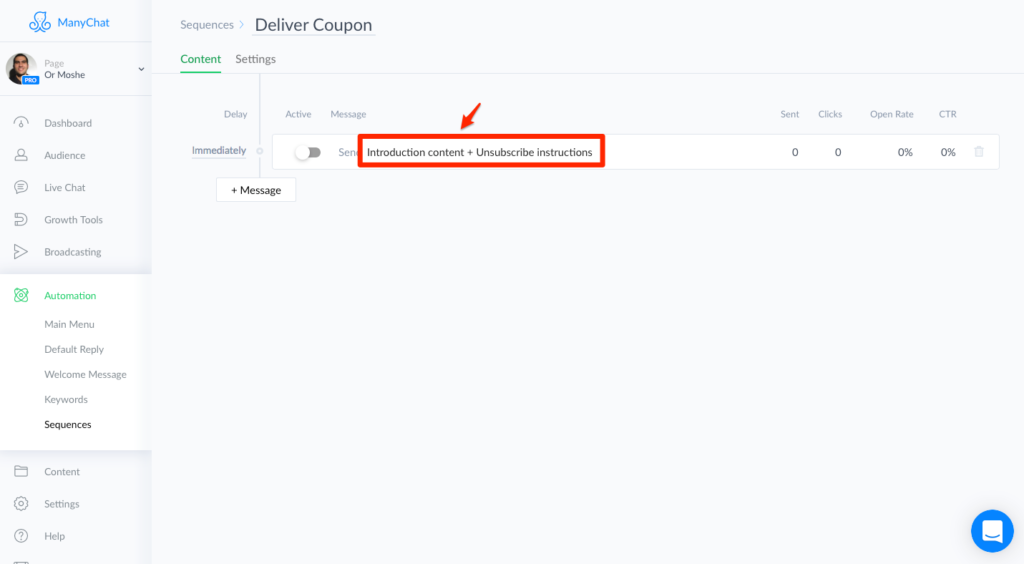
Click on the first message to edit it.
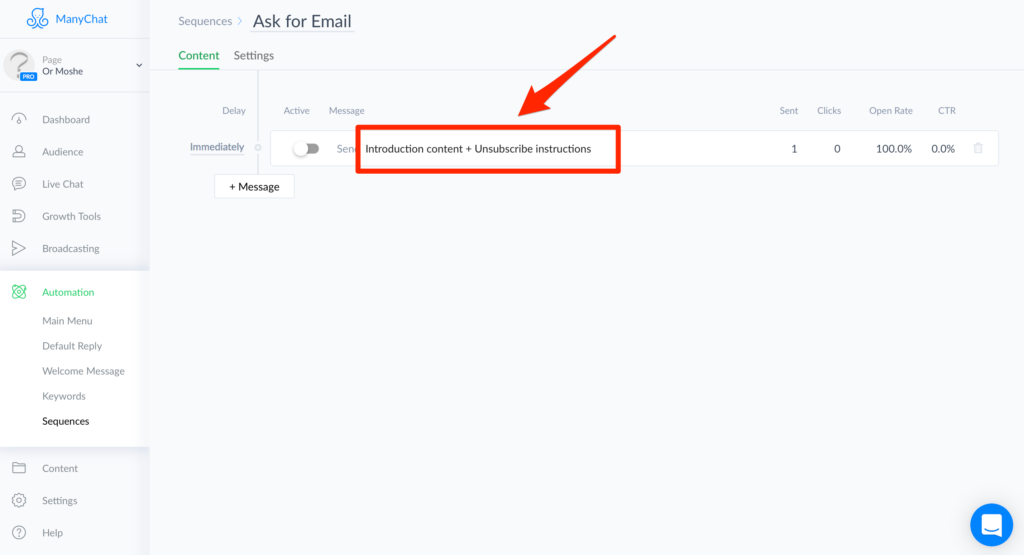
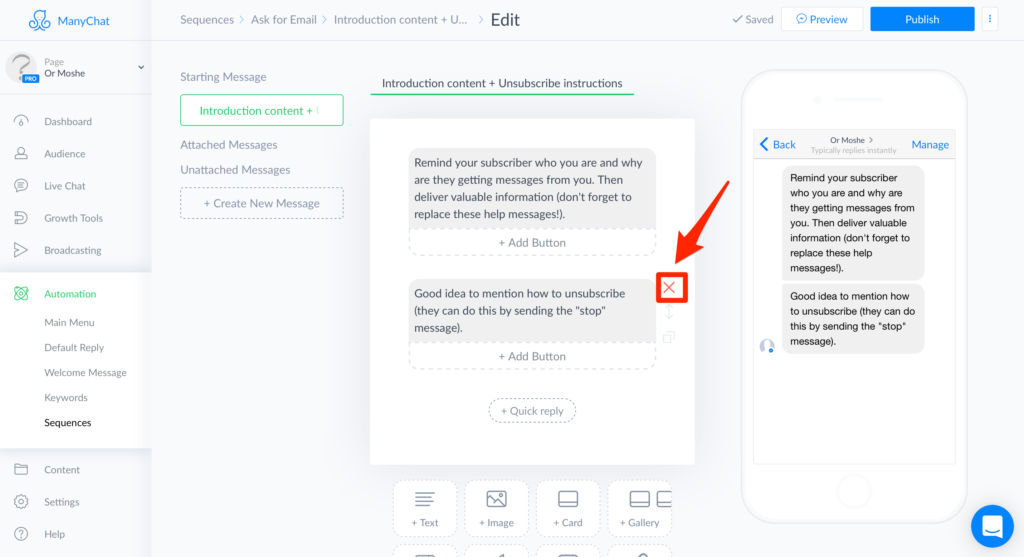
Click on the message name to rename it then click on the Edit Message button.
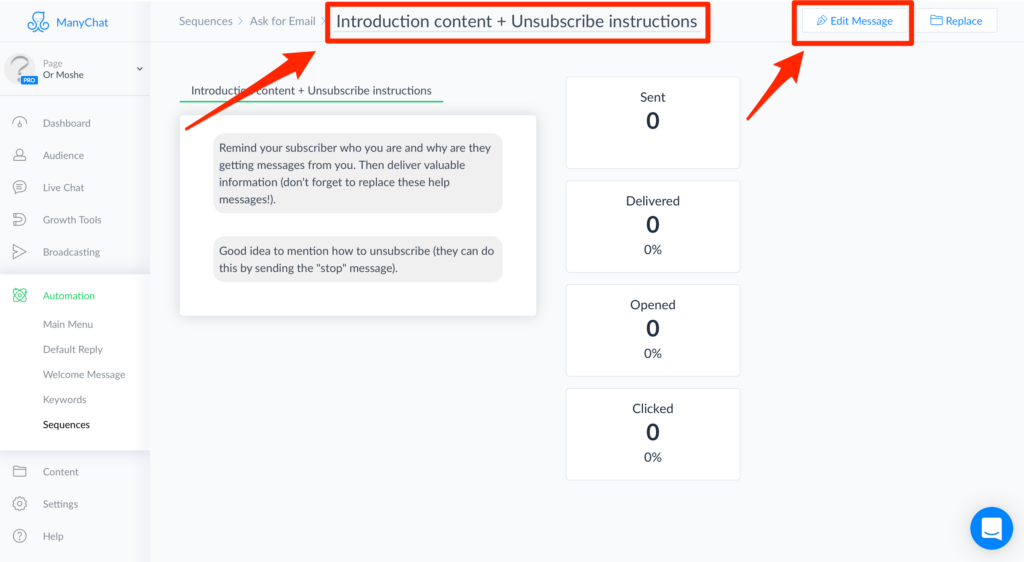
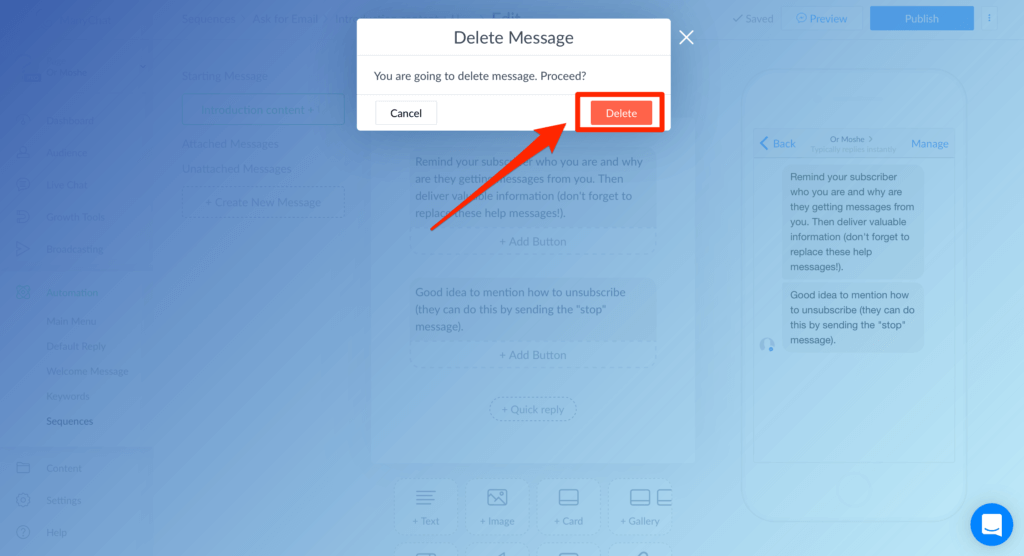
Delete both auto-created messages.
Confirm you’d like to delete them.
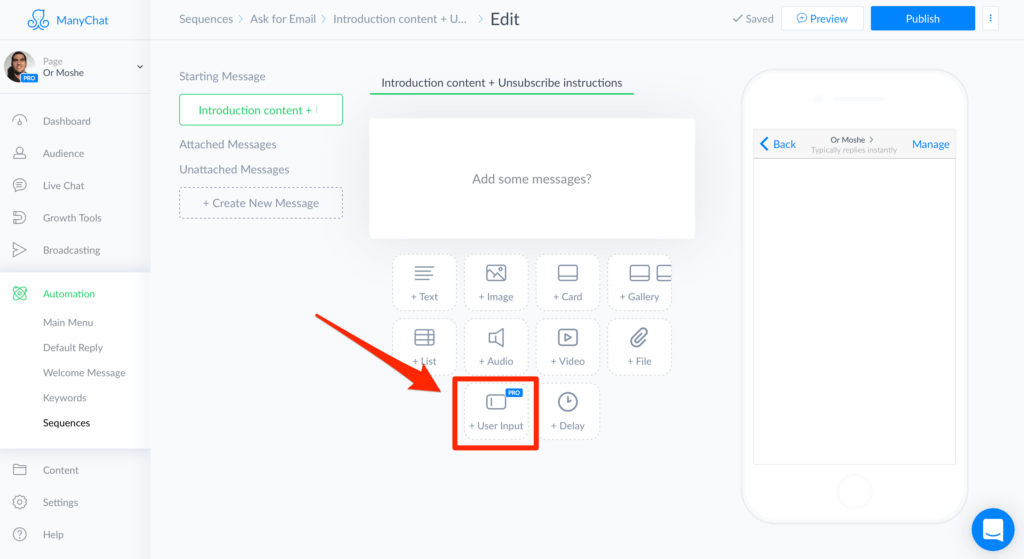
Click the User Input button.
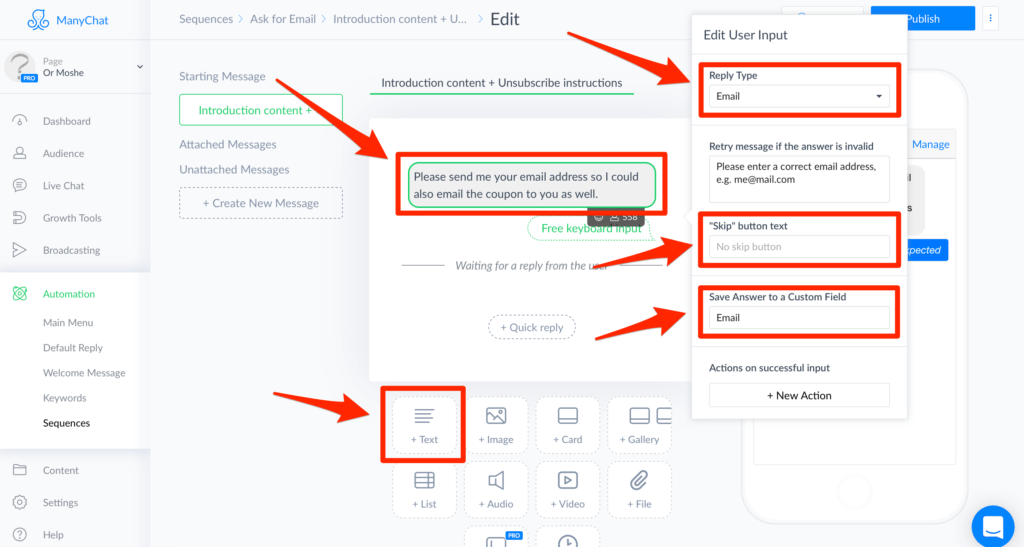
Enter a text to ask for the user for his email,
Set Reply Type to Email.
Remove the text from “Skip” button text, so there won’t be an option to skip.
Set Save Answer to a Custom Field to Email.
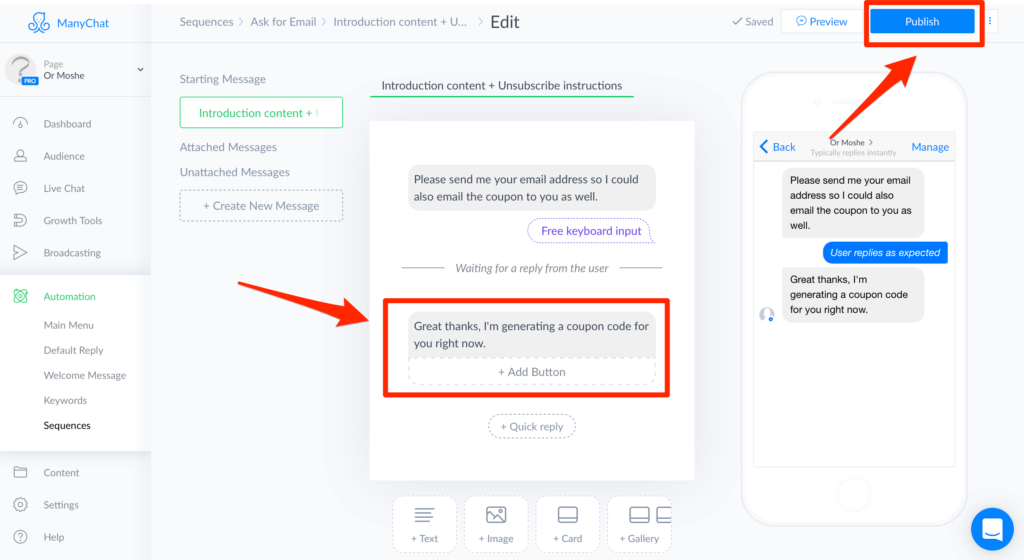
Click the Text button.
Enter a text that says you got the info and working on generating a coupon, then click the Publish button.
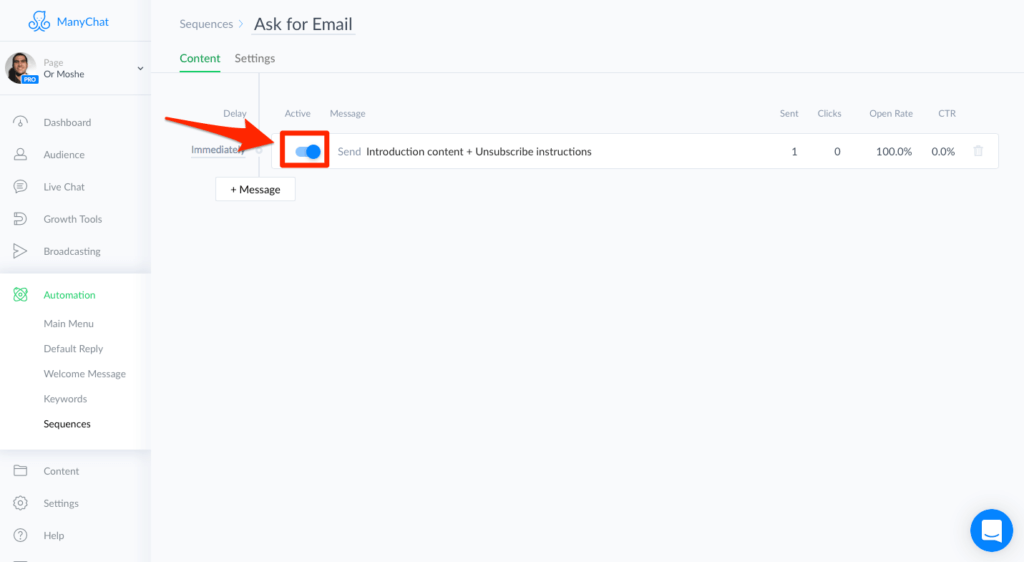
Go to Automation > Sequences and click on the Sequence you just created.
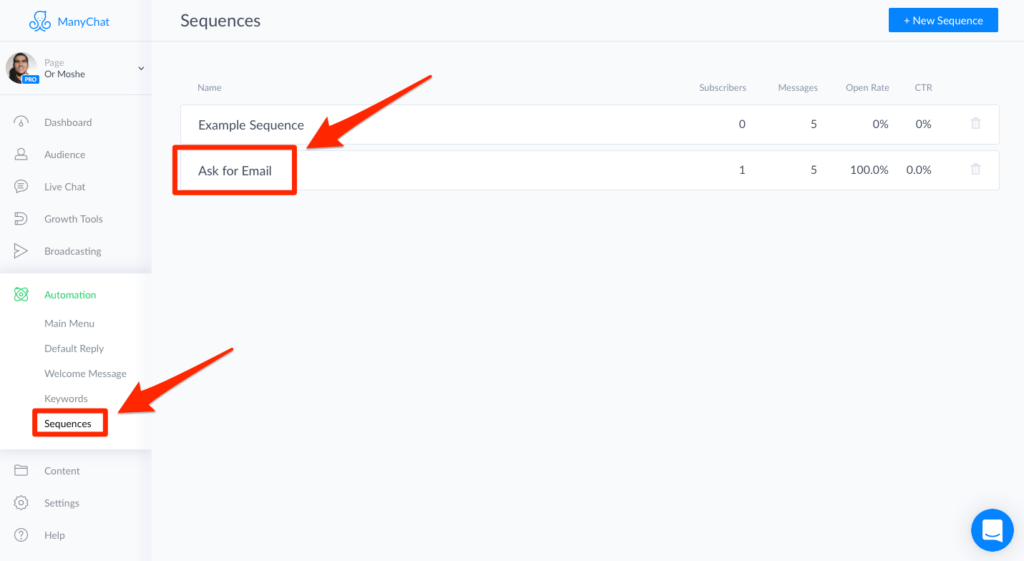
Make sure the message’s Active switch is on.
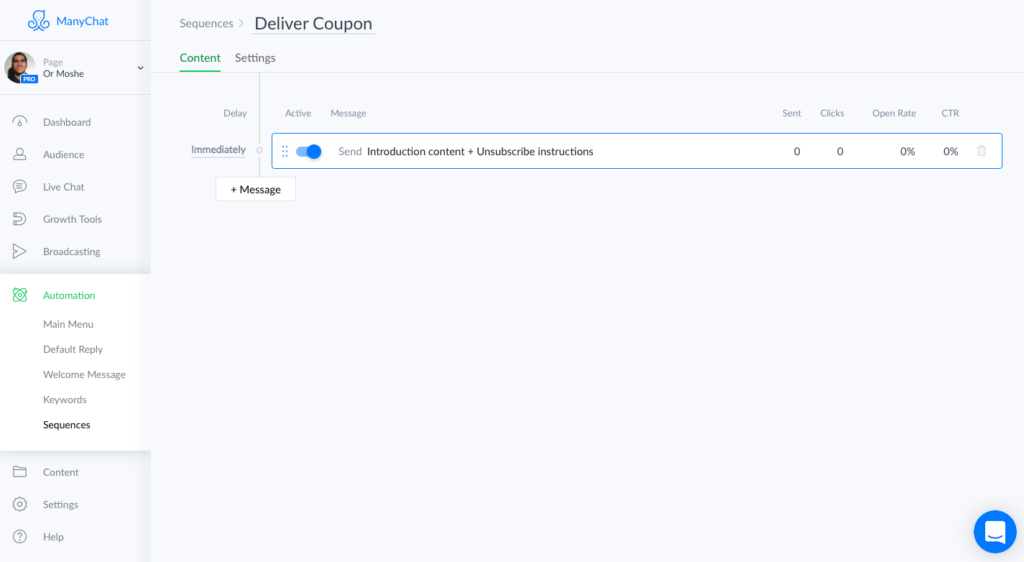
Go to Automation > Sequences and click the New Sequence button.
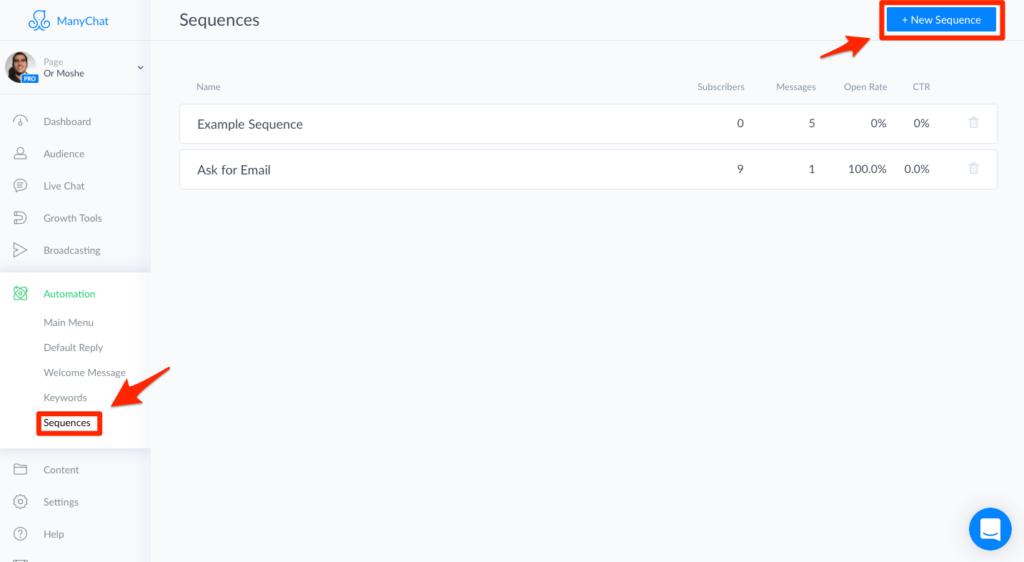
Enter sequence name for delivering the coupon and click the Create button.
Delete the last 4 messages that were auto-created, leaving you with only the first one.
Click on the first message to edit it.
Click on the message name to rename it then click on the Edit Message button.
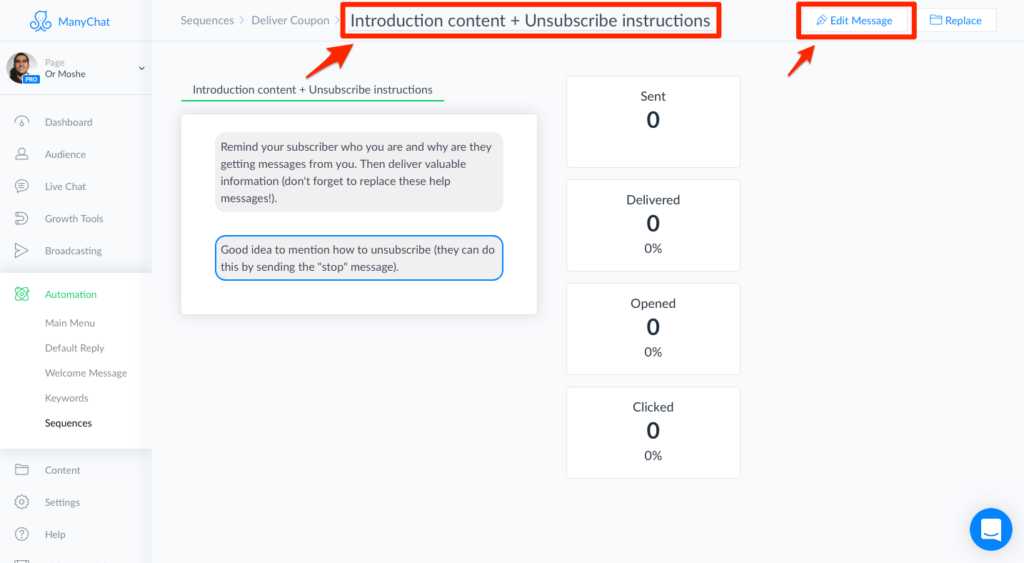
Delete both auto-created messages.
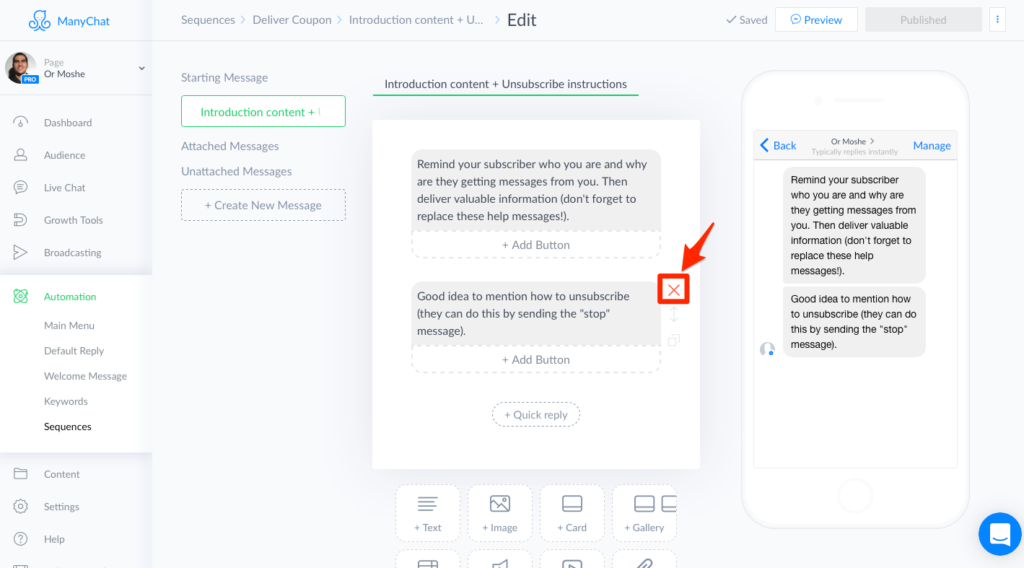
Click the Text button.
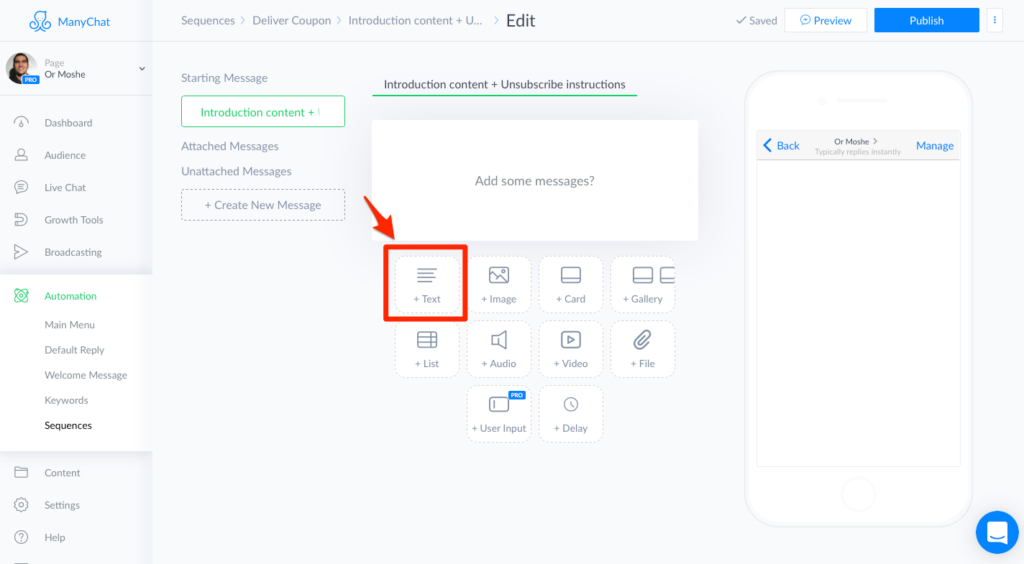
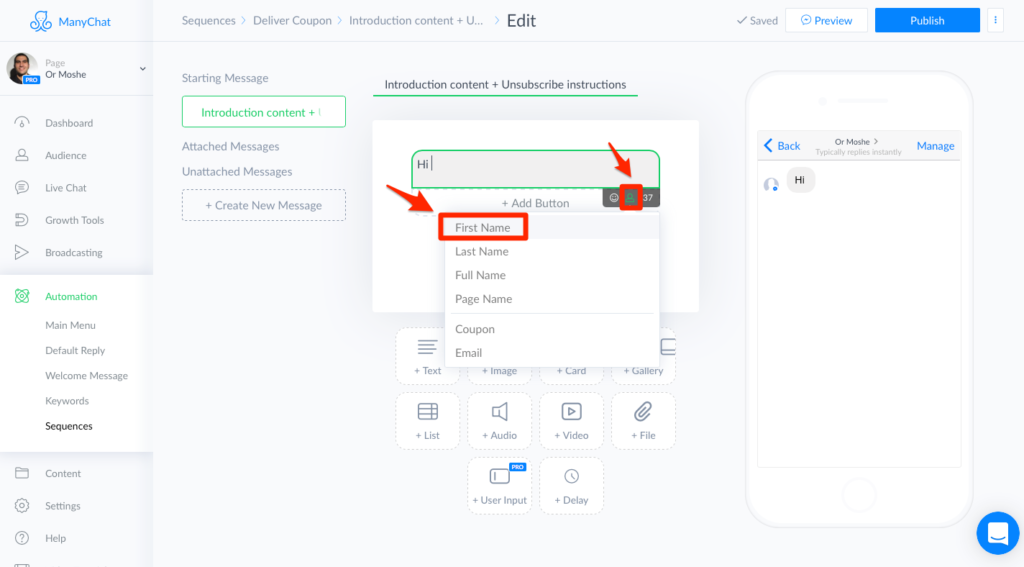
Enter the text of the message and use on the user icon to add the user’s first name / other information.
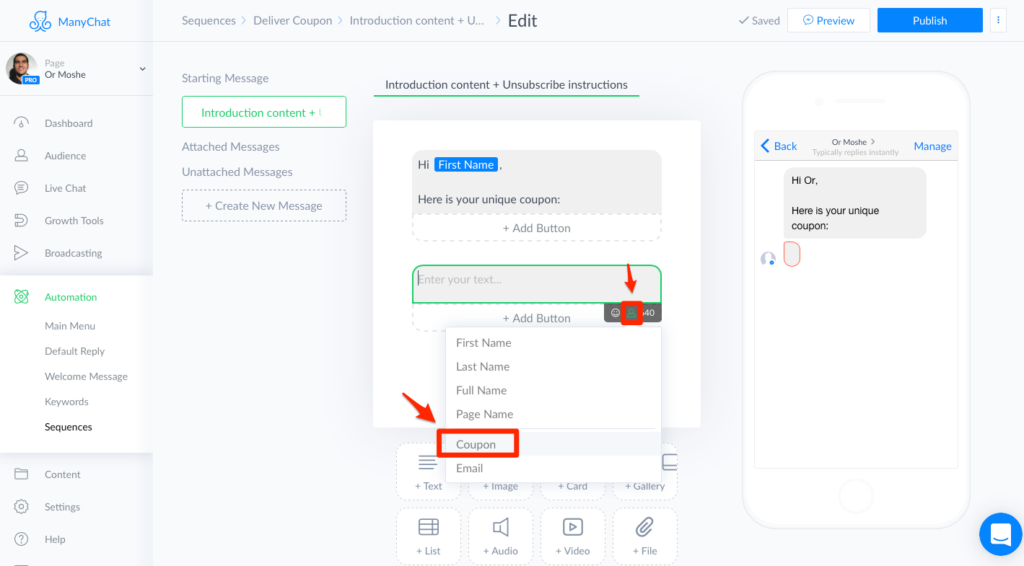
Add another Text message and use on the user icon to add the user’s coupon custom field.
Click Add Button
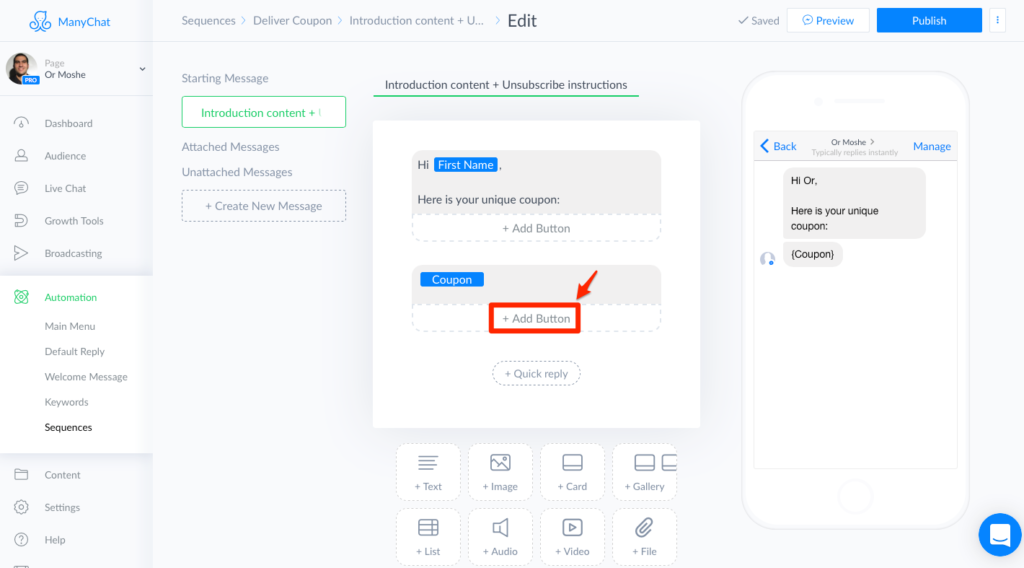
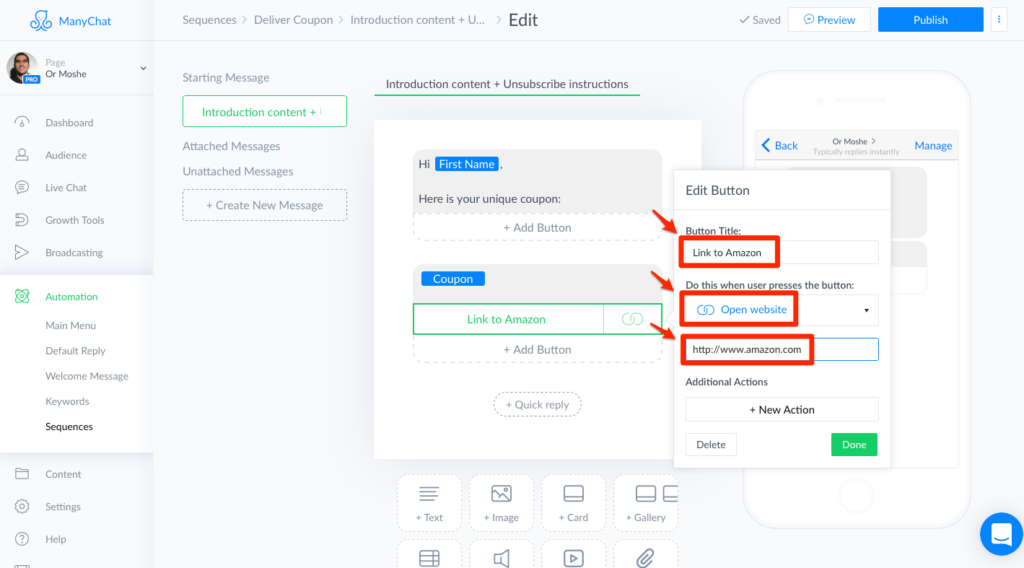
Enter Button Title, Select that it will Open a website and enter your amazon link.
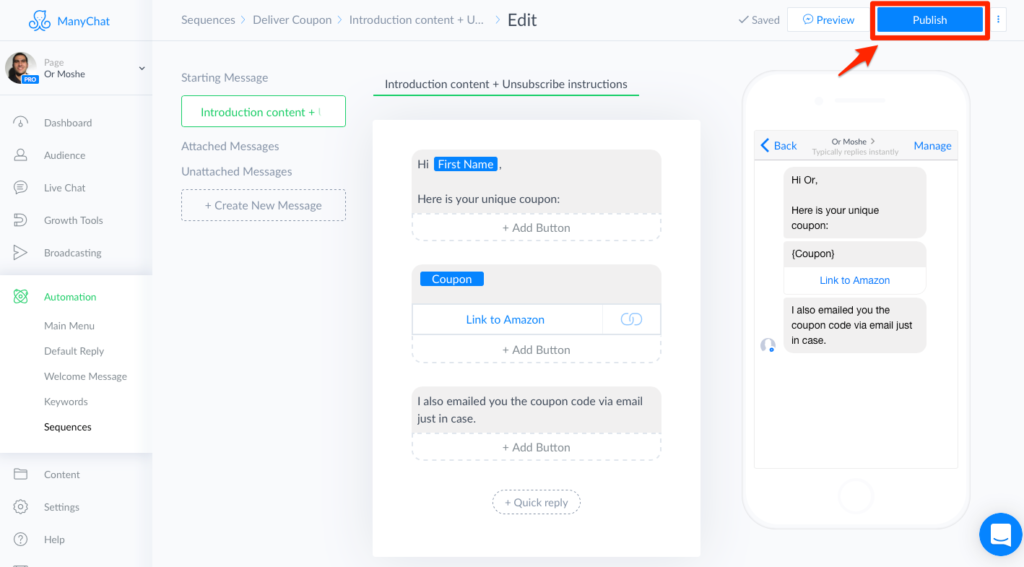
Click the Publish button.
Go to Automation > Sequences and click on the Sequence you just created.
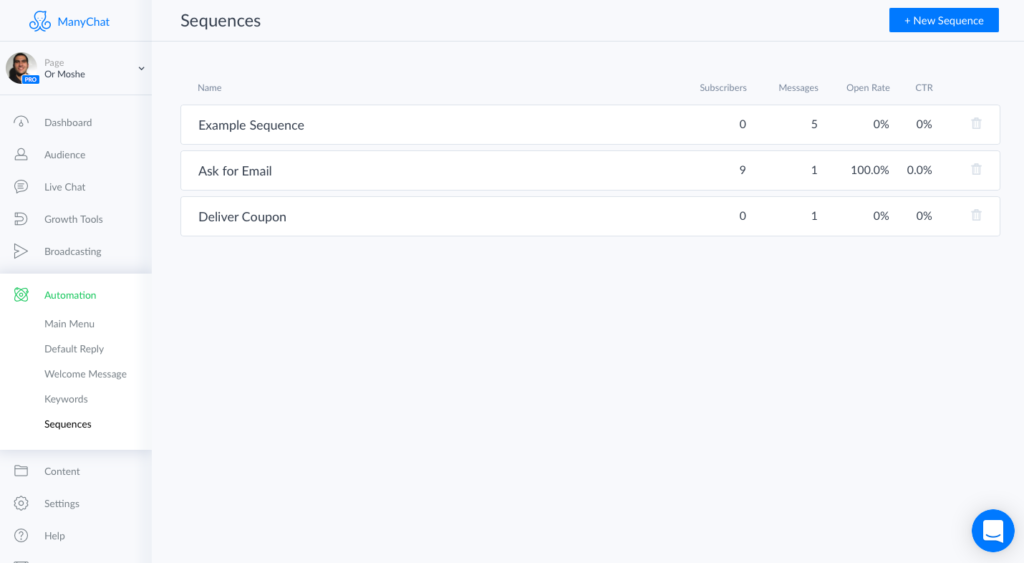
Make sure the message’s Active switch is on.
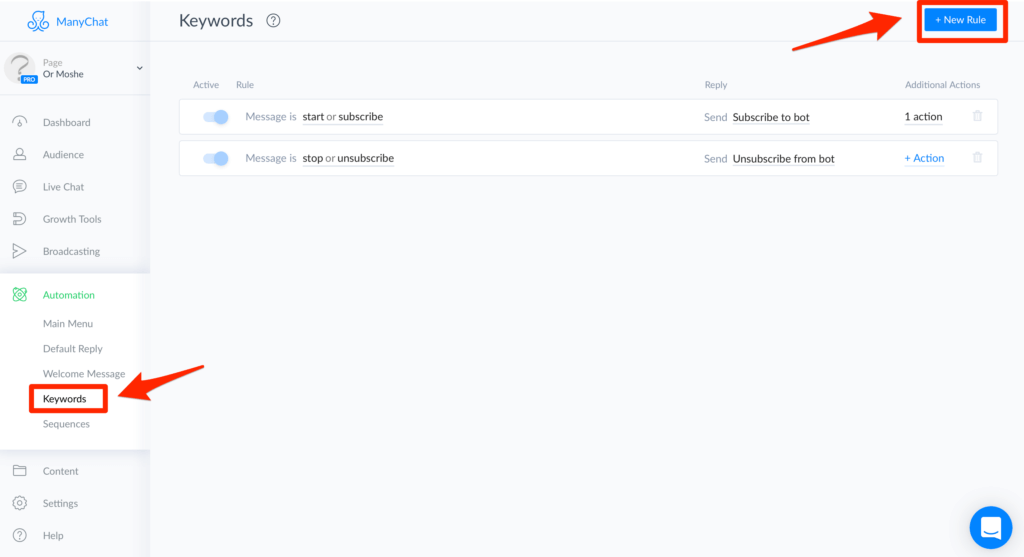
Setting Automation Keyword Trigger
Go to Automation > Keywords and click the New Rule button.
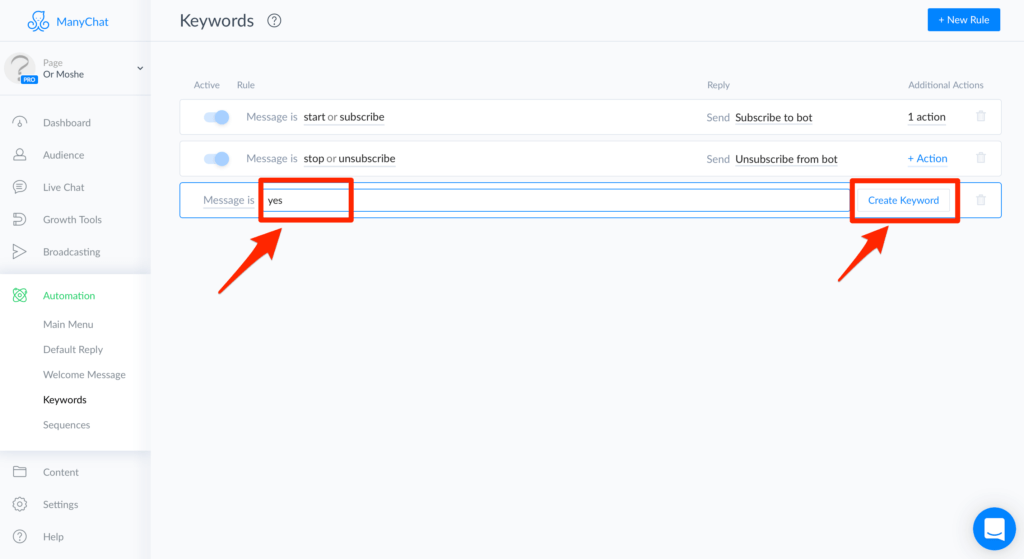
Enter the keyword that you’d like to trigger the sequence (“yes” in this example) and click the Create Keyword button.
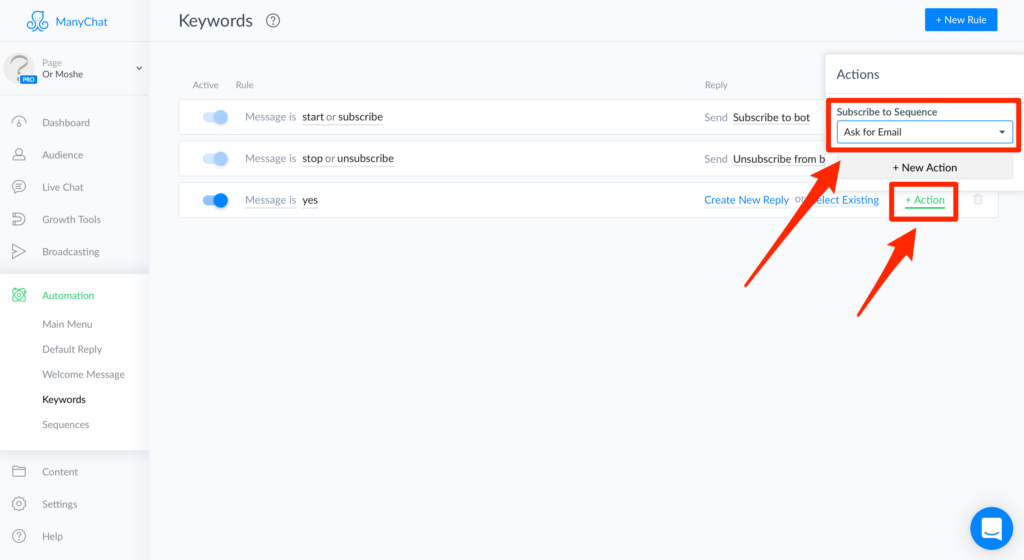
Click on the Action button and select the sequence you previously created.
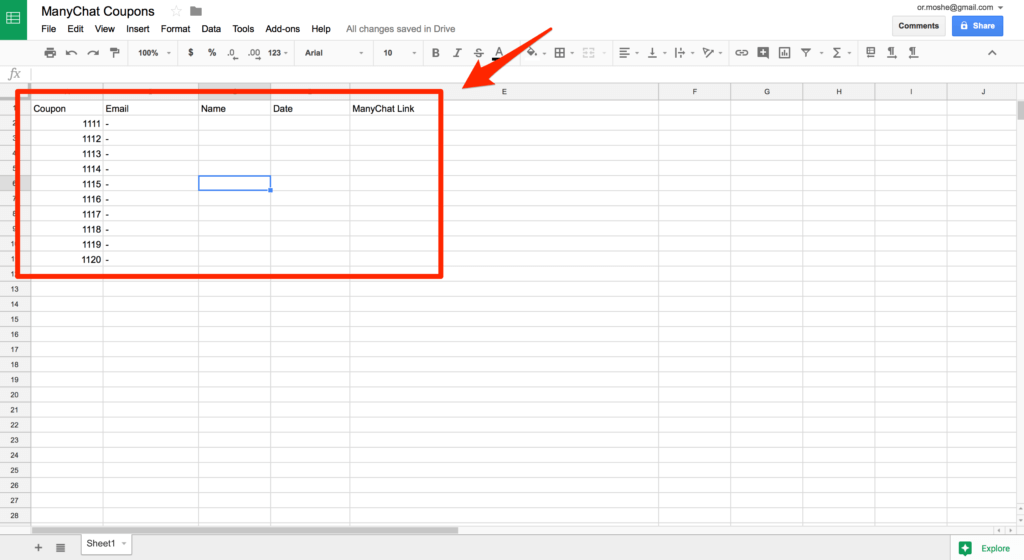
Creating a Google Sheet
Create a new google sheet and create the following columns:
Coupon, Email, Name, Date, ManyChat Link
Under the Coupon column paste all your unique coupons.
Under the Email column enter – for each row with a coupon.
Setting up MailerLite
Setting a Custom Field
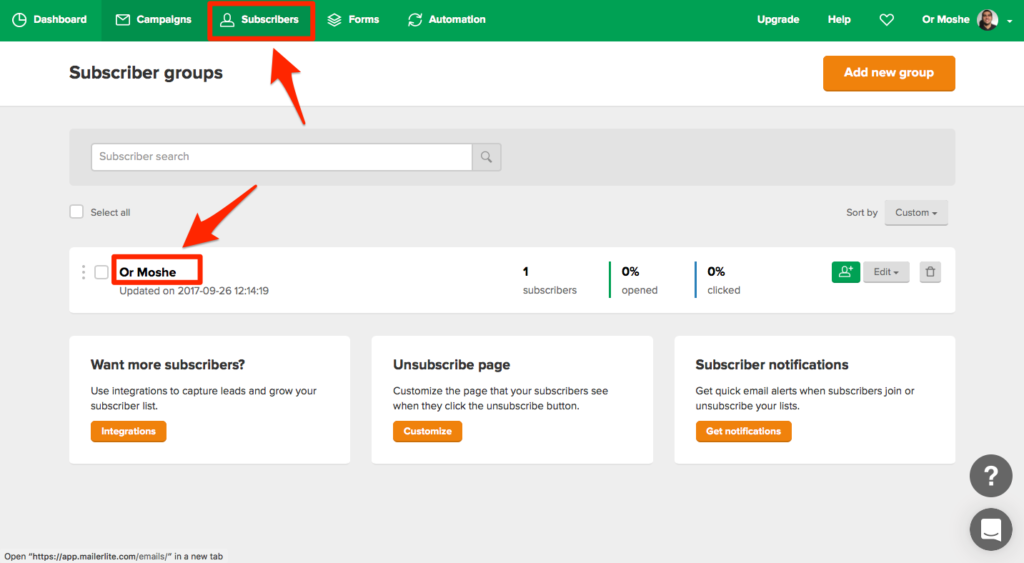
Login to your MailerLite account and go to Subscribers, then click on your Group Name.
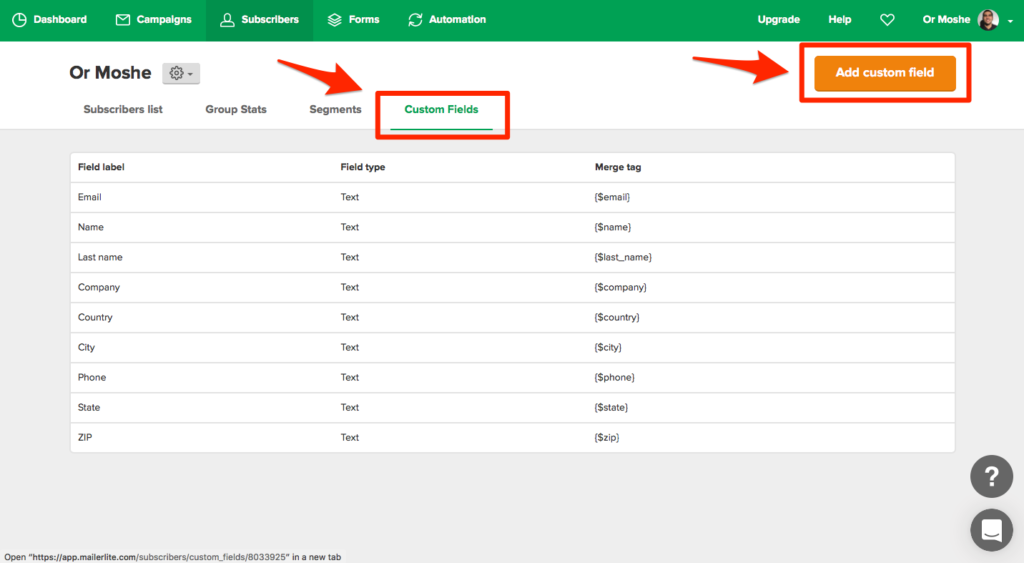
Click on Custom Fields and then on the Add custom field button.
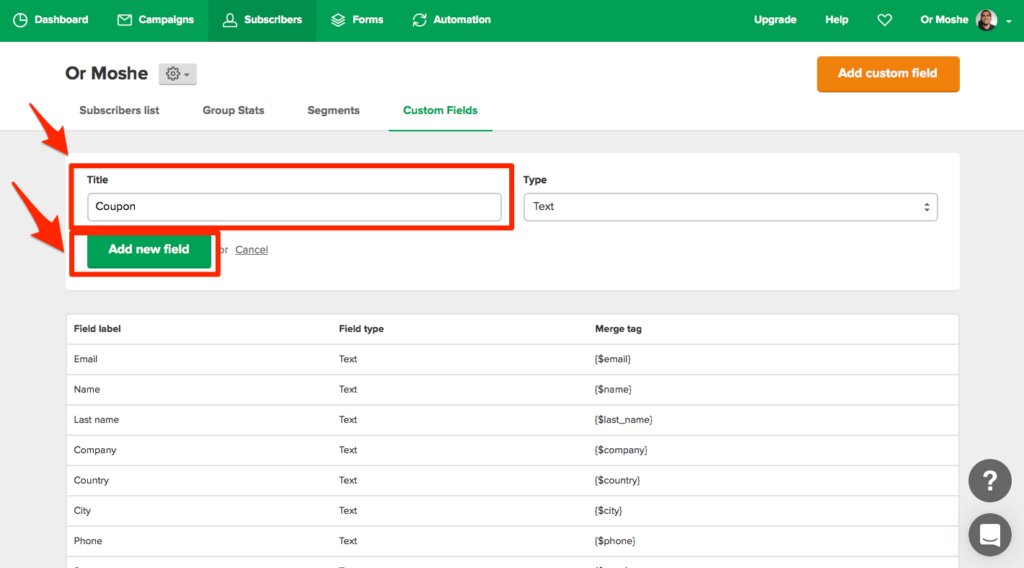
Set Title to Coupon, and click the Add new field button.
Setting an Automation
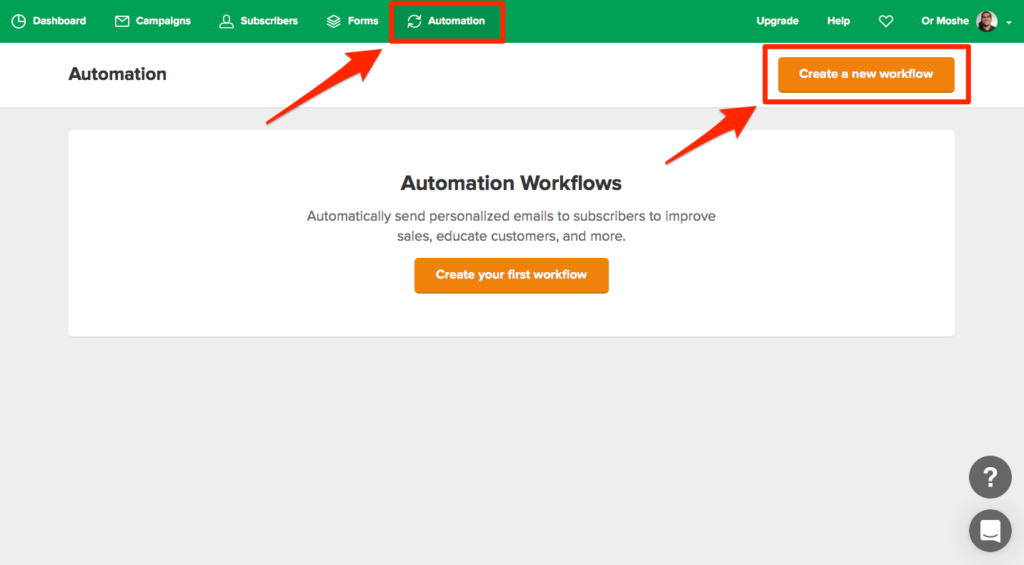
Click on Automation and then on the Create a new workflow button.
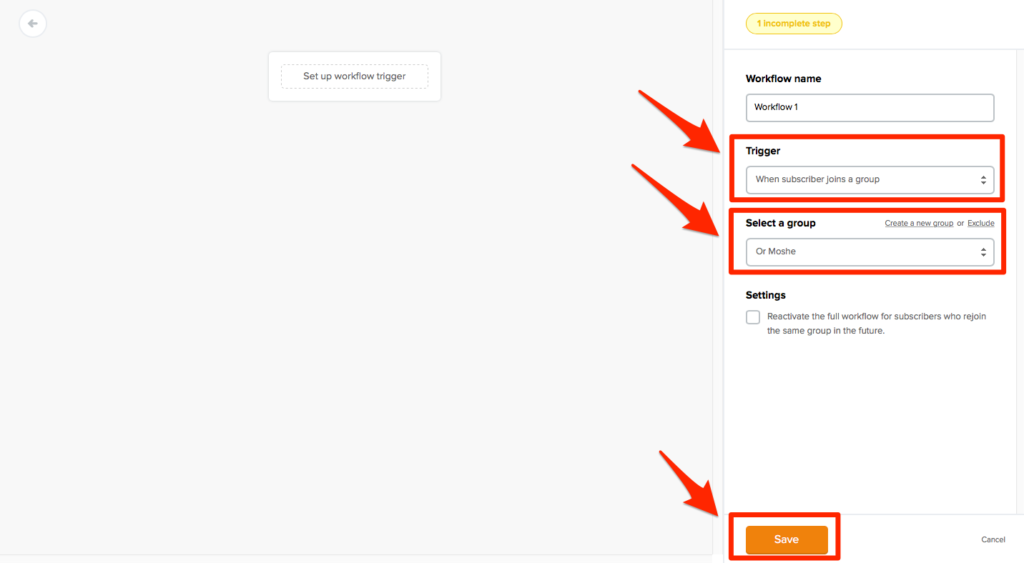
Set Trigger to When subscriber joins a group,
Select your group,
Click the Save button.
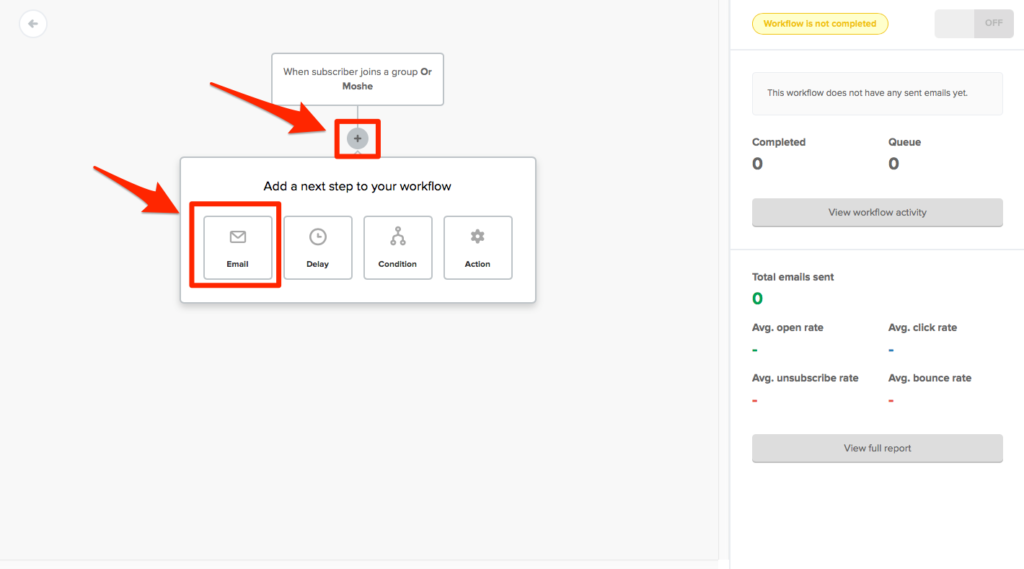
Click on Plus button and then on the Email button.
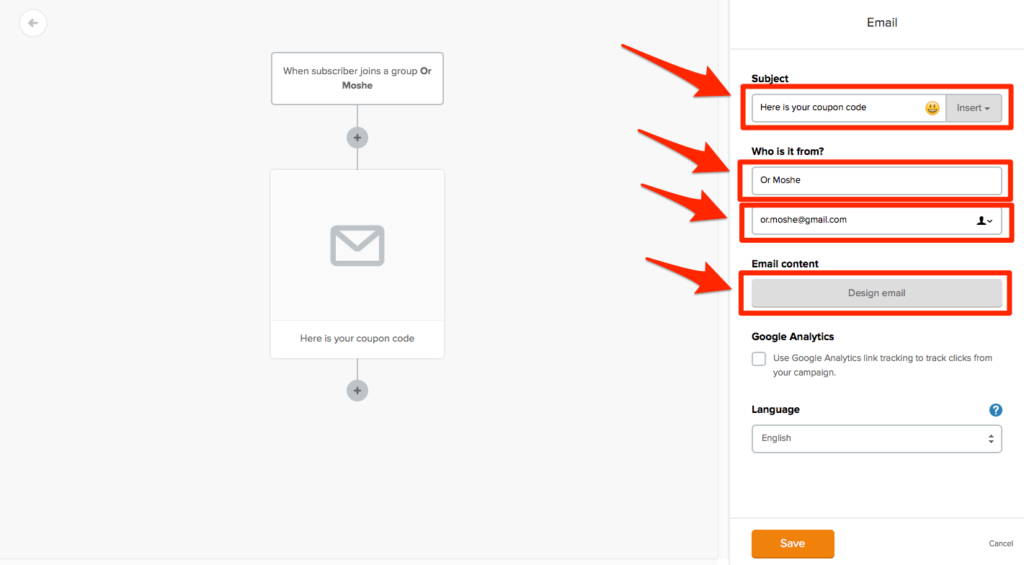
Enter your Subject, Sender Name and Sender Email and click on the Design email button.
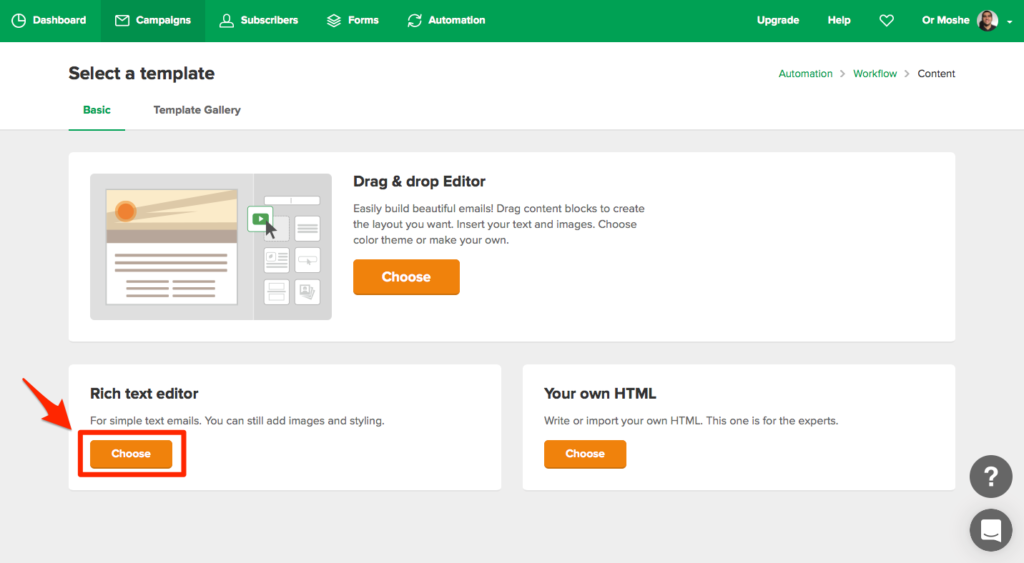
Click on Choose button under Rich text editor.
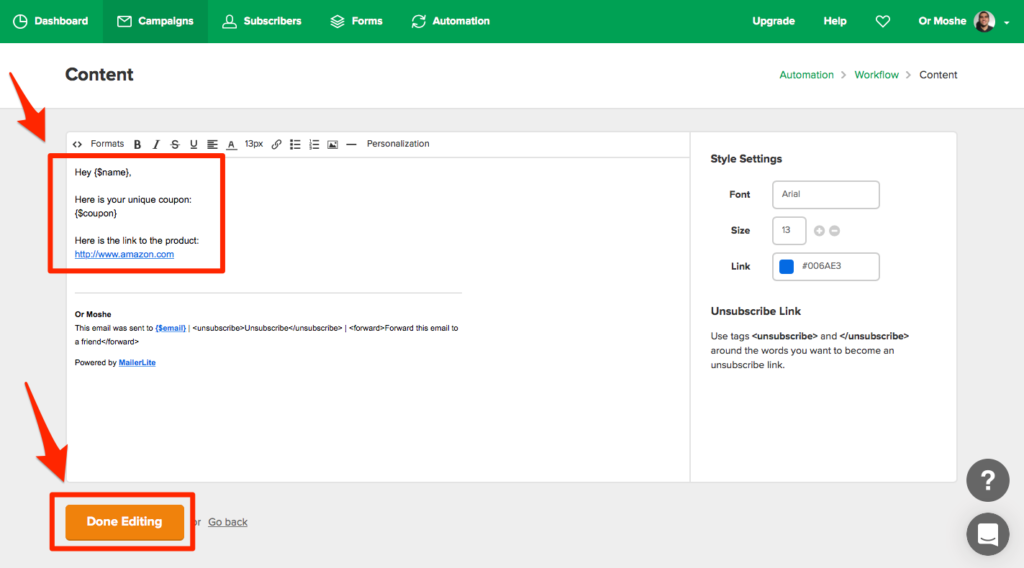
Enter your email body,
Use {$name} for the user first name,
Use {$coupon} for the user coupon.
Click the Done Editing button.
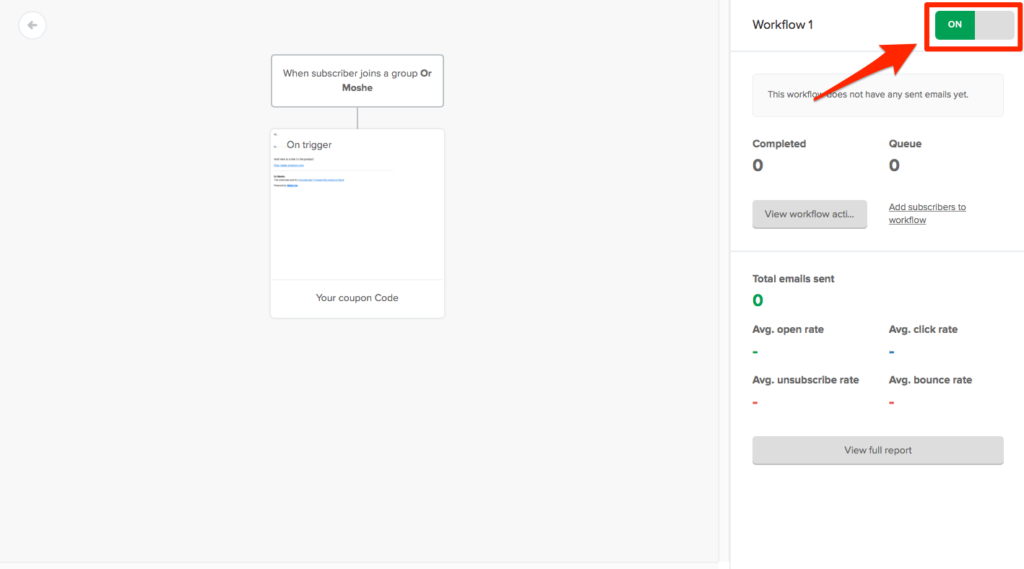
Make sure the Active Switch is on.
Setting up Zapier
ManyChat Trigger
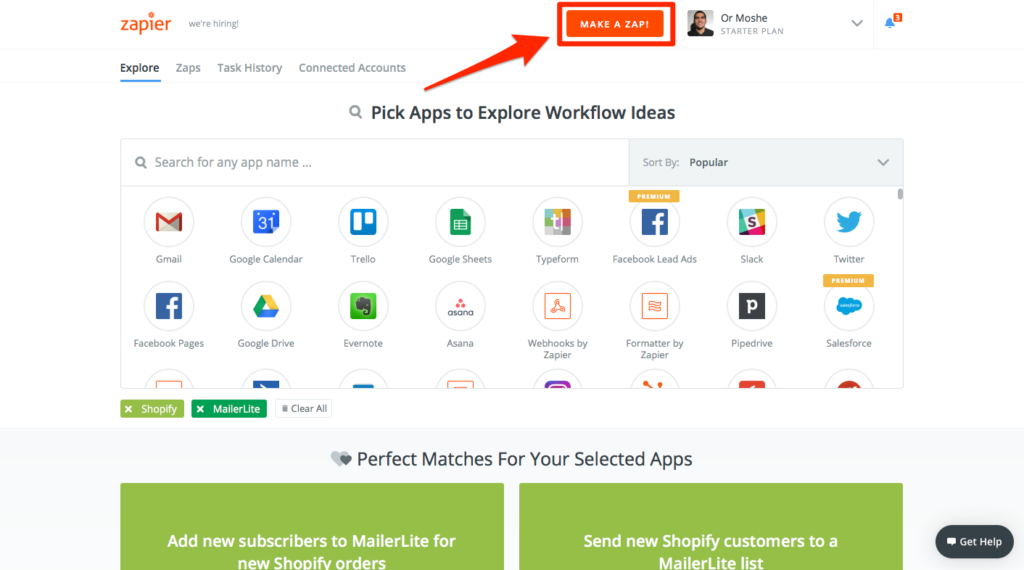
Login to your Zapier account and click the Make a Zap button.
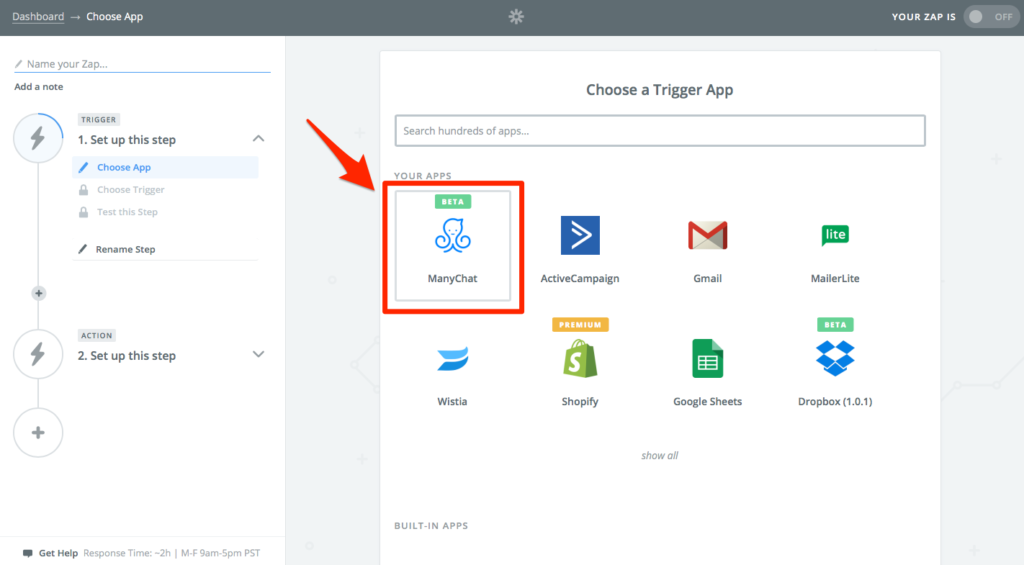
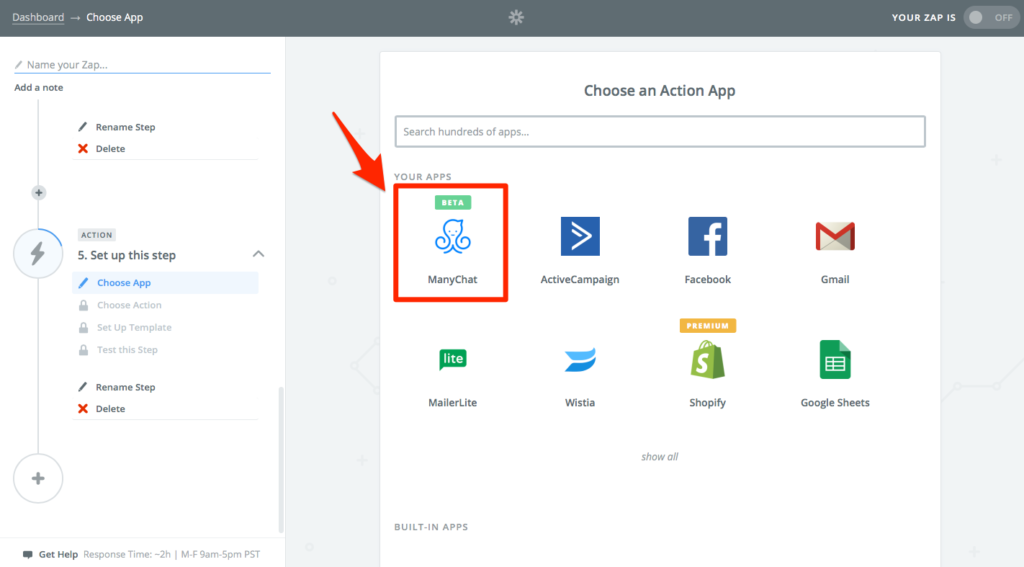
Select the ManyChat app (you many need to search for it if it doesn’t show up already).
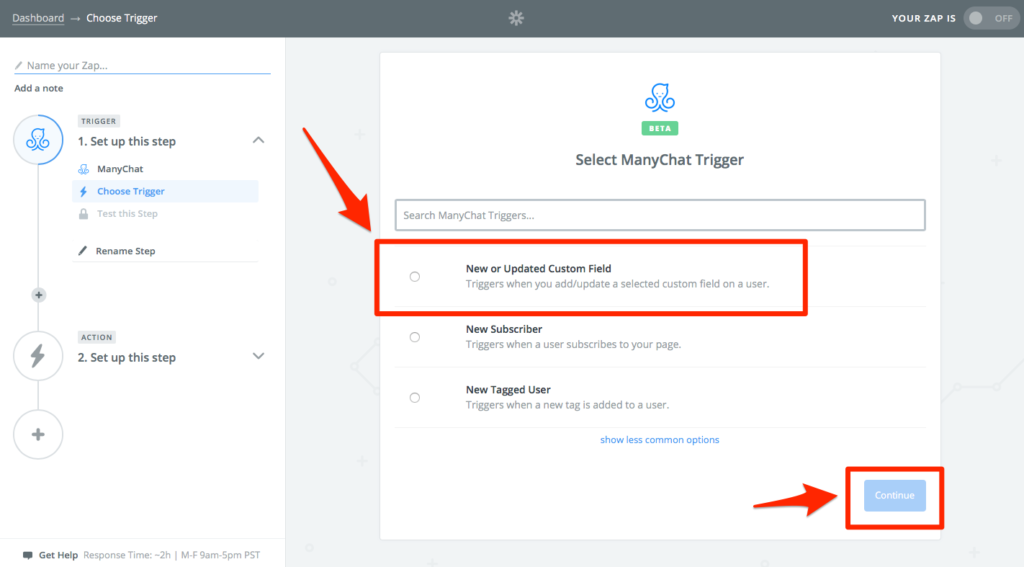
Select New or Updated Custom Field, and click the Continue button.
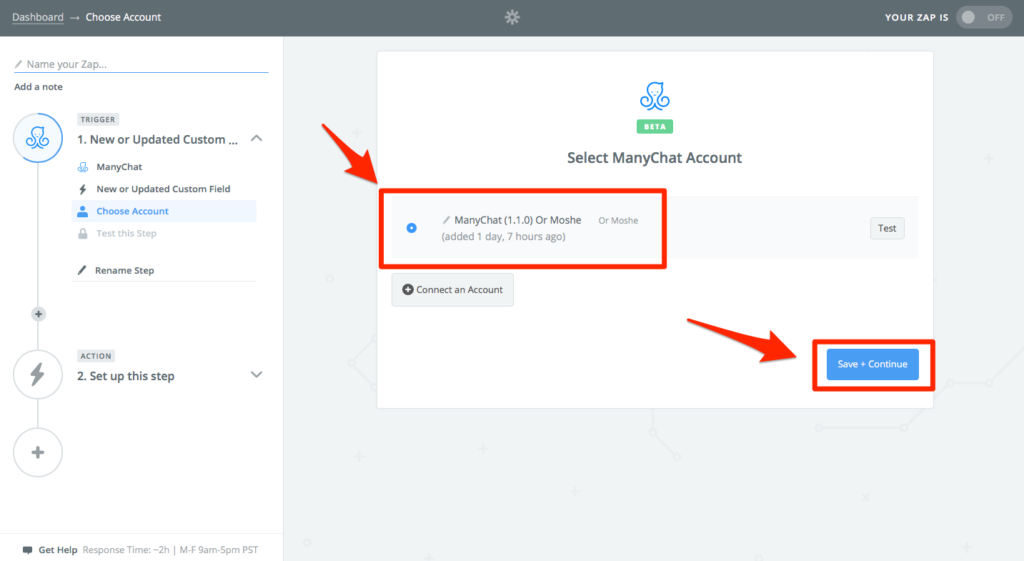
Select your ManyChat account (you many need to click the Connect an Account button first), then click the Save + Continue button.
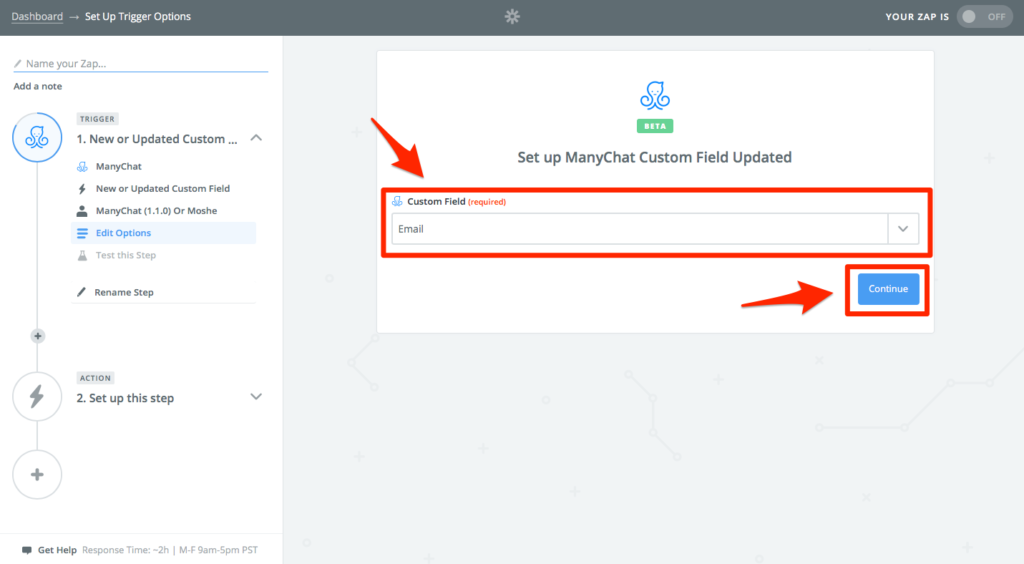
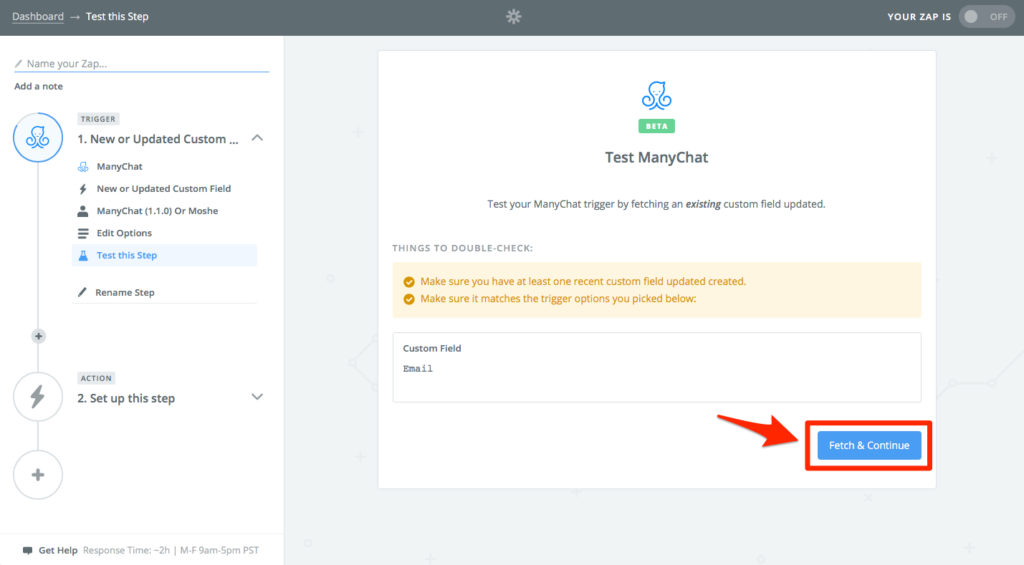
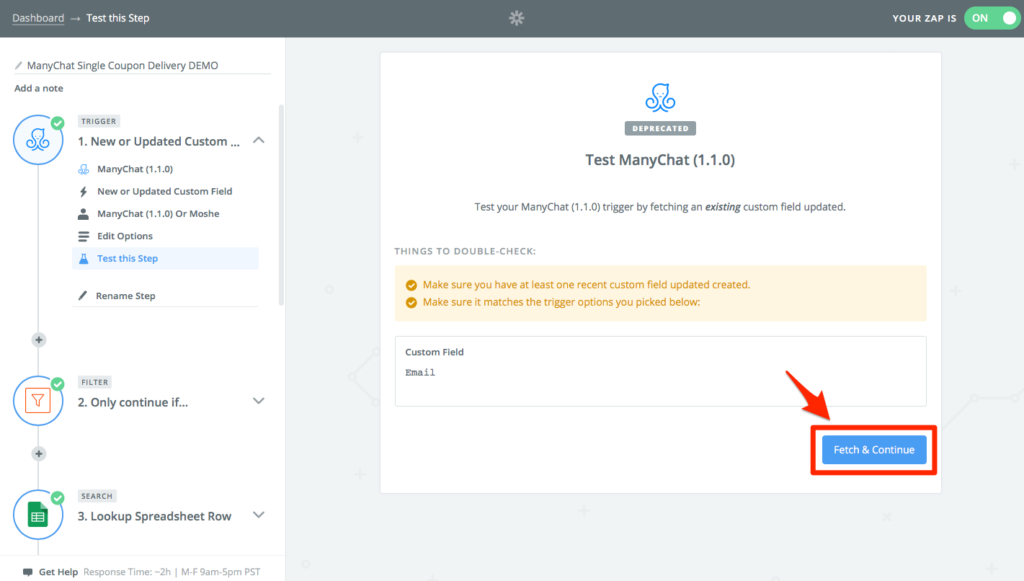
Select Email under Custom Field, then click the Continue button.
Click the Fetch & Continue button.
Click on the View your custom field updated link.
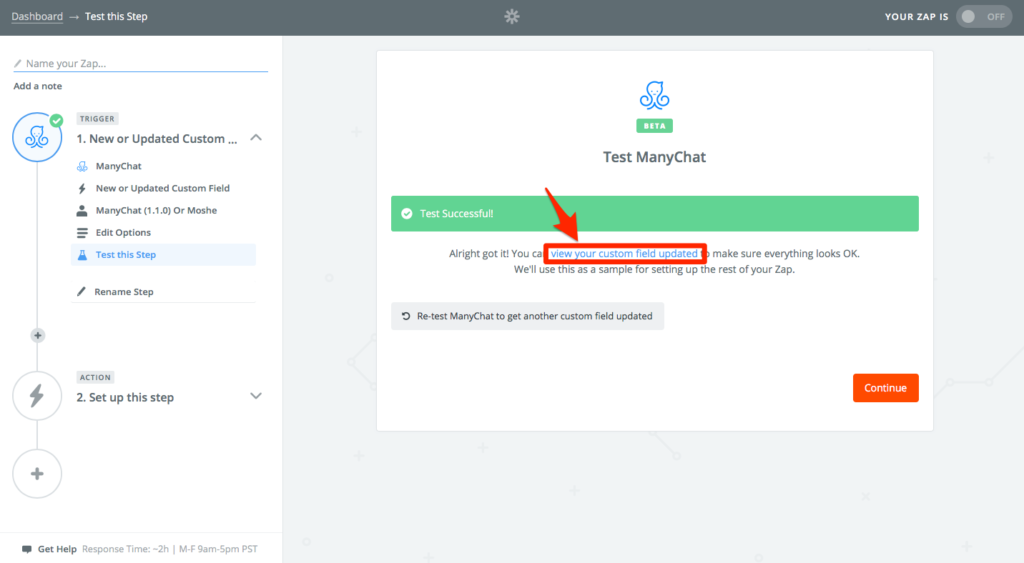
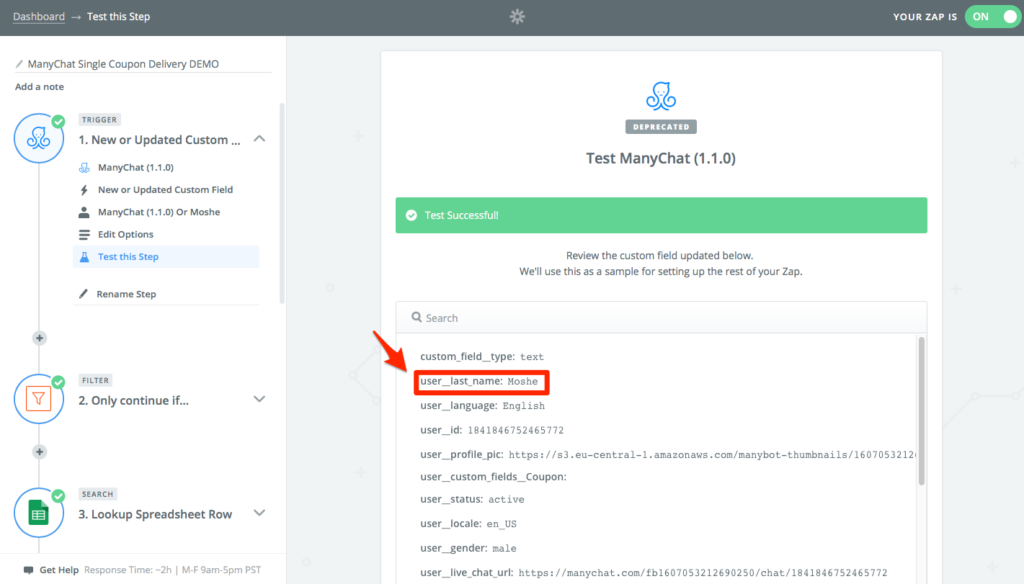
Identify which user Zapier pulled from ManyChat for this test.
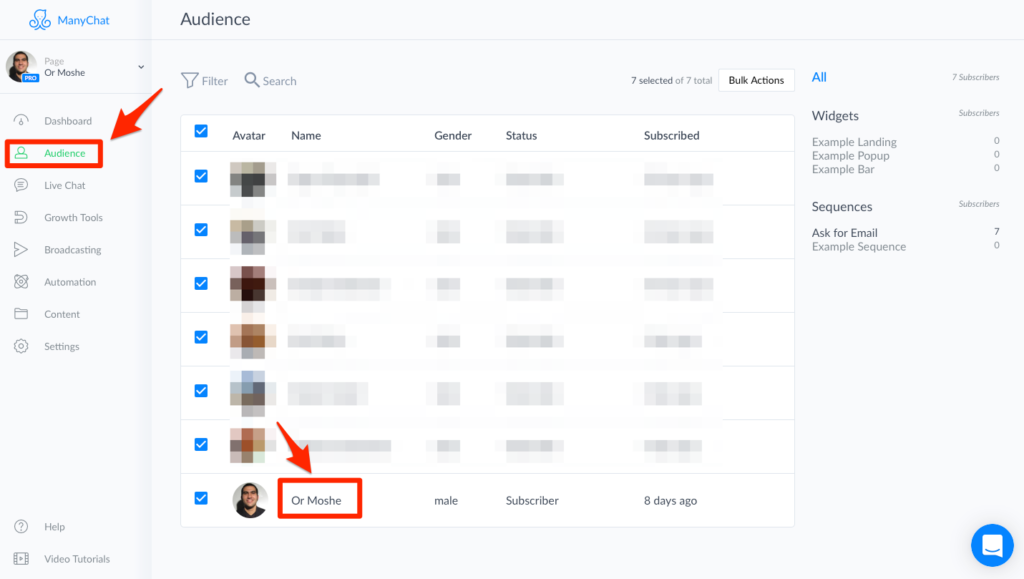
Open ManyChat and go to Audience and click on the user that was pulled.
Click on Show All under Custom Fields.
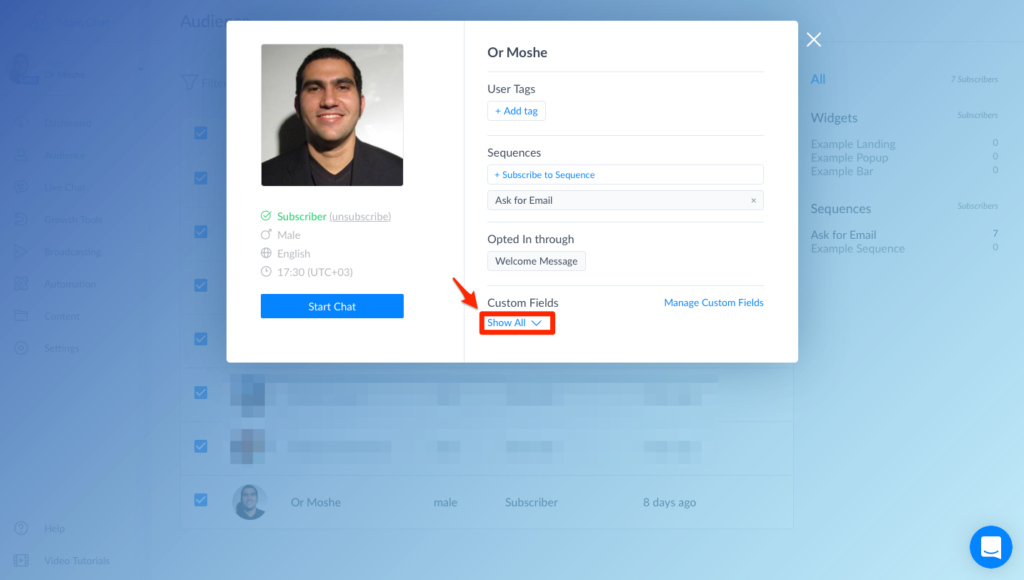
Click on Email
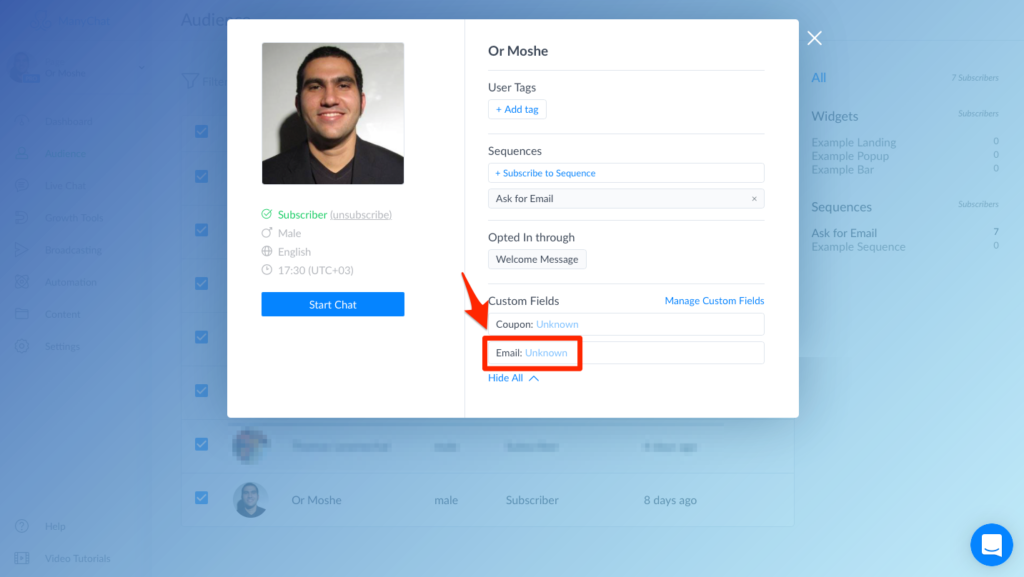
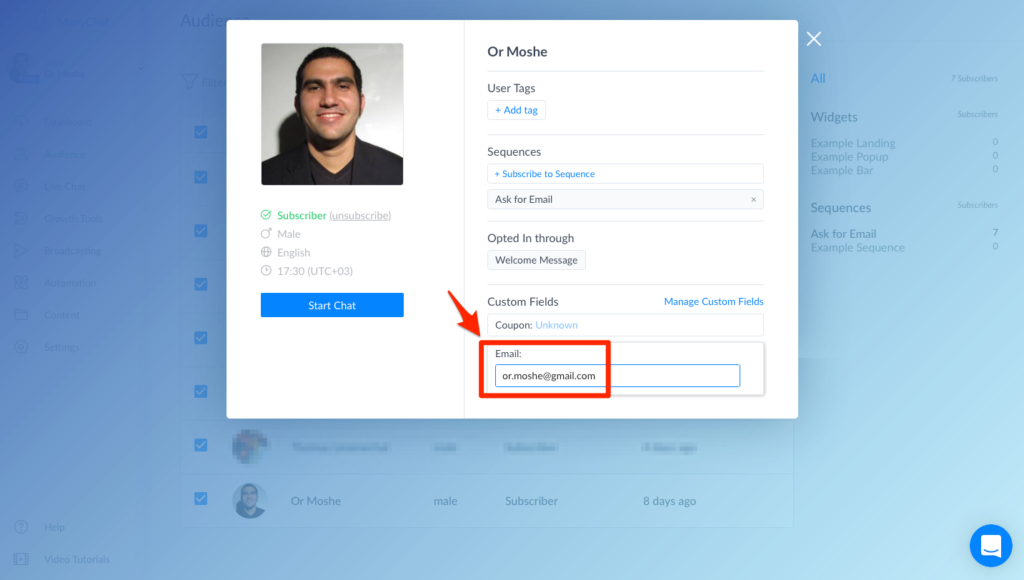
Enter an email address.
Go back to Zapier and click on Re-test Manychat to get another custom field update button
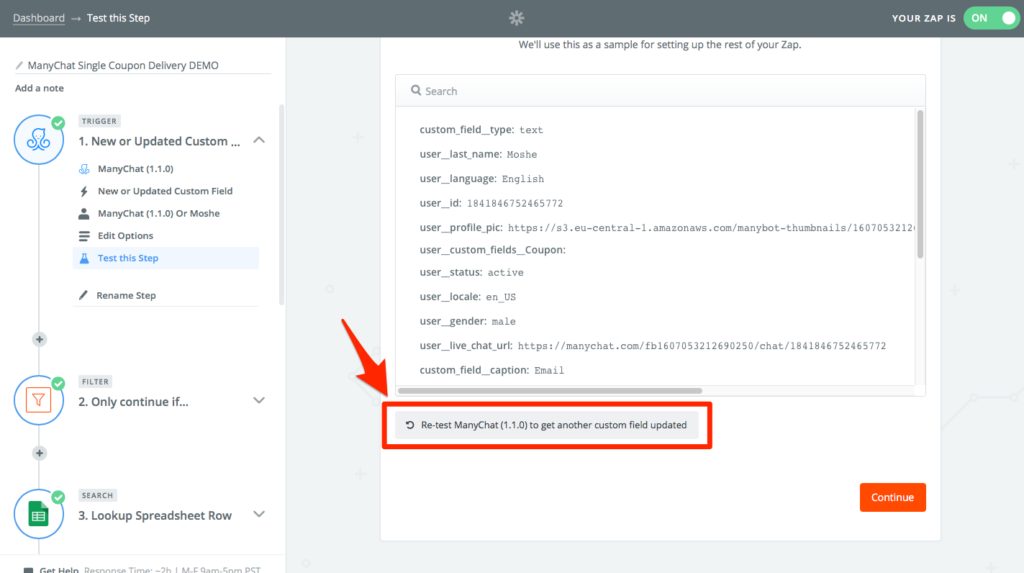
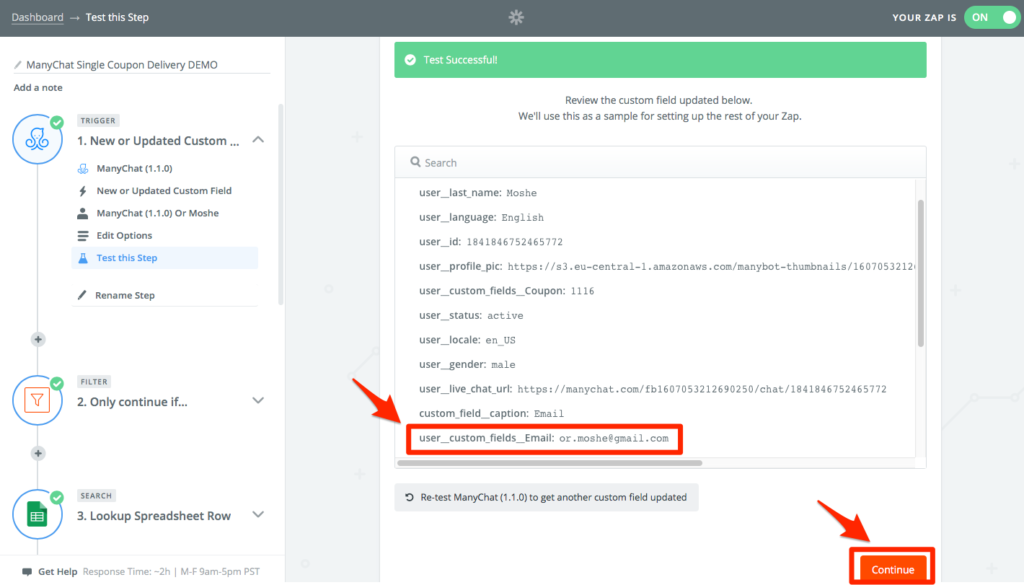
Click on Fetch & Continue
Verify that Zapier indeed pulled the email address you entered under user_custom_fields_Email, then click the Continue button.
Google Sheet Lookup
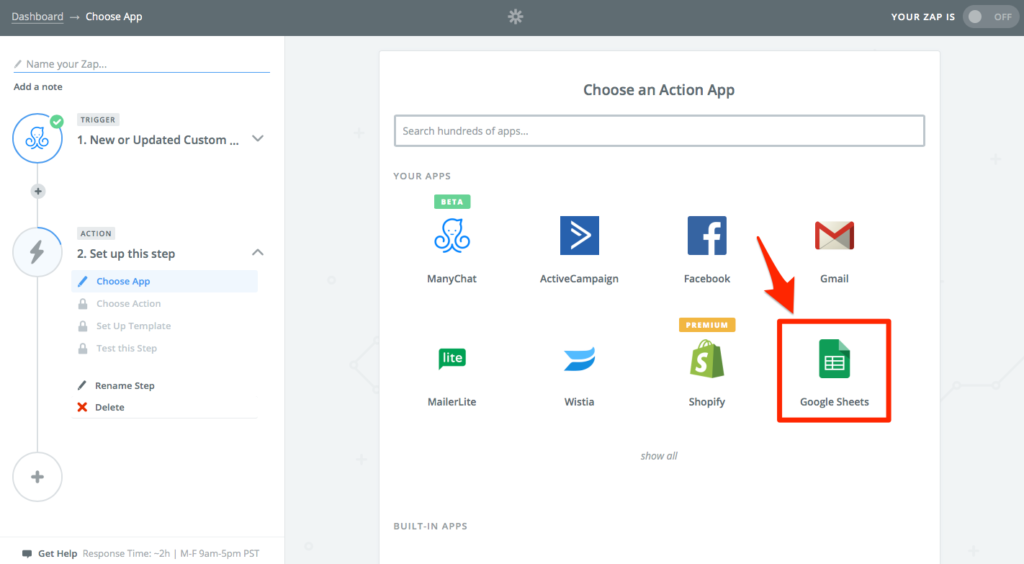
Select the Google Sheets app (you many need to search for it if it doesn’t show up already).
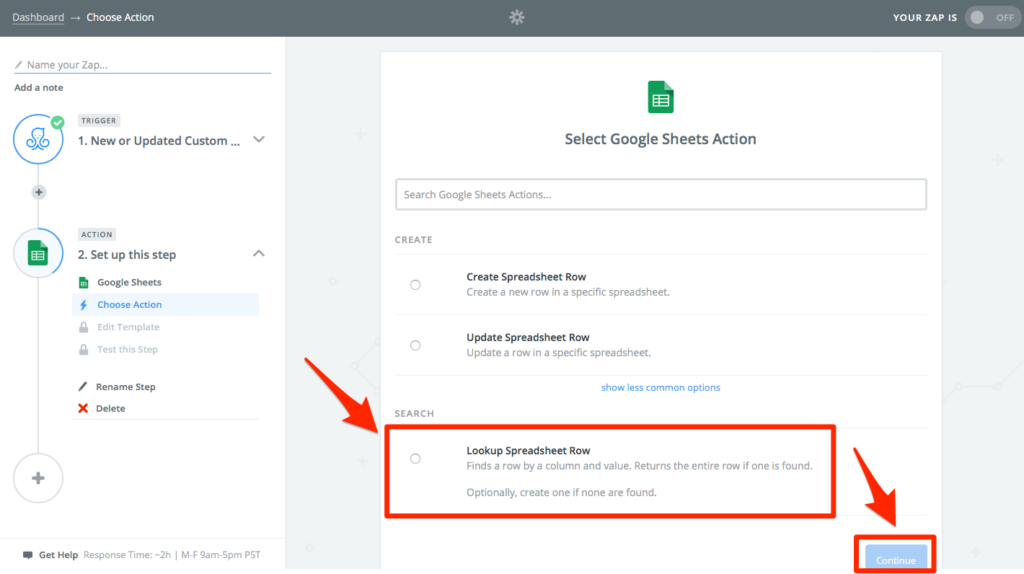
Select Lookup Spreadsheet Row, and click the Continue button.
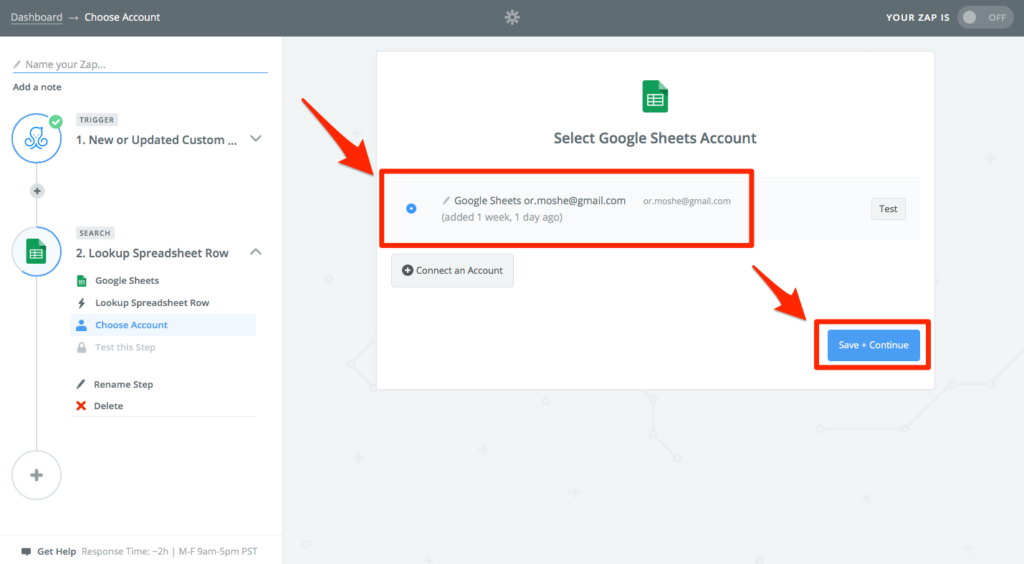
Select your Google account (you many need to click the Connect an Account button first), then click the Save + Continue button.
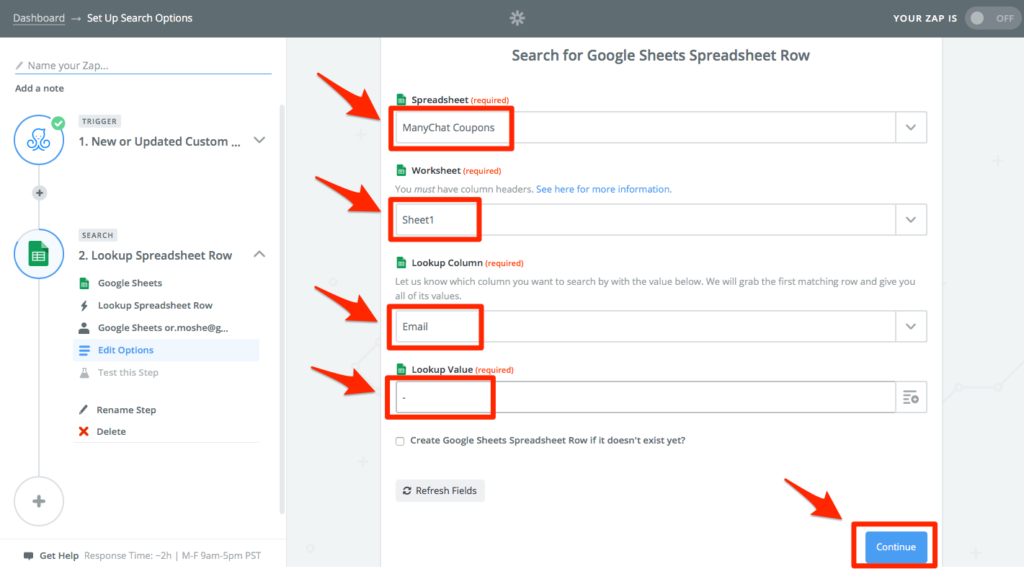
Select the spreadsheet you previously created,
Set Worksheet to Sheet1,
Set Lookup Column to Email,
Set Lookup Value to –,
Click the Continue button.
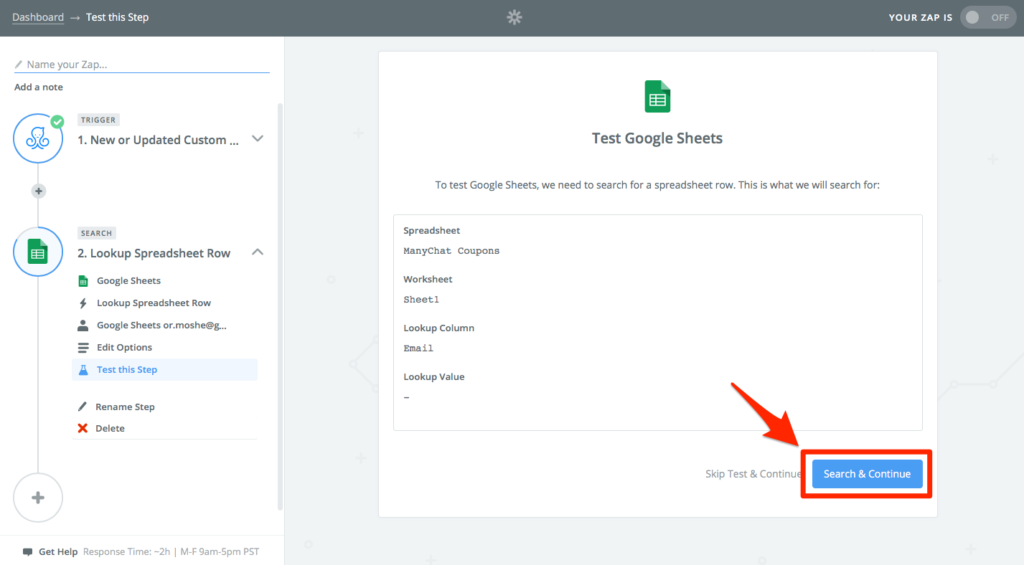
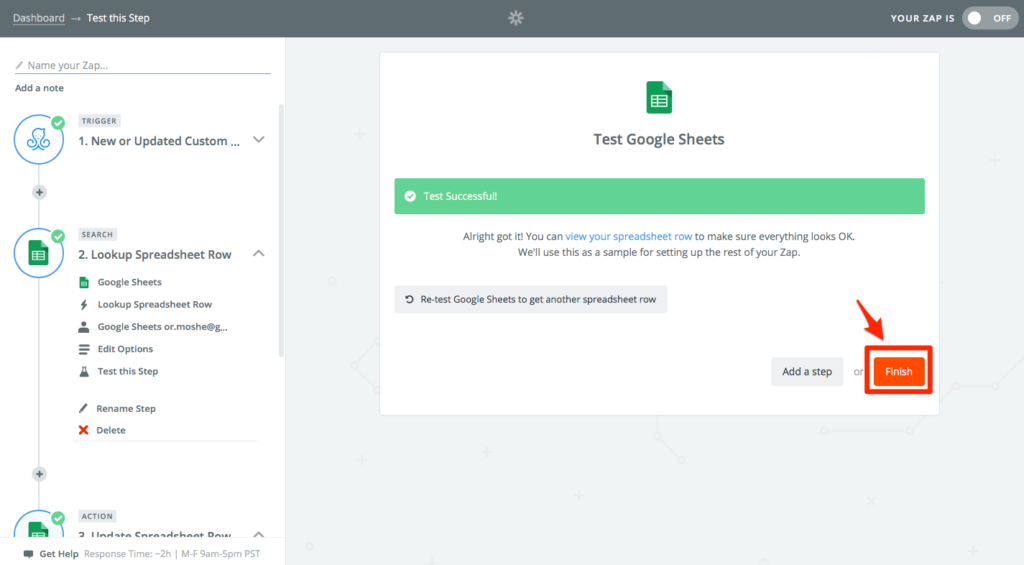
Click the Search & Continue button.
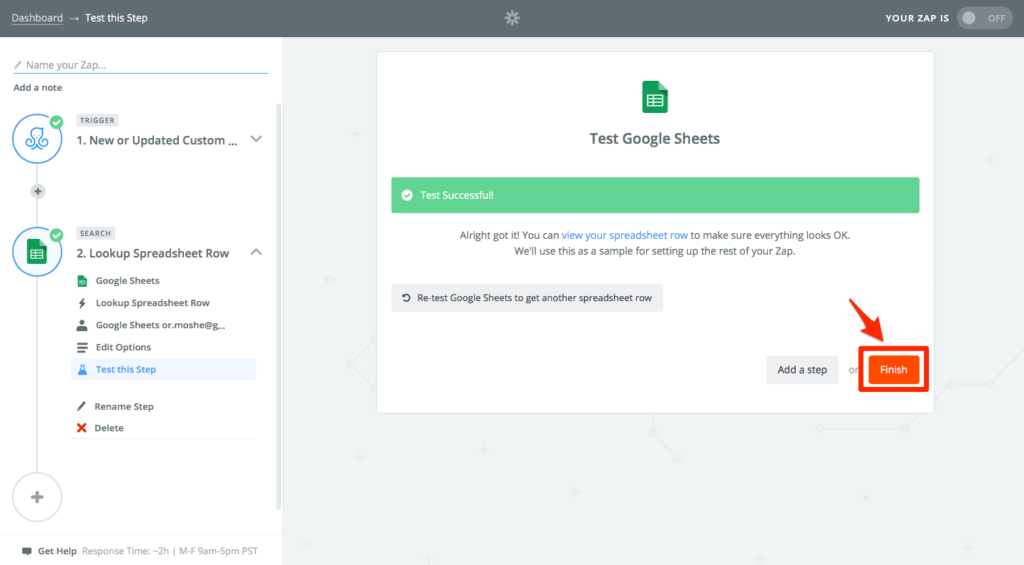
Click the Finish button.
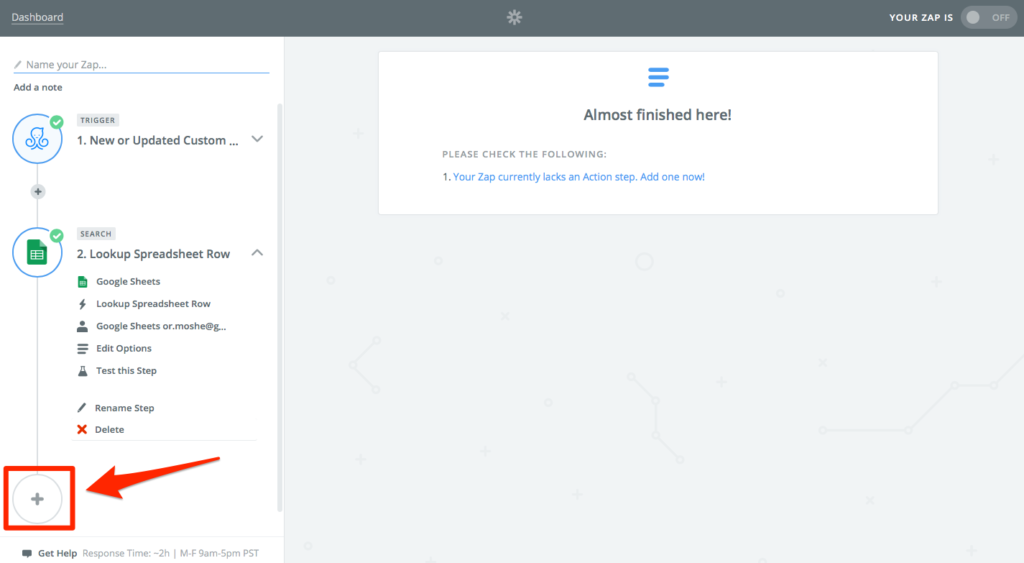
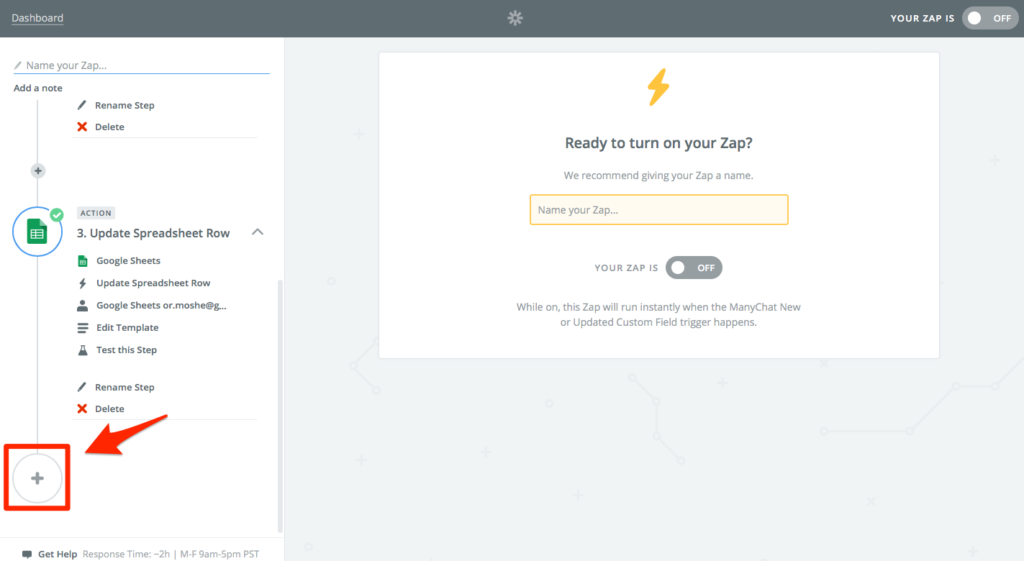
Google Sheet Update
Click the Plus button.
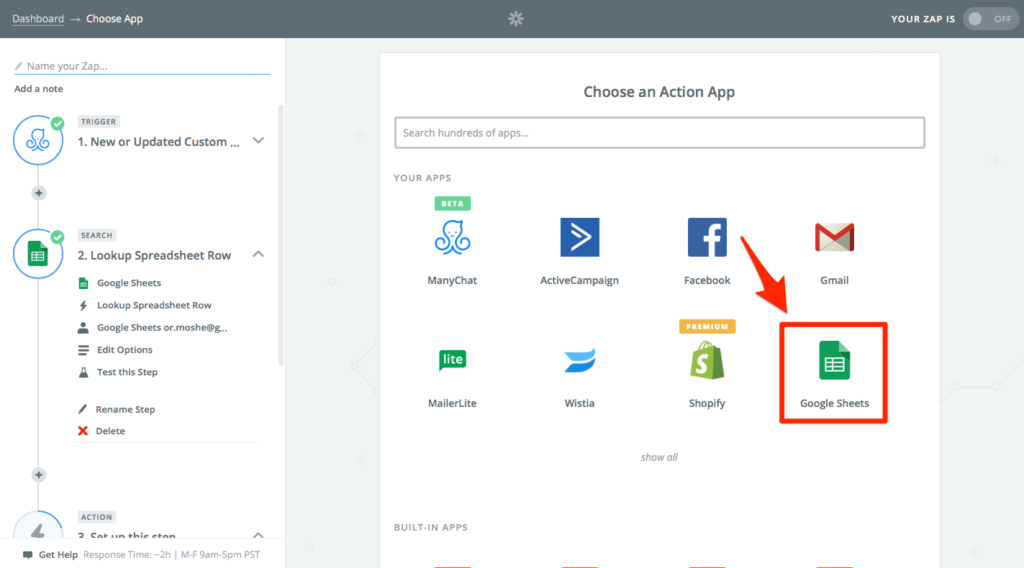
Select the Google Sheets app (you many need to search for it if it doesn’t show up already).
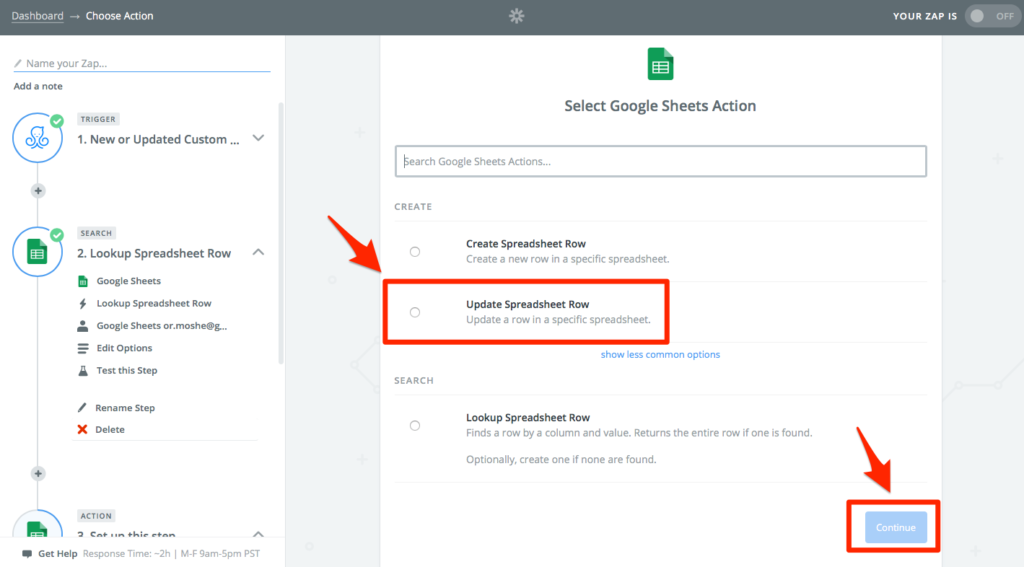
Select Update Spreadsheet Row, and click the Continue button.
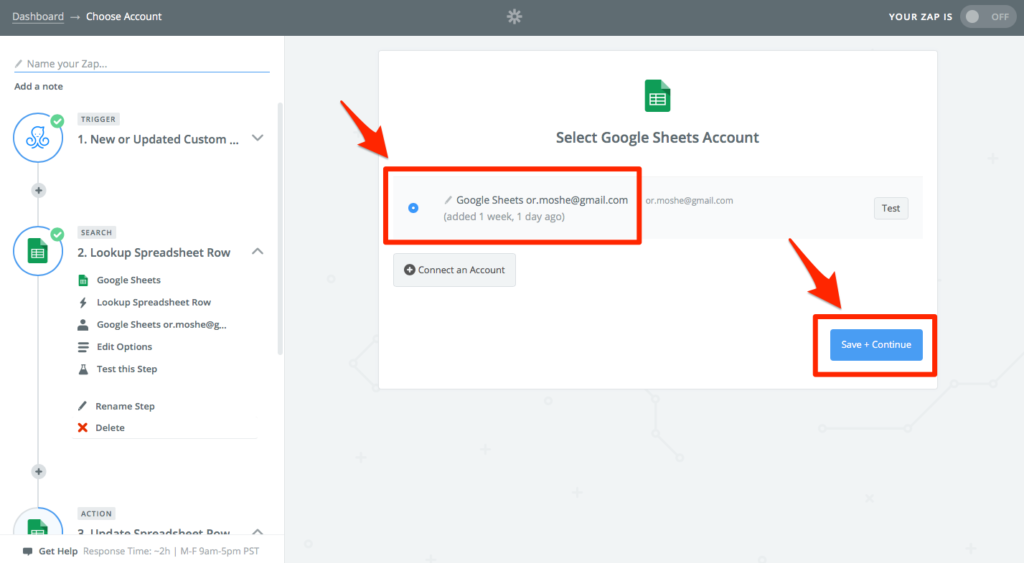
Select your Google account (you many need to click the Connect an Account button first), then click the Save + Continue button.
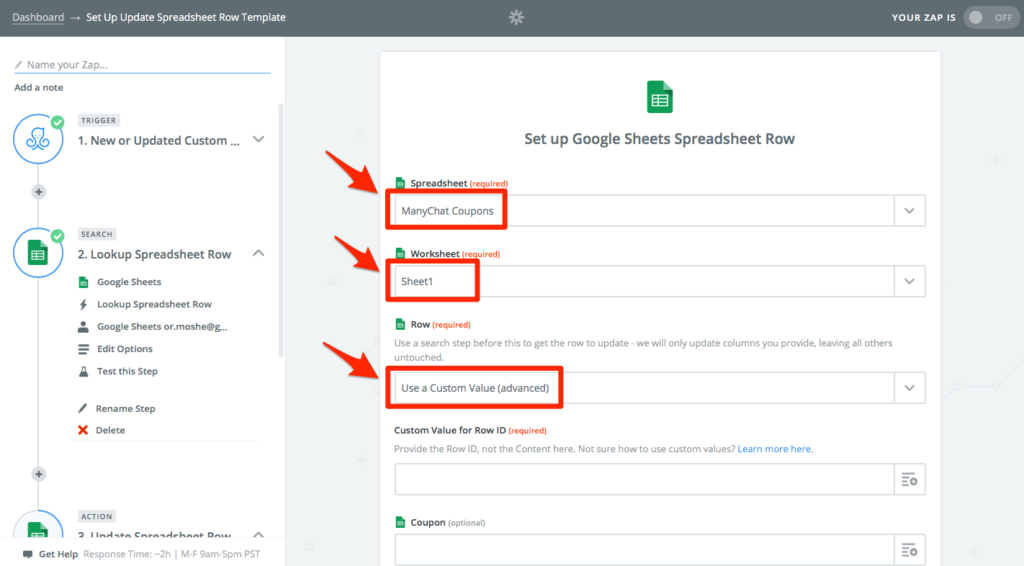
Select the spreadsheet you previously created,
Set Worksheet to Sheet1,
Set Row to Use a Cusom Value (advanced)
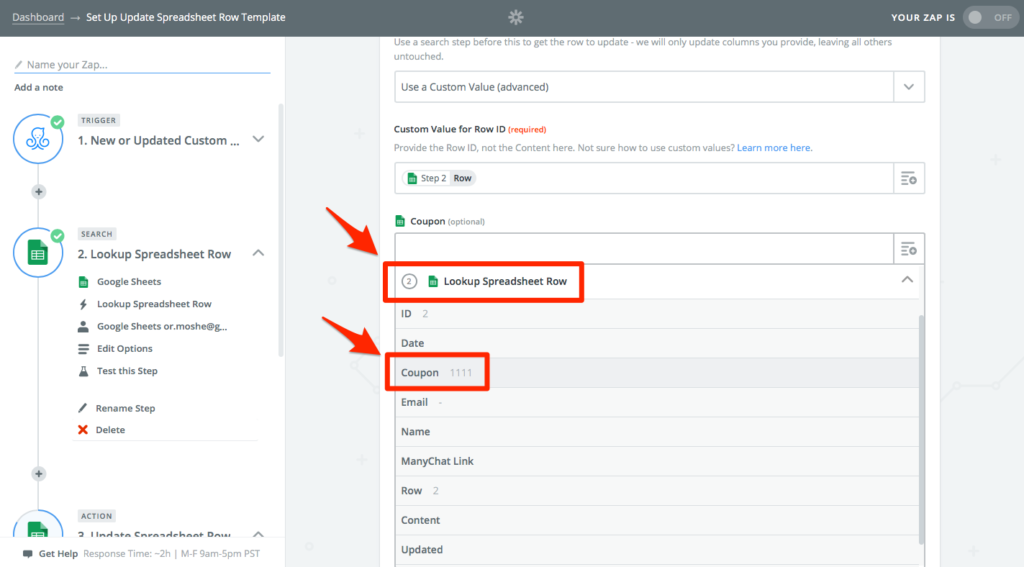
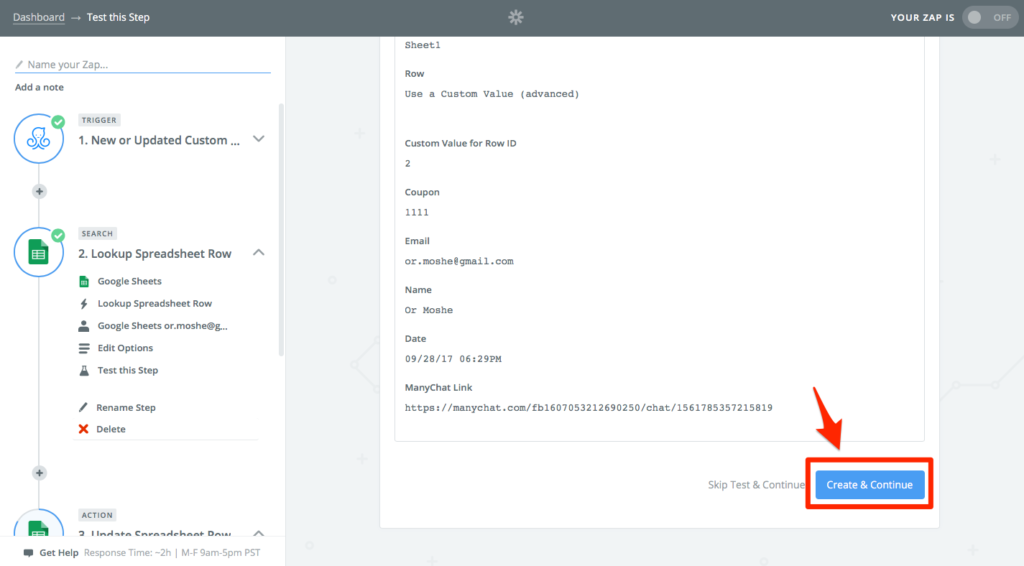
Set Custom Value for Row ID to 2 Lookup Spreadsheet Row > Row

Set Coupon to 2 Lookup Spreadsheet Row > Coupon
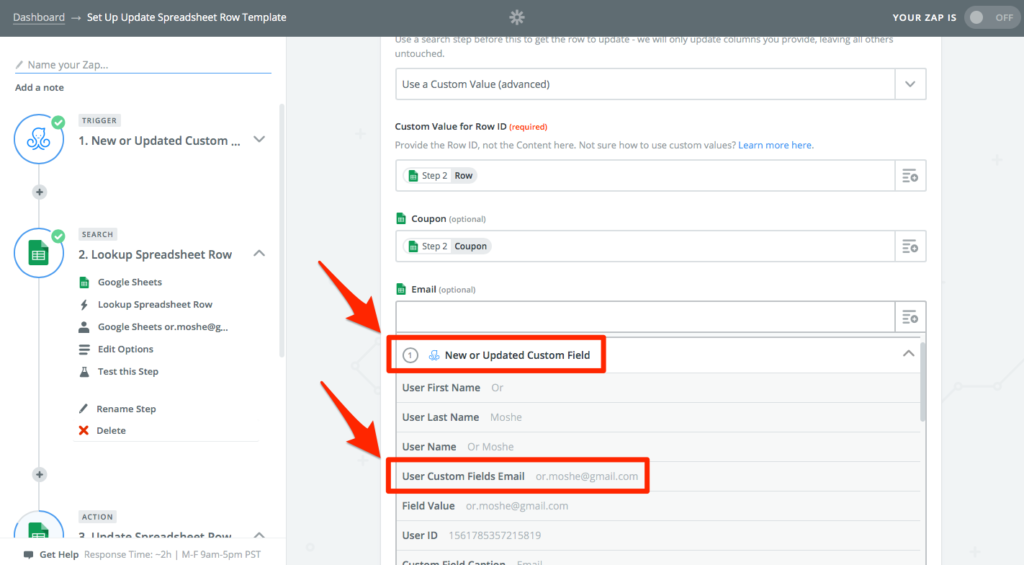
Set Email to 1 New or Updated Custom Field > User Custom Fields Email
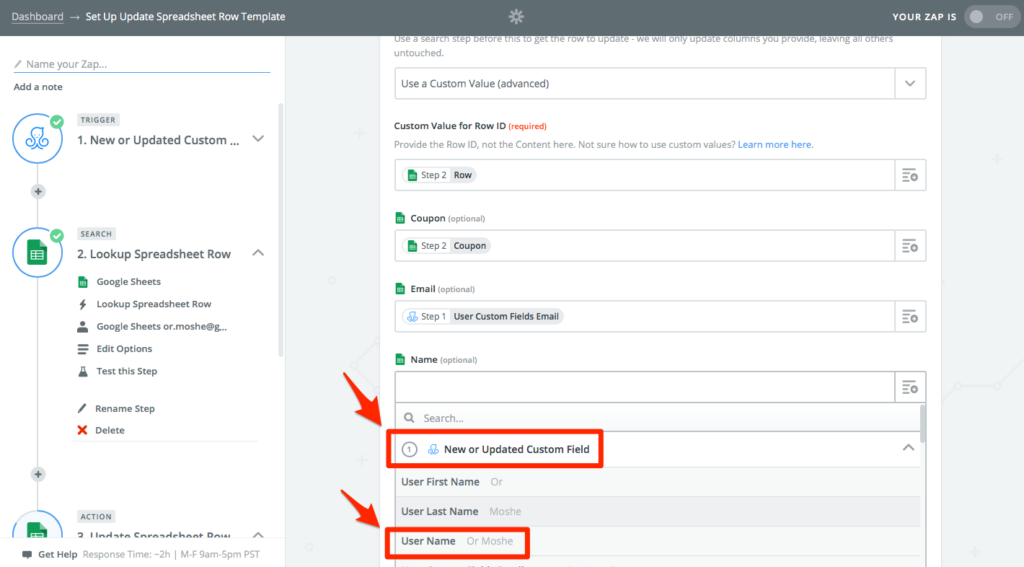
Set Name to 1 New or Updated Custom Field > User Name
Set Date to {{zap_meta_human_now}}
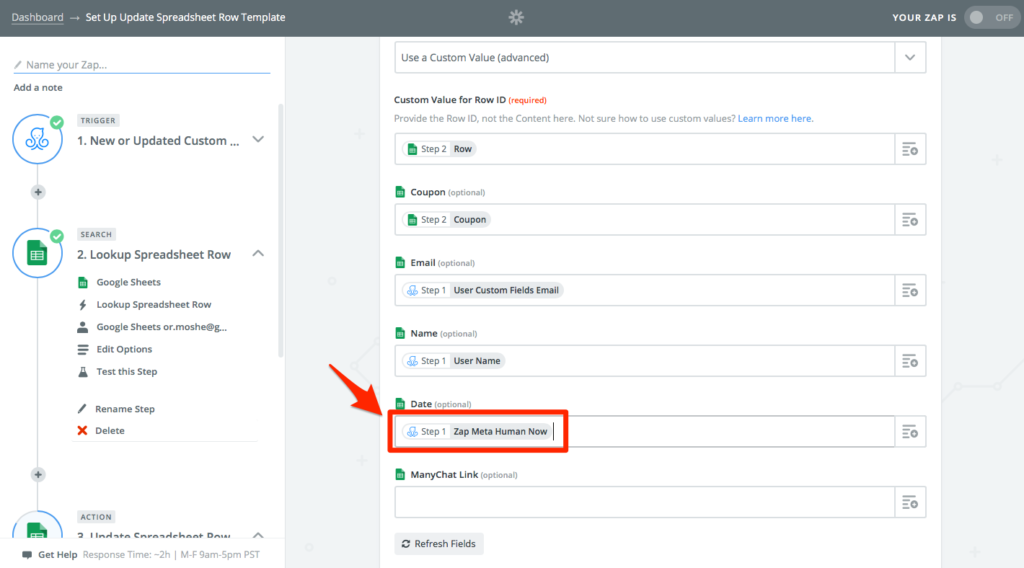
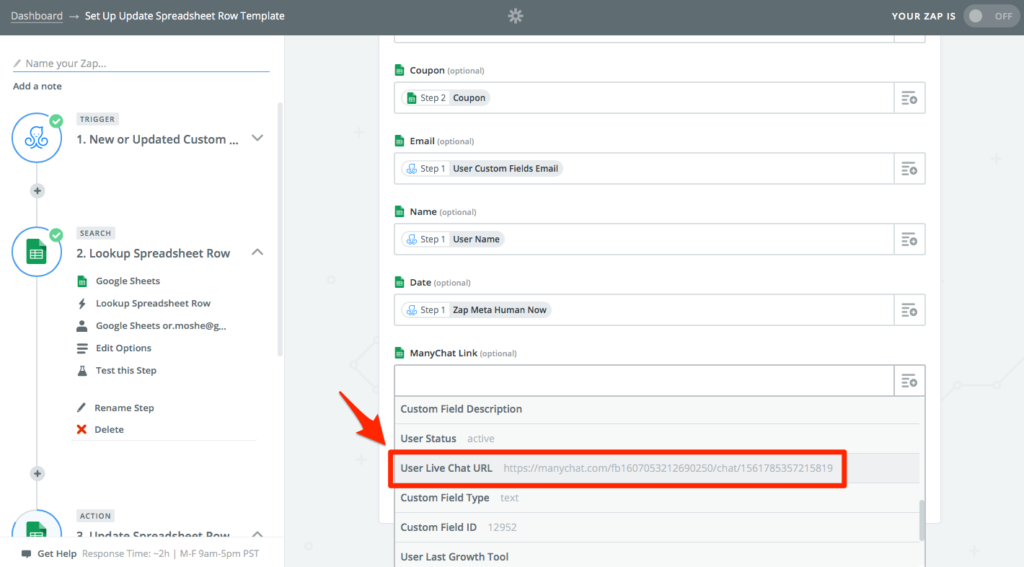
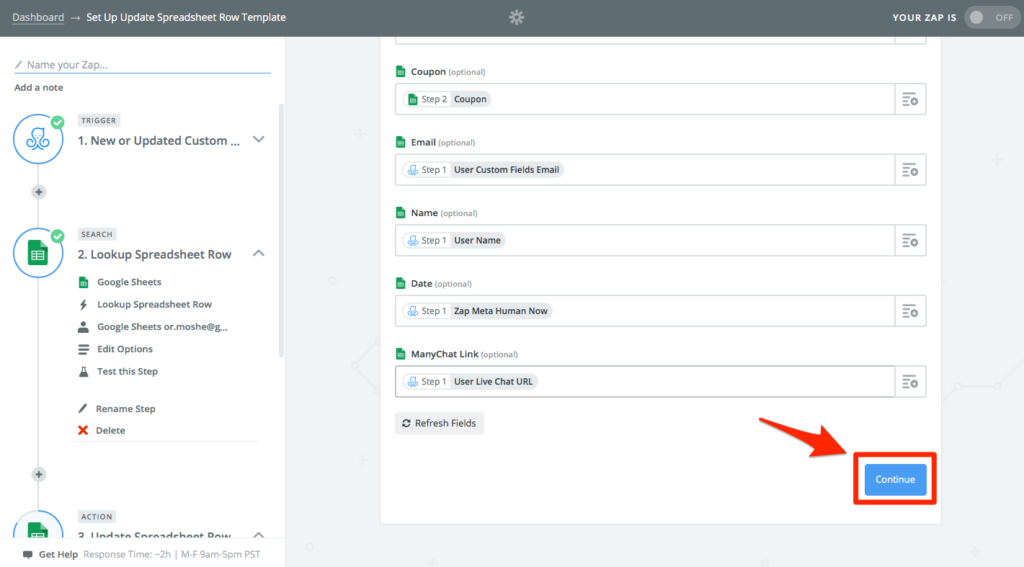
Set ManyChat Link to 1 New or Updated Custom Field > User Live Chat URL
Click the Continue button
Click the Create & Continue button
Click the Finish button
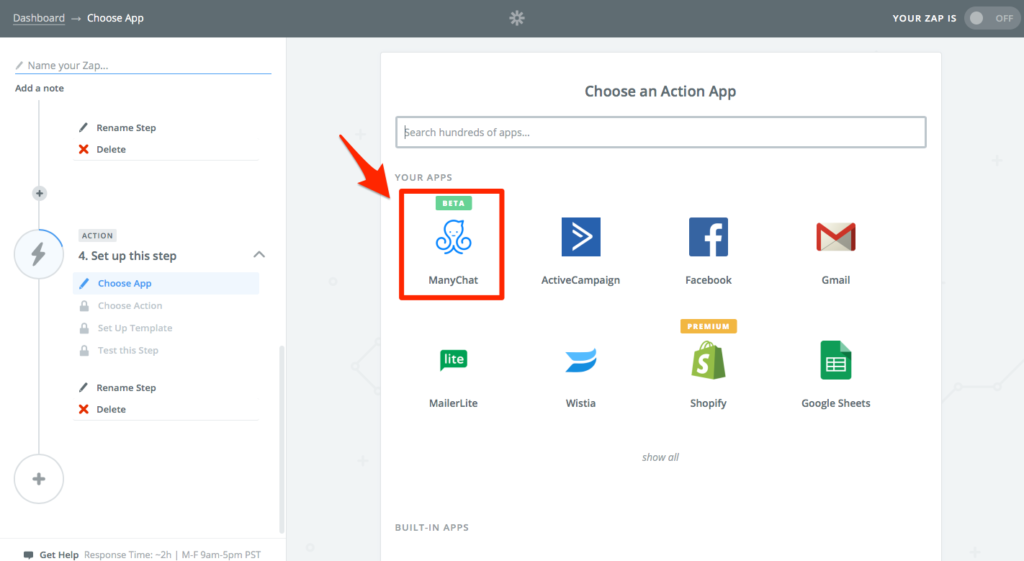
ManyChat Update Custom Field
Click the Plus button.
Select the ManyChat app (you many need to search for it if it doesn’t show up already).
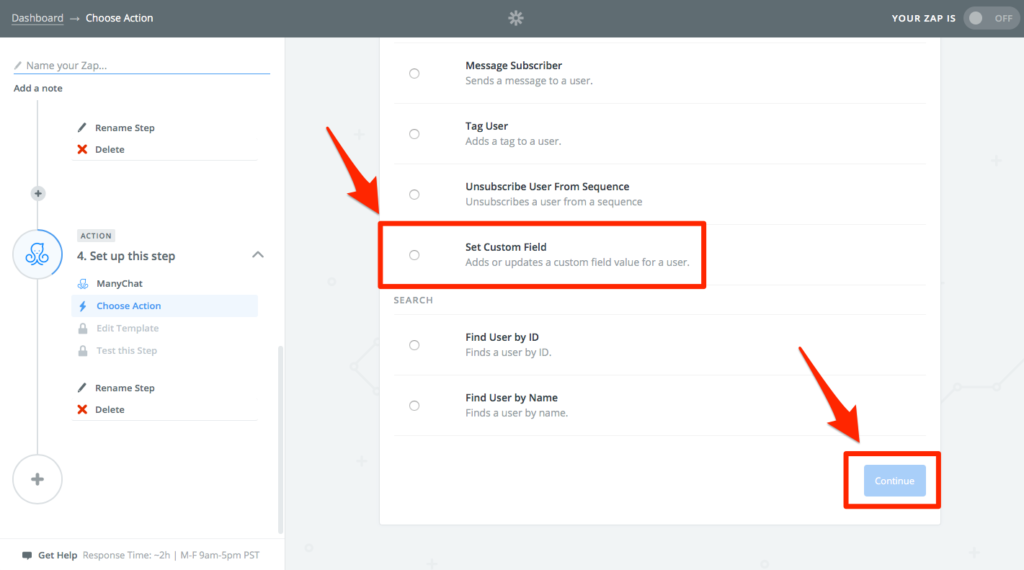
Click on show less common options
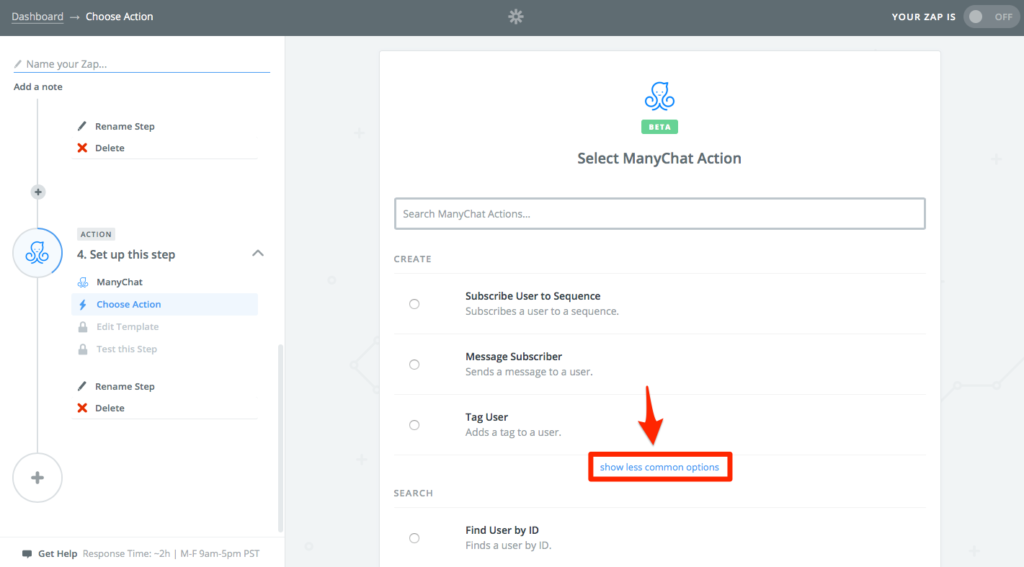
Select Set Custom Field, and click the Continue button.
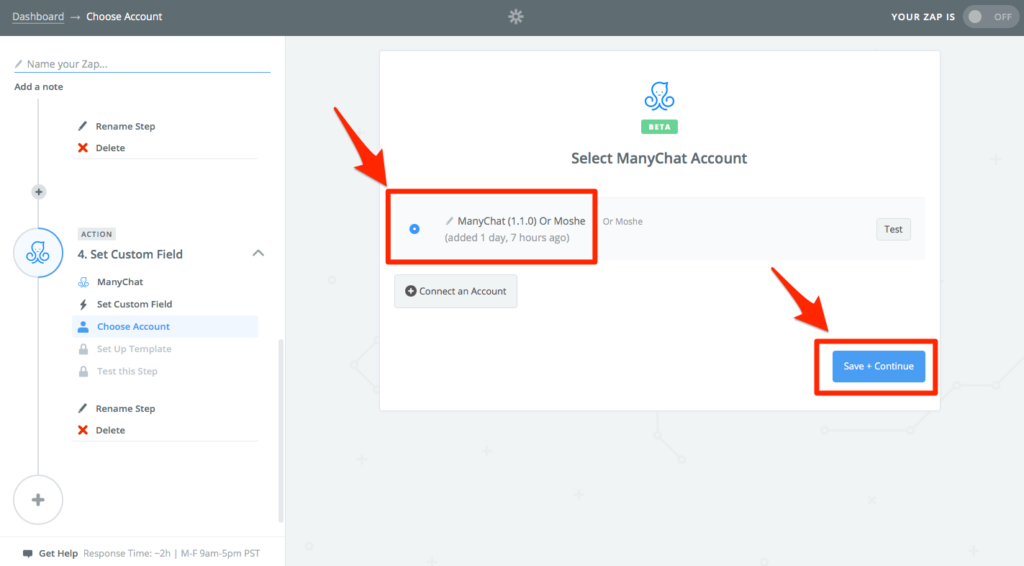
Select your ManyChat account (you many need to click the Connect an Account button first), then click the Save + Continue button.
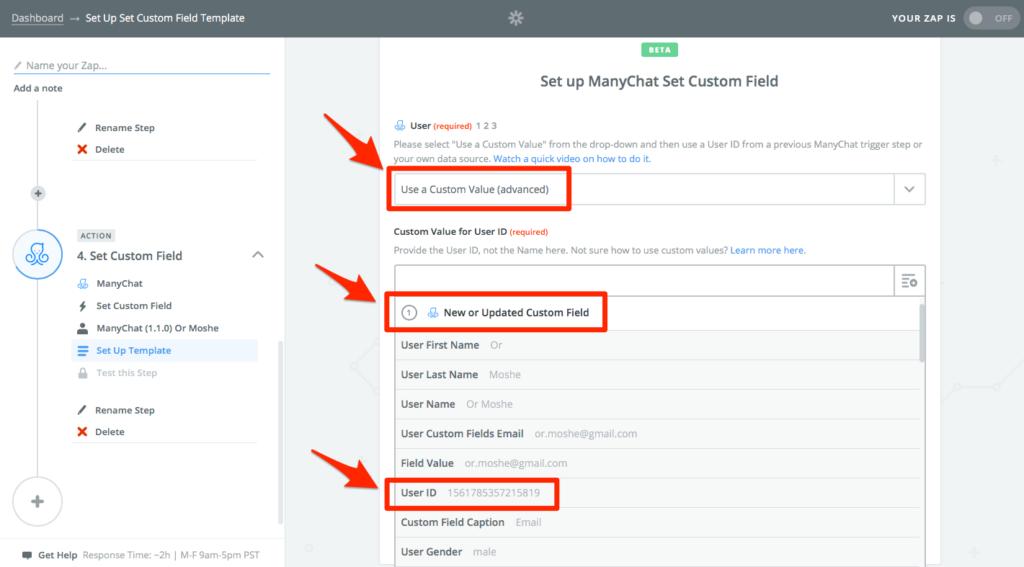
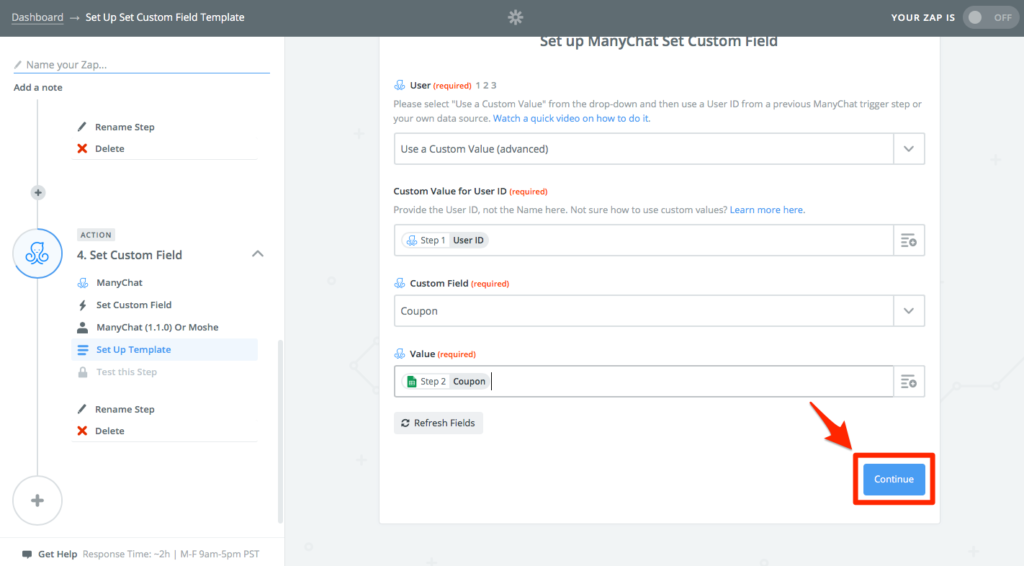
Set User to Use a Custom Value (advanced),
Set Custom Value for User ID to 1 New or Updated Custom Field > User ID
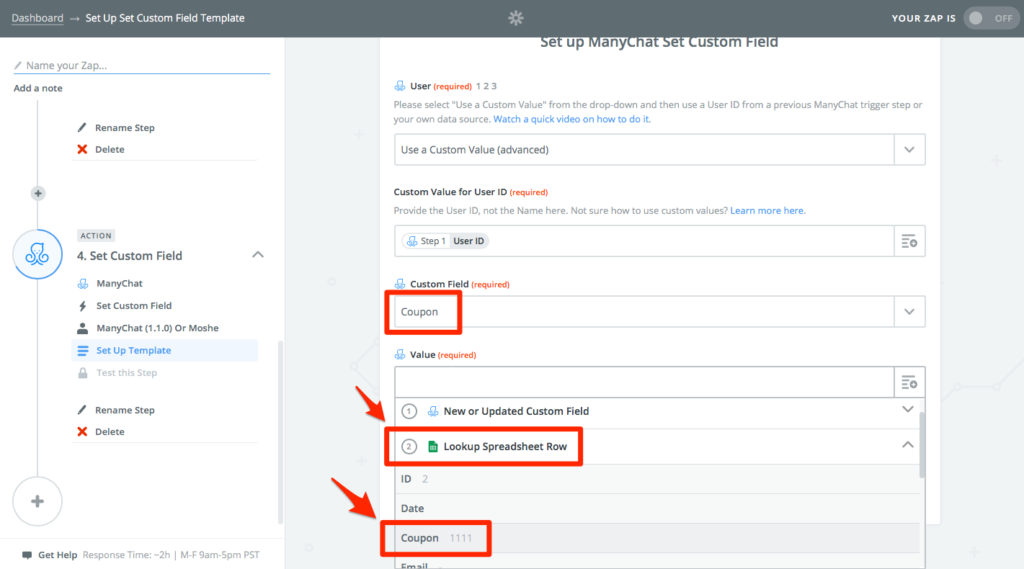
Set Custom Field to Coupon,
Set Value to 2 Lookup Spreadsheet Row > Coupon
Click the Continue button
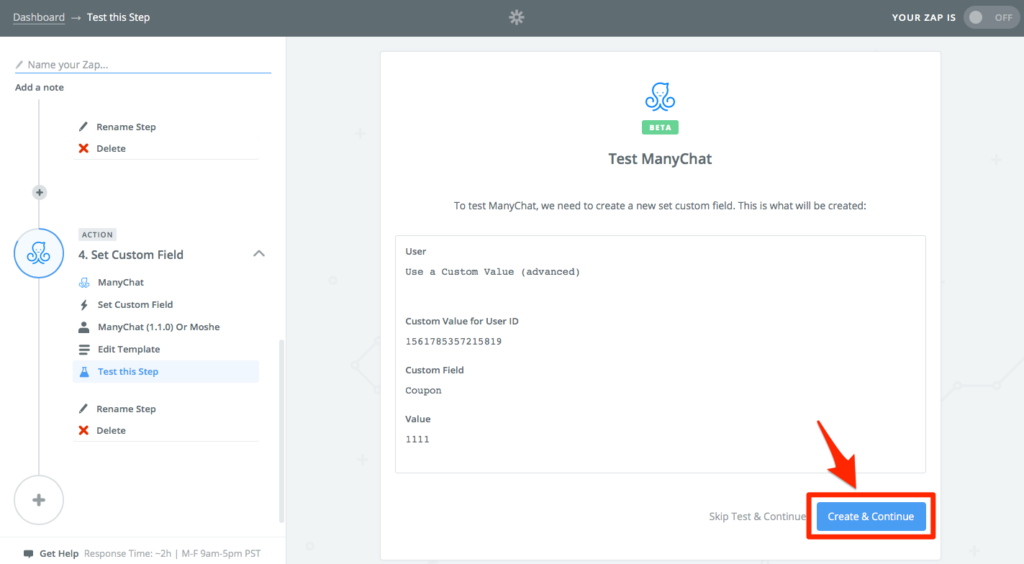
Click the Create & Continue button
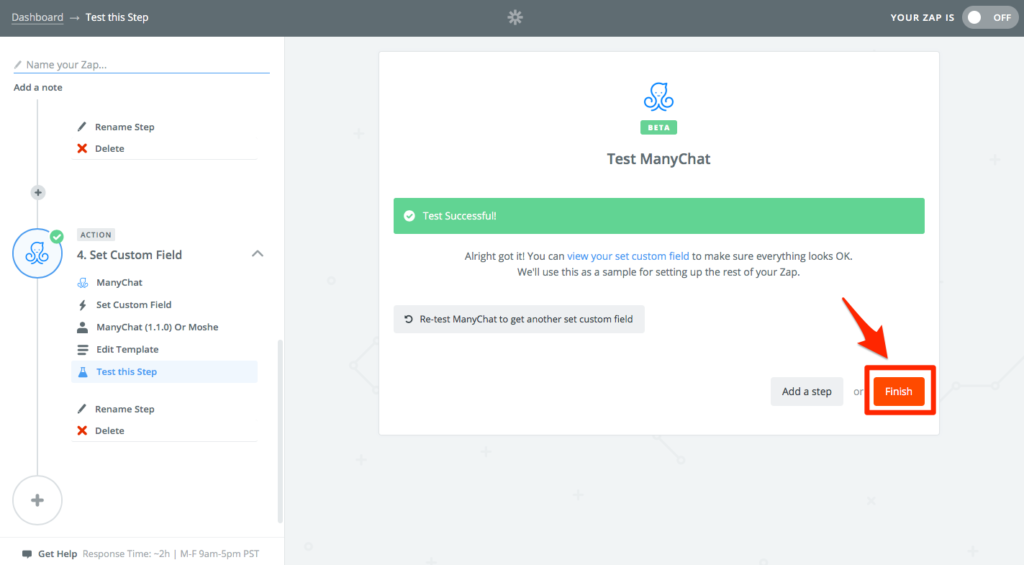
Click the Finish button
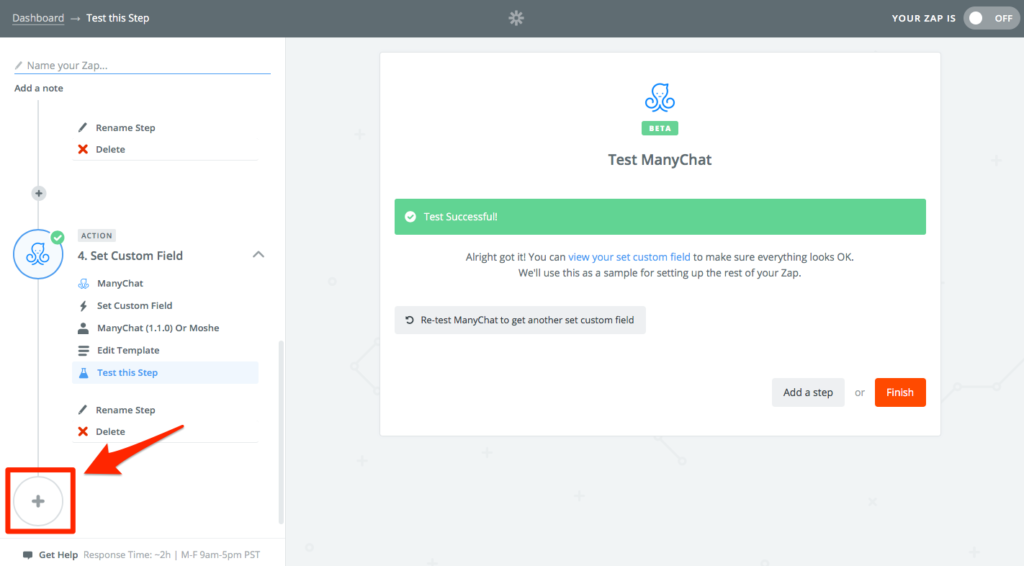
ManyChat Subscribe to Sequence
Click the Plus button.
Select the ManyChat app (you many need to search for it if it doesn’t show up already).
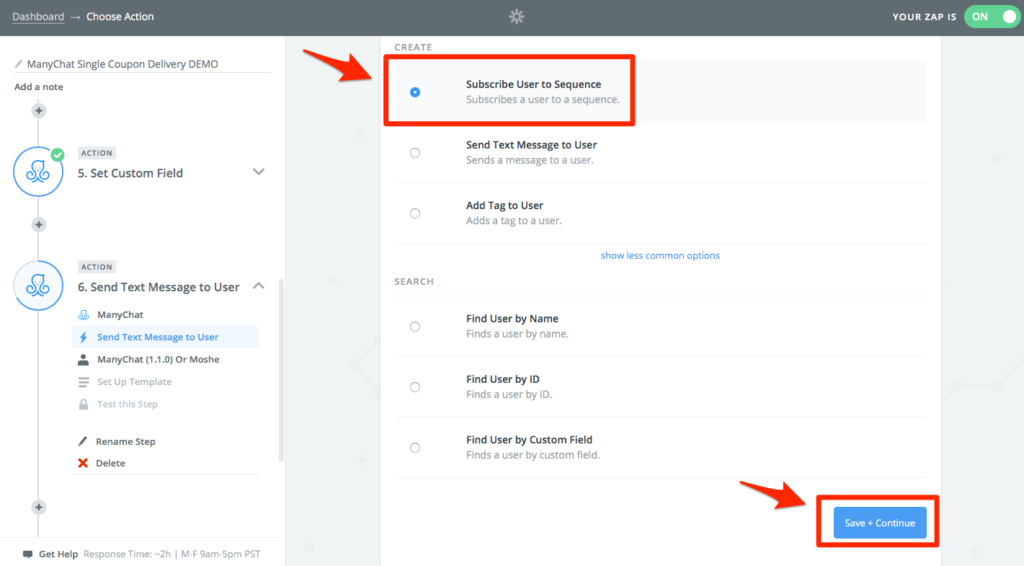
Select Subscribe User to Sequence, and click the Save + Continue button.
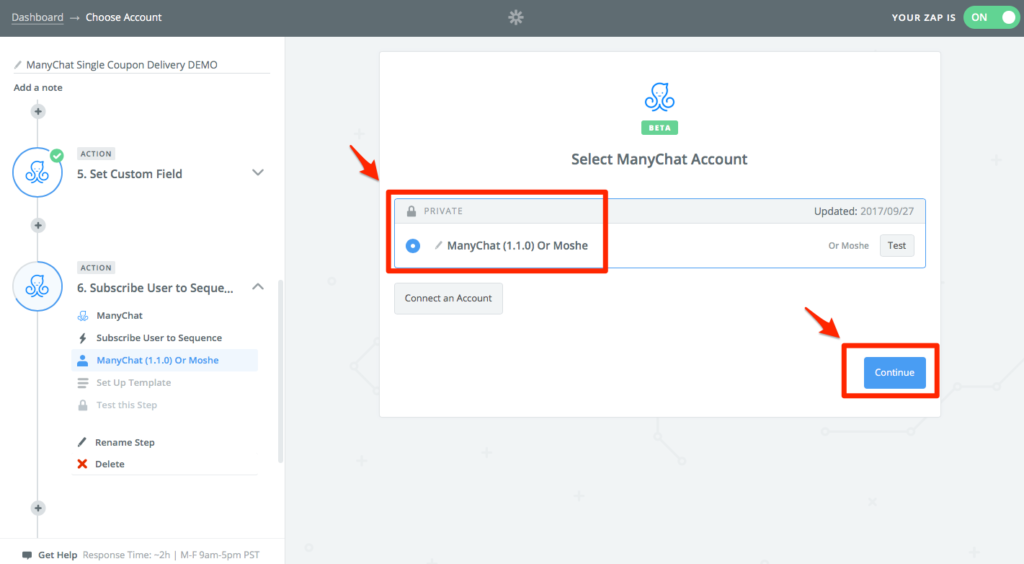
Select your ManyChat account (you many need to click the Connect an Account button first), then click the Save + Continue button.
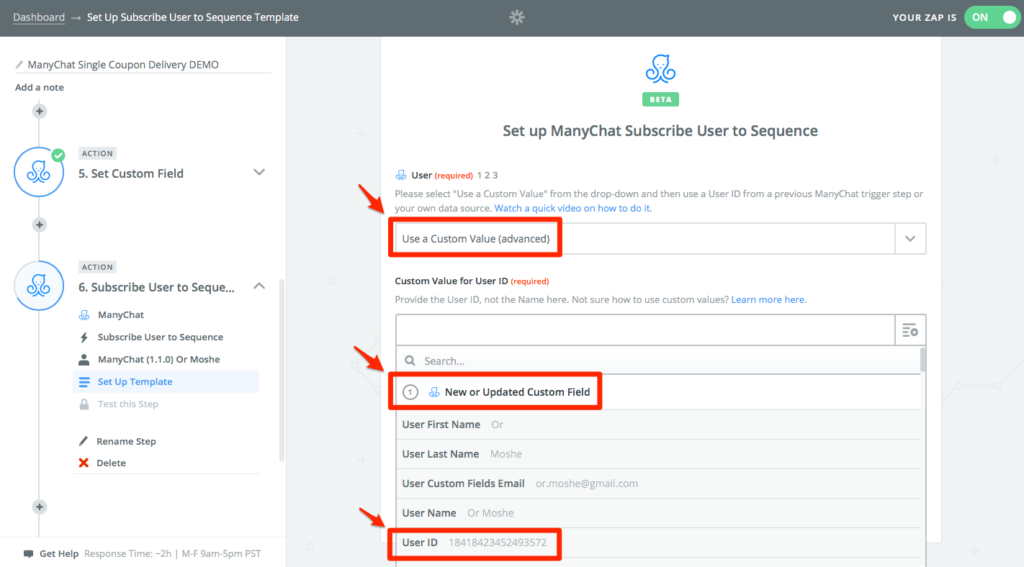
Set User to Use a Custom Value (advanced),
Set Custom Value for User ID to 1 New or Updated Custom Field > User ID
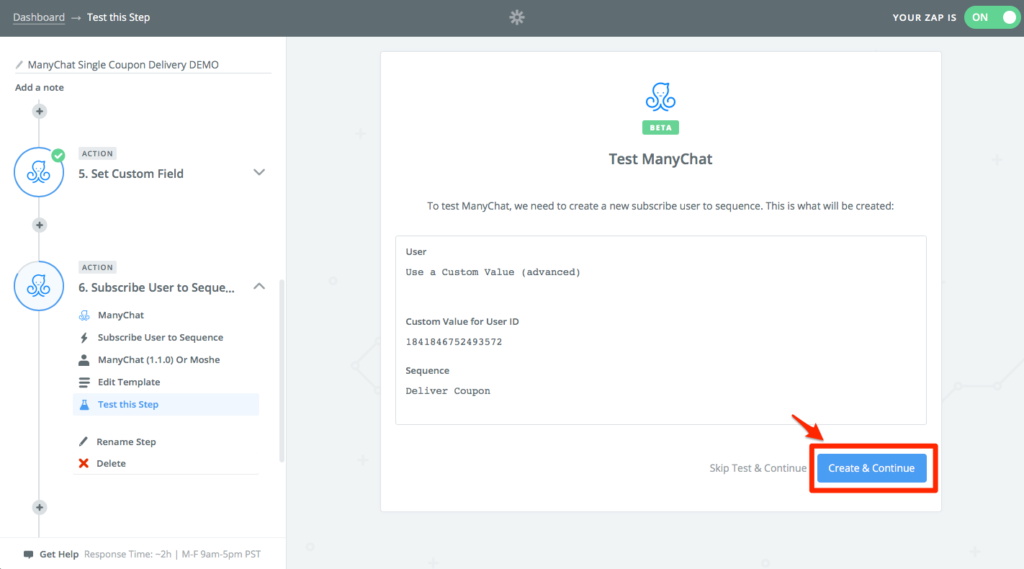
Set Sequence to Deliver Coupon, and click the Continue button.
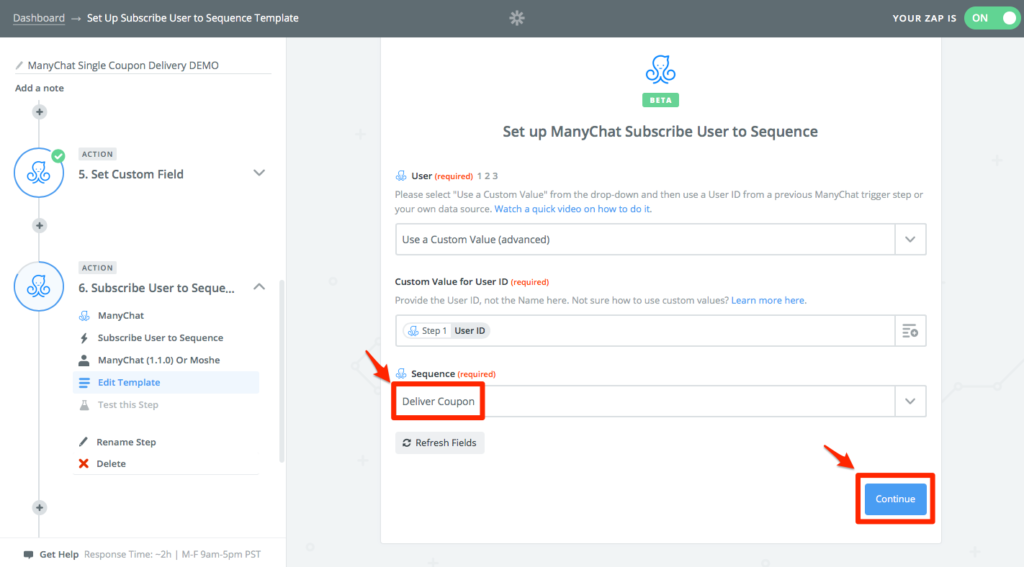
Click the Create & Continue button.
Click the Finish button.

MailerLite Update Subscriber
Click the Plus button.
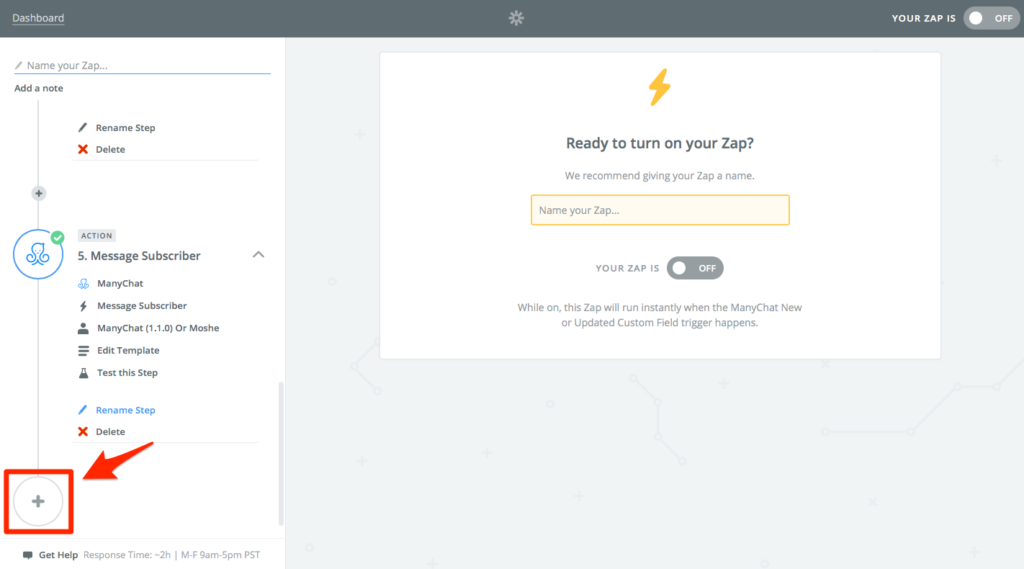
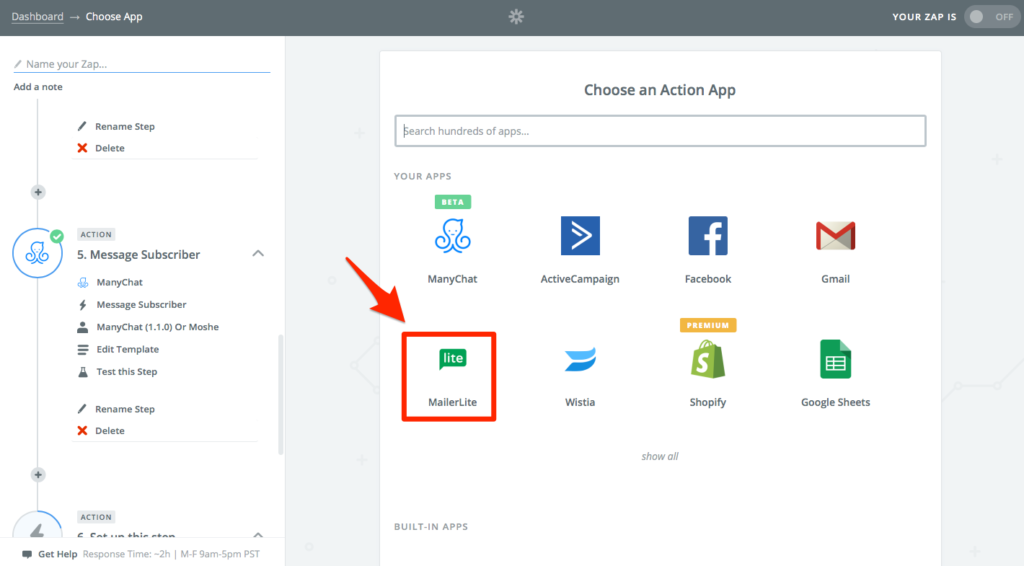
Select the MailerLite app (you many need to search for it if it doesn’t show up already).
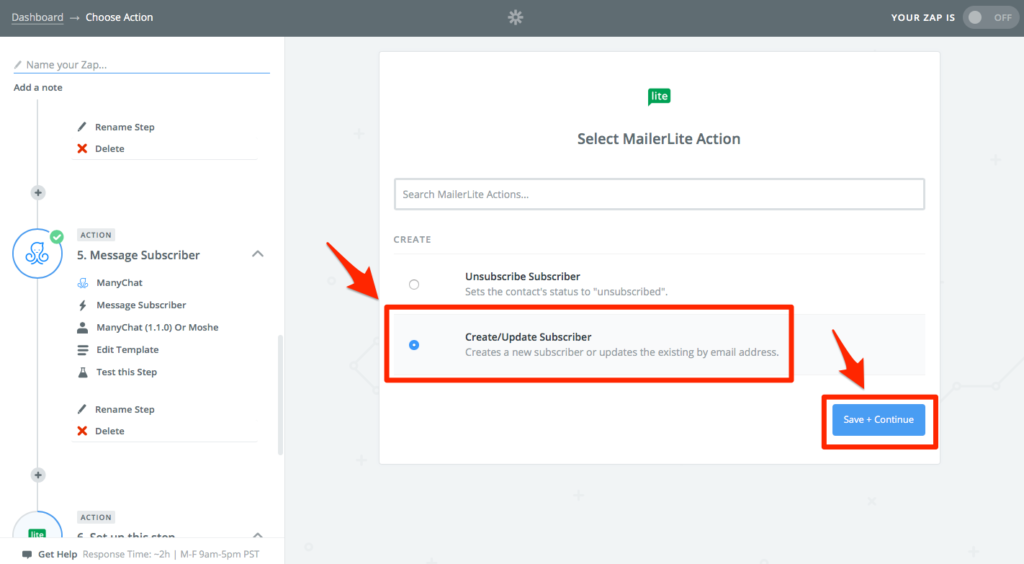
Select Create/Update Subscriber, and click the Save + Continue button.
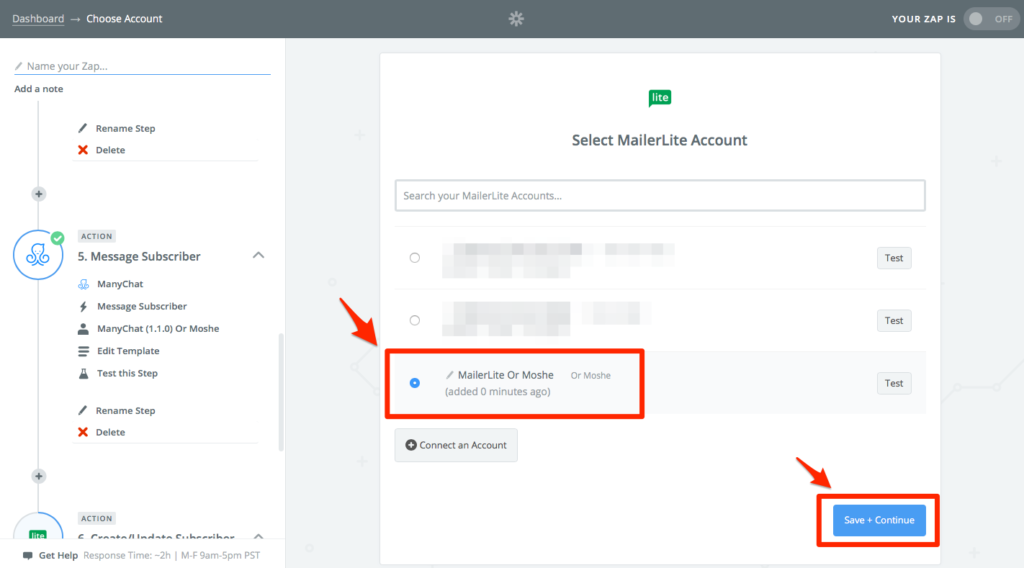
Select your MailerLite account (you many need to click the Connect an Account button first), then click the Save + Continue button.
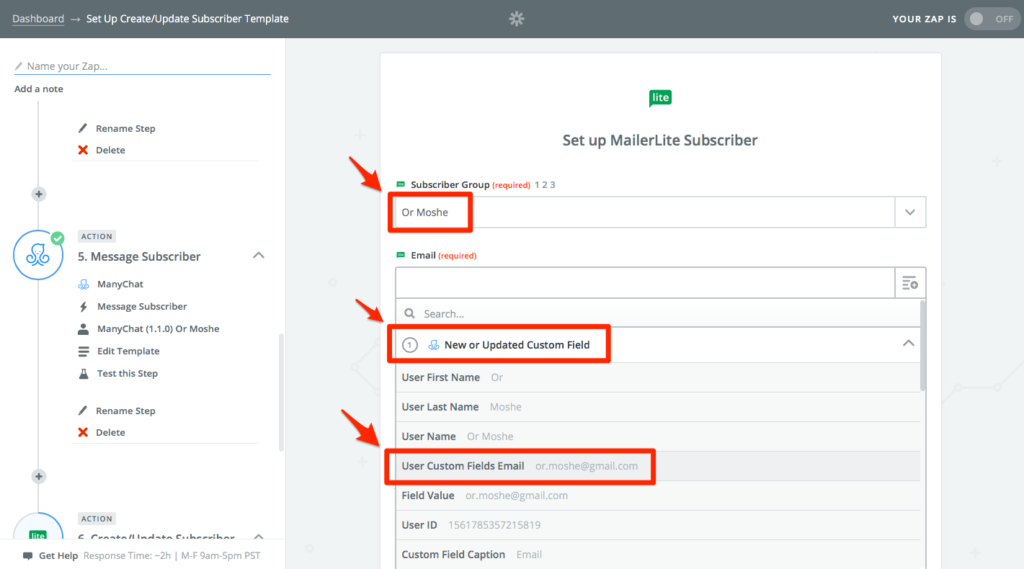
Select Subscriber Group,
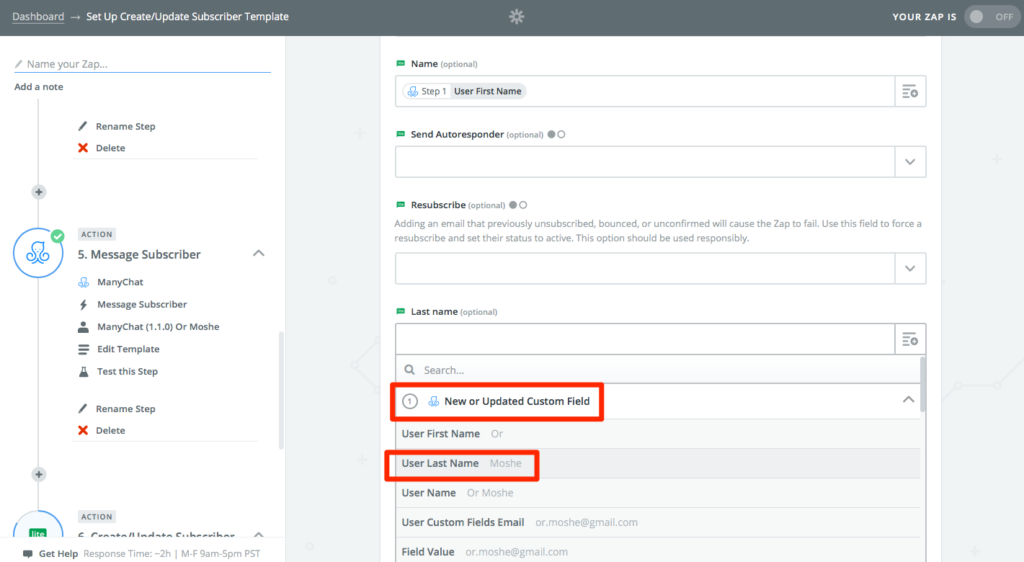
Set Email to 1 New or Updated Custom Field > User Custom Fields Email
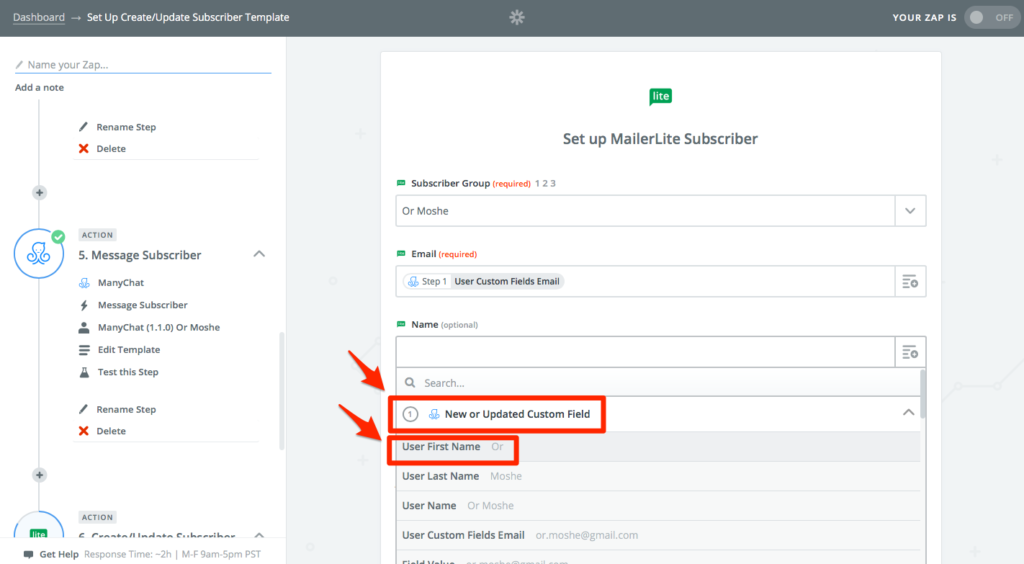
Set Name to 1 New or Updated Custom Field > User First Name
Set Last Name to 1 New or Updated Custom Field > User Last Name
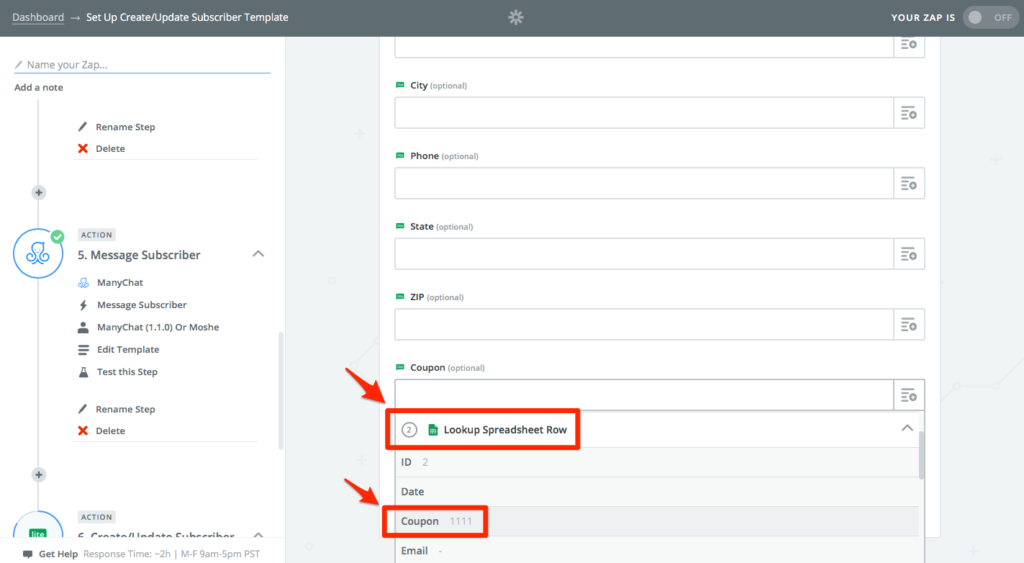
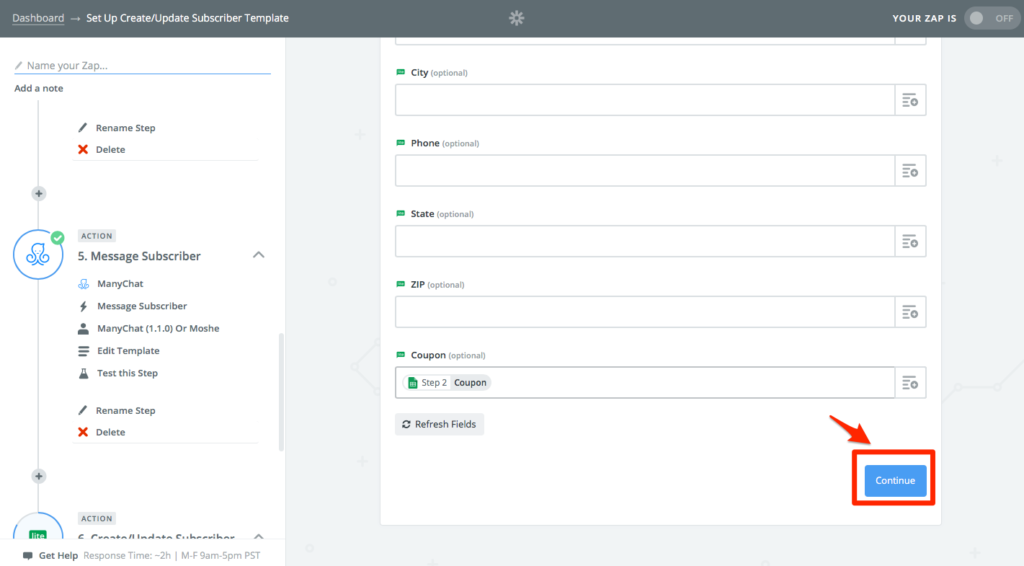
Set Coupon to 2 Lookup Spreadsheet Row > Coupon
Click the Continue button.
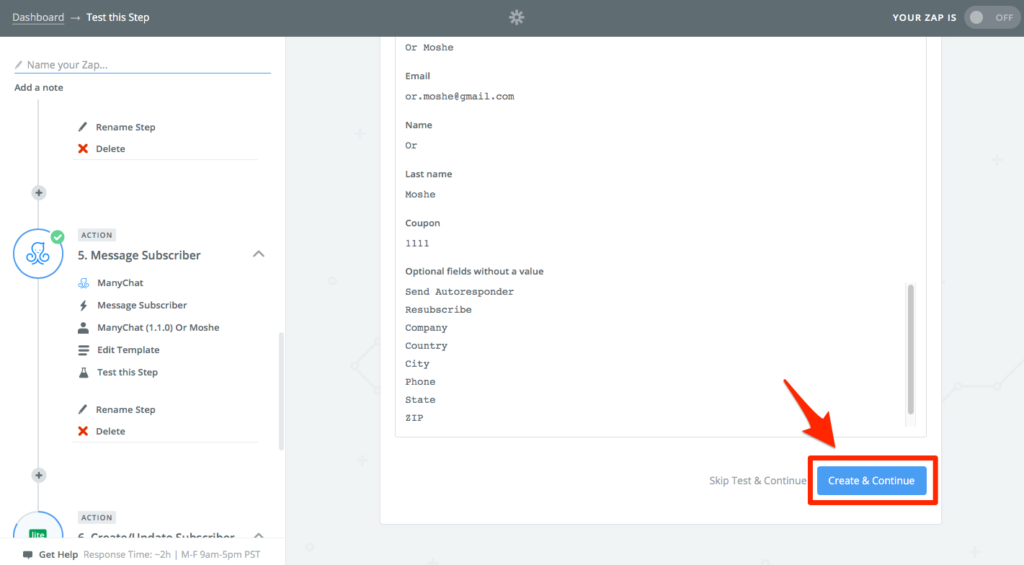
Click the Create & Continue button.
Click the Finish button.

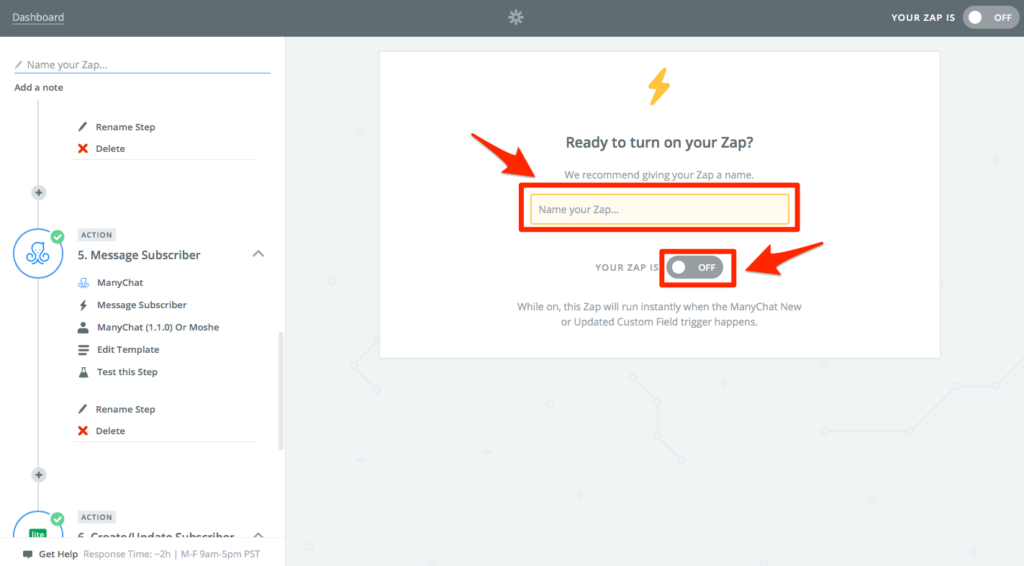
Enter a Name for your Zap,
Make sure the Active Switch is On.
Creating the post on FB
Posting on Facebook
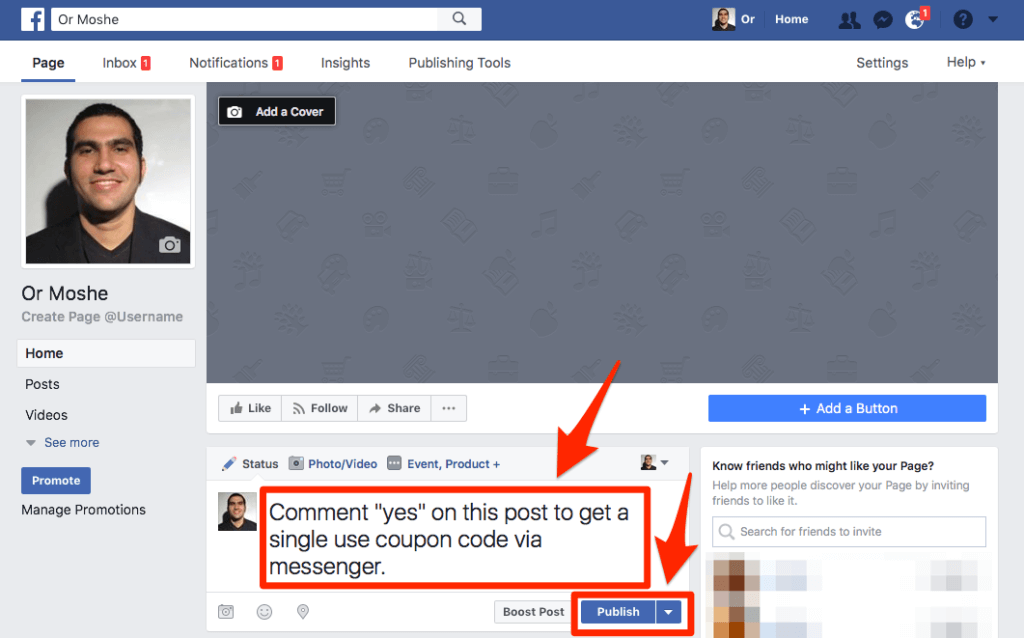
Publish a post on your FB page, remember to mention that your page is going to contact people who comment on that post via Messenger.
* Note: you can later boost that post, use it in your FB ads, drive traffic to it, etc.
Setting ManyChat Growth Tool
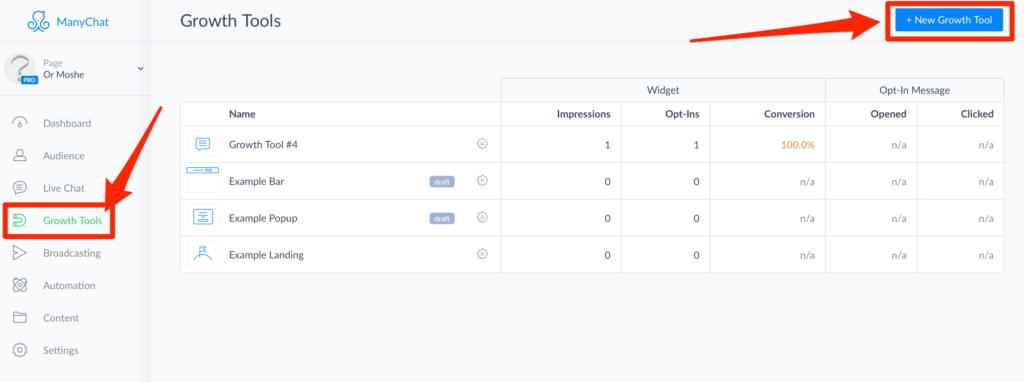
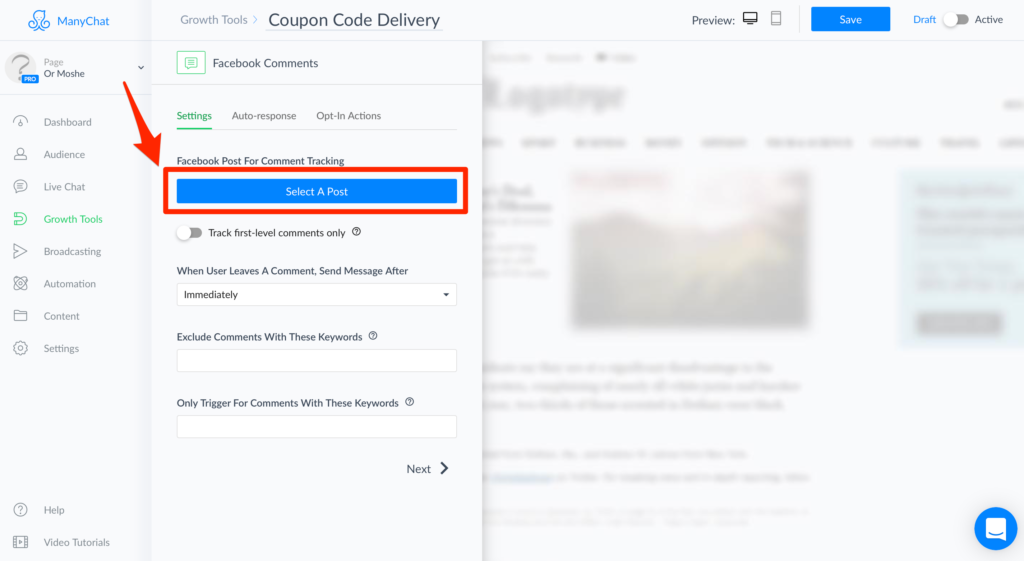
Go to ManyChat and open Growth Tools, and click on New Growth Tool
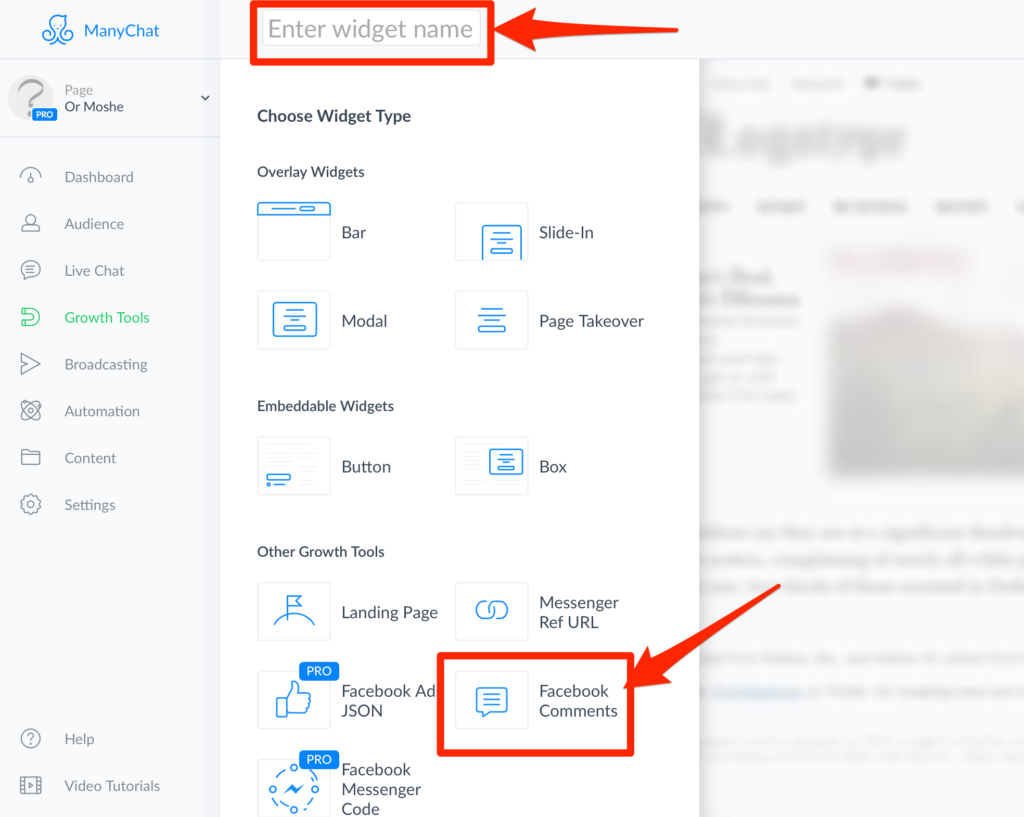
Enter Widget Name and select Facebook Comments
Click on Select A Post
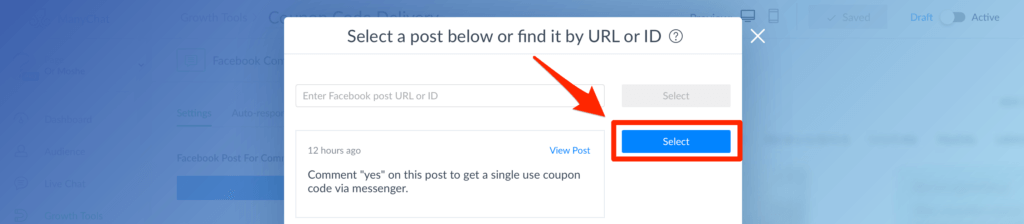
Select the FB post you created earlier by clicking the Select button
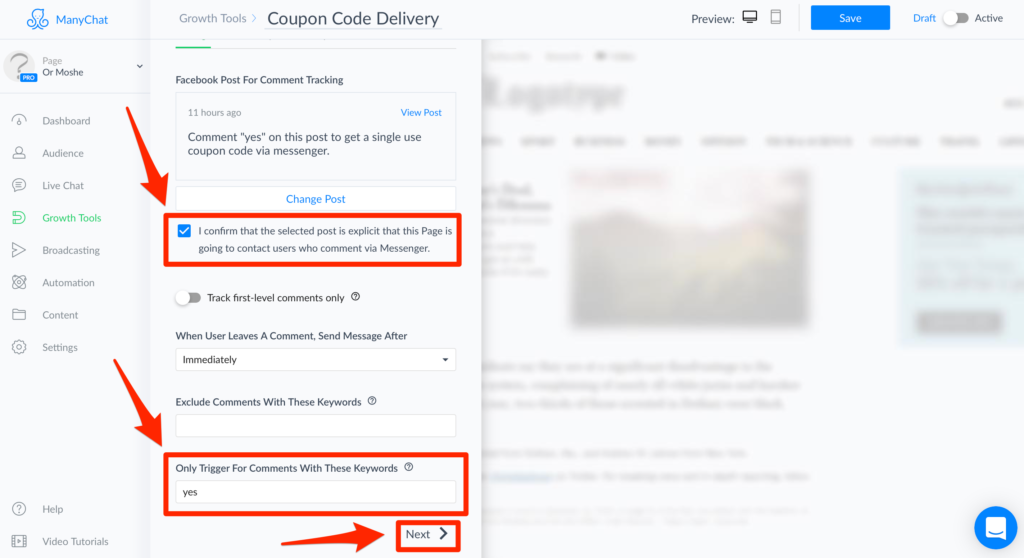
Check the checkbox that confirms the post is going to contact users who comment, Enter a trigger word and click Next.
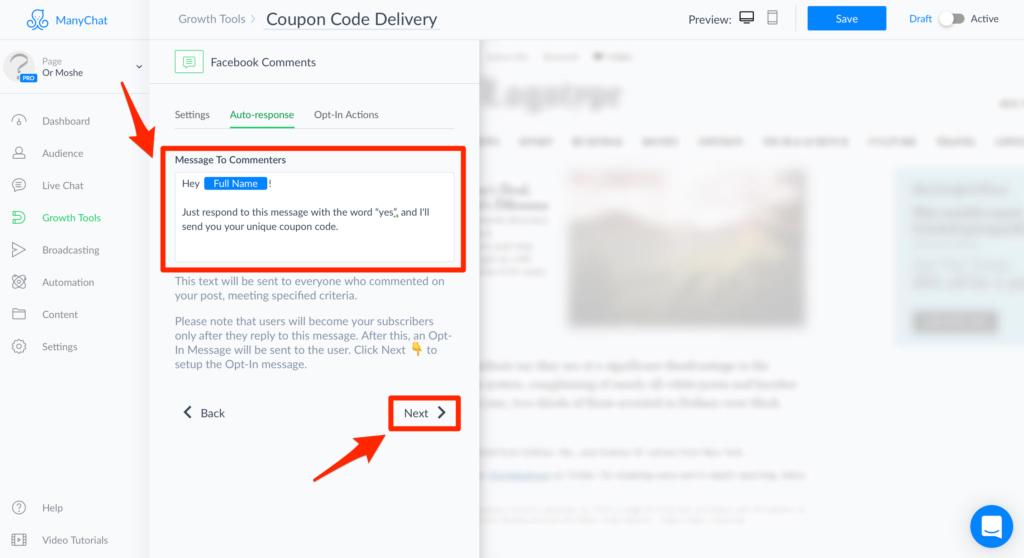
Enter a message that will be auto-sent to commenters, make sure to mention what you expect them to reply to start the right sequence (“yes” in this this example), then click Next.
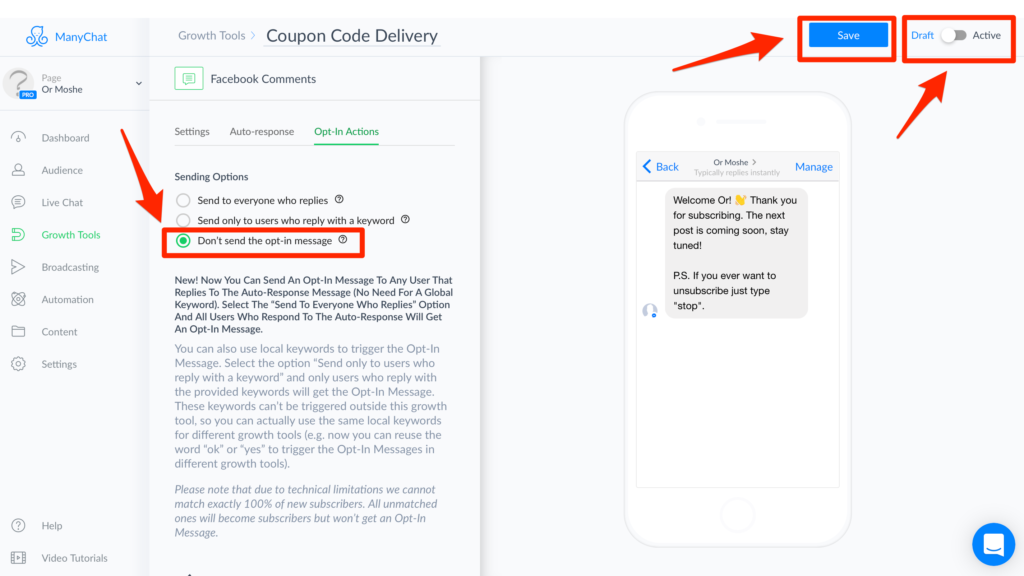
Select Don’t send the opt-in message, click Save and Turn on the Active switch.
Run a Test
And You’re done 🙂
All you have left to do is to run a test an make sure everything works as expected.
- Comment on the FB post you previously created with your personal FB account.
Make sure the whole process is working: - You should receive an automated message from ManyChat Growth Tool.
- After you reply with the selected keyword (“yes” in our example) you should become a subscriber to the page’s messenger list.
- ManyChat then should asks you for your email address and replies that it is working on generating a coupon for you.
- Zapier then should assign you the coupon, update the Google spreadsheet, update ManyChat custom fields, message the subscriber with the coupon via messanger and subscribe the user to MailerLite.
- MailerLite then should email the coupon to you via email as well.
Closing Tips and Thoughts
- Make your FB post more compelling by using an image / video.
- Promote your FB post using FB ads, email your current email list about it and direct people to it.
- When sending traffic to your amazon product, instead of sending them directly to amazon send it using a redirect tool (like Rebrandly) and put a FB pixel before they are sent to amazon.
- Follow up (using automations) with users both through messenger and through emails.
- Use the messenger list and the email list you collected to promote and rank new/other products.
Feel free to reach out to me via email, facebook or the comments section below if you have any questions or if there’s anything I can do to help.
If this guide was valuable to you, please share it with friends and on forums or groups.
Hey Or,
Thank you for this valuable post. Could you please explain more about using a redirecting tool like Rebrandly? How and What would you be tracking using that?
Thank you!
Hi Abdullah,
Thanks for the feedback, I really appreciate it.
Rebrandly works a bit like a url shorter, similar to goo.gl, bit.ly, etc.
One of the main features that I like about Rebrandly is that it allows you to insert a pixel code (of FB for example) so it will tag the user you go through the link using your pixel before it sends them to the destination (amazon in this case).
Later on you could create a custom audience and look alikes based that.
Please let me know if that answers your question and if there’s anything else I can do to help.
Or.
Hi. on step
“Select Subscriber Group,
Set Email to 1 New or Updated Custom Field > User Custom Fields Email”
there are an empty field, but I have subscriber in mailerlite.
and then i have arror in test
“Required fields without a value
Email”
field – http://prntscr.com/gtlnth
error – http://prntscr.com/gtlog6
Hi Serhii,
When you build zaps in Zapier it actually goes and pull data to build and test the different integration.
According to your error it pulled a user from ManyChat but this user had the Email custom field we created as blank, so when we got to the MailerLite step it returned an error as Email can’t be empty when updating a subscriber in MailerLite.
I added the steps to fix that to the guide, it’s under:
Setting up Zapier > ManyChat Trigger.
Starting with “Click on the View your custom field updated link.”
After those extra steps please go back to the Zapier MailerLite Update Subscriber step,
The User Custom Fields Email shouldn’t be blank there and look like in my original screenshot and it will let you move on.
Please let me know how it goes.
Or.
hello, I did not expect a quick reply, especially on such a detailed response. Thank you very much all works. Let’s start the test
Hi Or,
am trying to do this – thanks for the awesome instructions – I am getting an error as I am integrating Zapier with ManyChats at the “fetch and continue” stage.
What have I missed?
thanks, Regina
error: https://drive.google.com/open?id=0BzlkR4mnOftMMW9ZSW1leWhPUzQ
Hi Regina,
Message your Facebook page from your personal page and subscribe to your messenger list, this will make you the first subscriber and will allow Zapier to pull a subscriber data to you could build your Zap.
Please let me know how it goes.
Thanks,
Or.
I’m sorry – I know this is an idiot question – but how do I do that as I am an admin on the FB page?
perfect – that worked – onwards!
thanks for the quick response!!
cheers, Regina.
Glad to hear that Regina 🙂
Let me know if there’s anything else I can do for you.
oops – forget that – just did it – will now try to integrate Zapier again 🙂
Hey Or,
fantastic – so I set everything up and the test worked perfectly – thank you!!
Quick question – do I have to go through the whole process again if I wish to change the FB post that this applies to – or is there a way to change the post in ManyChats without having to repeat all the Zapier steps?
thanks.
Hi Regina,
Simply going back to ManyChat Growth Tool and selecting a different post is enough.
Zapier is triggered by the custom field changes and not by specific post so it shouldn’t be an issue.
Or.
Excellent – thanks. That went really well – with a great uptake!
now – another newby question – if I want to run a few of these for different products/codes etc – I just go through the process exactly the same each time? Is there any issue with Zapier integrating the correct post with codes etc or do I need to run only 1 promo at a time. At which step would Zapier pick up the right Manychat stream?
I also tried to integrate through mailchimp – but didn’t have any luck – will see if I can do it now that you have posted instructions (didn’t want to bother you).
thanks, Regina
Hi Regina,
If you followed the guide, the trigger for Zapier to start working is when the ManyChat Custom Field is updated.
There are several ways to set it up so you could have multiple campaigns at the same time and Zapier won’t mix them.
In my opinion the way that makes the most sense is to change that trigger from New or Updated Custom Field to New Tagged User and making sure ManyChat is not only saving the email address to a custom field but also tagging the user with a specific tag.
Of course you will also need to have multiple custom fields for the coupons, so basically a custom field for each coupon type (both on ManyChat and on MailerLite/MailChimp).
Please let me know if that makes sense.
Btw,
If you’re still having issues with MailChimp after following the instructions in my reply to Darrick, please let me know and I’ll try to add detailed instructions like I did for MailerLite so you guys could use MailChimp instead of MailerLite without an issue.
Thanks,
Or.
hmmmm – still confused by the trigger – do you mean use same google sheet as well? sorry 🙁
Different Zaps for each campaign, including a different google sheet.
Hi Or,
Amazing walk through – thank you!
Big snag here though as I’m using MailChimp. Their action template lacks the Coupon field, or ANY custom input field for that matter. Amy way around this or do I need my client to start a MailLite account?
Thanks again!
Darrick
Hi Darrick,
I really appreciate the feedback 🙂
I just tested MailChimp and it’s pretty much works the same as MailerLite.
First you will need to create the custom field for the coupon in MailChimp and then on Zapier when you select MailChimp instead of MailerLite, then after you select Add/Update Subscriber and the specific list you’d like the user to subscribe to on the bottom there is a button called Refresh Fields, after clicking it you should see the custom filed you created earlier in MailChimp and set it similar to how you’d do it for MailerLite.
Hope this helps,
Please let me know how it goes.
Thanks,
Or.
HI Or,
Thanks for the quick reply. I started a MailerLite account and await further instructions from my client on which mail service he’d like to continue using. If MailChimp, I’ll work the suggestion you provided.
Thanks again!
Darrick
You’re the best! Well done!!!!
Thanks Emily,
I really appreciate the feedback 🙂
Can this be set up without having to incorporate email into the mix? I just want to deliver the single use coupon via messenger.
Hi Alex,
Yes, for sure.
Few things you will need to modify:
1. Skip completely the MailerLite setup.
2. Skip the Zapier MailerLite setup (last step in the Zap)
3. Change the trigger in the Zapier ManyChat (first step in the Zap) – I’ll go with the New Tagged User trigger and simply make sure you have ManyChat tag the users that should get a coupon.
Let me know if you have any questions or issues.
Thanks,
Or.
Thanks for your share. It really helps. I wonder how to have ManyChat tag the users that should get a coupon?
Hi Jean,
Simply add an action on your ManyChat sequence to tag the user at the point where you’d like zappier to trigger and generate the coupon.
Thanks,
Or.
Hi Or,
This is so fantastic you made this! I would not have known where to start. Thank you so much.
However, I am having one problem on setting up Zapier. In the section “Select Email under Custom Field, then click the Continue button.” I do not get the option “Email”. Only “Coupon” appears. And when I try to use “Coupon” it creates an error.
Do you have any idea what is going on there?
Thanks
Jason
Hi Jason,
My pleasure.
Based on what you’re describing I think you only created a Coupon custom field in ManyChat – You’ll also need to create an Email custom field in ManyChat.
Please take a look on the ManyChat Custom Fields Setup part, specifically the part that says “Then do it again, this time enter Email under Name and click the Create button.”.
Please let me know if that solves you’re issue or if you still need any help.
Thanks,
Or.
this is GOLD.
Thanks for all your hard work in putting this post together!!!
Thanks for the kind words Amul,
I really appreciate it!
Thanks Or, have just set this up. Is there any reason to ask people to say ‘yes’ again one in messenger? How would I exclude this step without effecting the rest of the sequence.
Hi Sam,
A users have to interact with the bot first to become a Subscriber.
In this example we asked them to say ‘yes’, so you can’t really exclude this step, but you can modify it.
Let me know if there’s anything else I can do to help.
Thanks.
Or.
I’ve setup everything by the guide, but have noticed that there is an issue. Everything is turned on/active. But when I type YES in comments it sends me the initial send “YES” again. When I reply in messenger with YES, it doesn’t ask for email or trigger anything. I checked Zapier it’s on. But in the past when I’ve done similar things, I had an Opt-in message that subscribed to sequence. Where are we triggering that subscribe to sequence from the second keyword response “YES”
I also wanted to add that all the keywords are setup with the Action as Subscribe to Sequence “Ask for Email”
Hi John,
The trigger is setup here:
#Setting_Automation_Keyword_Trigger
If this is how it is set up on your end, I’d check that if the message inside the “Ask for Email” is switched on.
Let me know if have other questions.
Thanks,
Or.
Hi Or,
A quick one, for conversions & congruency :
In your Manychat sequence/facebook ad, would you suggest adding the discounted price somewhere so the subscribers can see how big is it in $$? Or you’d just give to subscribers their unique coupons and the nature of the discount in percentage (-40-50%-60%-75%off), but would let them find out the retail price when they land on your amazon page? What would be your approach? …Thanks !
Hi Geoffrey,
Every market is different so I’ll definitely suggest that you’ll test both options and see what works best for you and your audience.
In my case, best ads usually show the previous price with a strikethrough and the new price, without specifying the percentage.
Thanks,
Or.
I’ll try to test both, thanks for stopping by Or !
Another quick one, if you send coupon without asking for emails, as you replied to Alex, we have to :
1. Skip completely the MailerLite setup.
2. Skip the Zapier MailerLite setup (last step in the Zap)
3. Change the trigger in the Zapier ManyChat (first step in the Zap) - I’ll go with the New Tagged User trigger and simply make sure you have ManyChat tag the users that should get a coupon.
Do we also skip the Lookup Spreadsheet Row Part ?
Select the spreadsheet you previously created,
Set Worksheet to Sheet1,
Set Lookup Column to Email,
Set Lookup Value to -,
Click the Continue button.
Click the Search & Continue button.
Click the Finish button
do we do another lookup – example ID instead ?
Do we go to straight to the next step –> Google Sheet Update ?
Thanks for your time
Geoffrey
Hi Geoffrey,
Yes, using the ID instead of the Email will be the best option in my opinion.
Let me know if you’re having issues or questions about this.
Thanks,
Or.
All good Or,
but damn, $40usd/month to be able to do one 3+ steps Zap… there is no way to make the coupon delivery under two steps right ? 🙁
Are you referring to the Zapier plan?
I’m currently using the $15/month plan..
on their website they have one starting at $20 but you need to take it for the full year (payment of $240) otherwise it is $40 on a per month basis.
you got one at $15 monthly payment you said ?
Don’t know about that.. Maybe they changed their pricing at some point?
Try contacting them and asking about that maybe..
Hey Or
Excellent step by step!
So the question becomes how scalable is this? Even if the email collection task is removed it seems there may still be a significant amount of work for any given giveaway (targeting a specific word). What if we want to target 10 keywords for 20 product. It all of a sudden becomes 200 spreadsheets and campaigns right? Anyway around the heaviness of this? Or can you at least create one big campaign for each product with tonnes of coupons and then just swap out the amazon storefront link in the ManyChat sequence? Any thoughts on this? Other ideas for scalability?
Also how do you set it up on an FB ad? Do you have a post showing the steps for that?
D
Hi David,
I’m not seeing a good reason to create 10 campaigns for the same product to rank 10 keywords.
What I’m doing is using a link rotator between multiple keywords.
Another option is just to switch the link from time to time.
I don’t have a post showing how to set up the FB ad but what I’m mostly doing is quite simple:
1. Campaign objective is PPE.
2. Ad sets are different targeting including lookalikes based on amazon customer lists, different interests that fits my target audience, etc (this is where I do the most of the testing and optimization).
3. Ads are using same existing post.
Please let me know if that helps or if you have any questions or issues.
Thanks,
Or.
Thanks Or,
you mentioned:
What I’m doing is using a link rotator between multiple keywords.
Can you explain this in detail or make a post with the steps?
So you haven’t used JSON Growth tool for FB ads?
Hi David,
A link rotator is basically like a link shorter that directly the traffic to different end url on a rotation basis, so in your case you will enter 10 different urls, each with different keyword and you will get 1 new link that you will drive traffic to. then the link rotator will send the visitors to the 10 links you entered on a rotation basis.
I’m using a custom one so I can’t refer you to it, but I’m sure searching google for “link rotator” will get you lots of options.
Regarding JSON ads,
I played with it a little bit in the beginning but found the PPE ads with the comments growth tool worked better for me.
That doesn’t mean it’s always true and I’ll probably need to try them again at some point.. but at least for now I’m mainly doing PPE ads with the comments growth tool.
Thanks,
Or.
Hi Or,
Thanks so much for this extensive tutorial! I appreciate you sharing your expertise. 🙂
Just a quick question, I followed all steps but couldn’t get the zap to work. I could only get until the ‘Ask for email’ sequence but it seems that the ‘Deliver coupon’ sequence is not activated after I provide my email address.
Hi A,
The zap is triggered when the email custom field is updated.
Could you please verify that indeed the email custom field is updated when you finish the Ask for email sequence? if not then the issue is there, if it does then the issue is on the zap settings side.
Please let me know how it goes.
Thanks,
Or.
Hi Or,
Takes for the tip! The email address custom field was not being updated so I fixed that and recreated the zap. It works perfect!
Thanks for all your help! 🙂
A
Hey Or,
Not sure if you are still monitoring comments here or not but is there an automatic way to limit the number of coupons you deliver per day?
Thanks in advance!
-Jay
Hi Jay,
There’s a semi-automatic way to limit the coupons.
So you could load all your coupon on the spreadsheet but only have the Email of some of them set to “-” while the rest will be blank. in that way only the ones with “-” will be available.
You’ll need to modify the side of ManyChat a little bit so when the coupon is not available it will send a message about it and maybe ask them to join a waiting list for tomorrow or something like that..
Please reach out to me if you’re having issues with this and I’ll try to help you out.
Thanks,
Or.